2. STIG Manager User Guide
The STIG Manager User Interface
This Document describes every part of the STIG Manager UI available to all STIG Manager Users. This guide assumes the suggested setup, in which most Users have the Collection Creator privilege. This guide also assumes that the user has some familiarity with the terms and data associated with STIGs and tools commonly used in their evaluation. For more info about the data STIG Manager manages and the terms and concepts used to describe it, check out our glossary or data and permissions document.
Please see the STIGMan Application Management Guide for Administrative functions.
The videos below may be useful in getting familiar with STIG Manager’s layout and functions, though they may not be as up to date as this documentation.
Overall Organization
When first logging into STIG Manager, the User is presented with the Navigation Tree in the leftmost panel and the Content Panel to the right. Clicking on a Collection in the Nav Tree will open up the corresponding Collection Dashboard in the Content space to the right.
Use the Navigation tree to navigate between different Collections, as well as the STIG Library, User Interface Preferences, and Application Management functions. Use the Collection Dashboard to navigate to different workspaces within a Collection.
2.1. Content Panel
The Home tab is always available in the Content Panel. The Content Panel will be populated with tabs opened by clicking on a Collection in the Navigation Tree or opening up Workspaces from the Collection Dashboard.
Note
When a Review Workspace tab is opened from the Collection Dashboard, it opens in a Preview tab in the Content Panel. This tab will be replaced by the next tab that is opened. To make this tab permanent, double-click on the tab title at the top of the Content Panel.
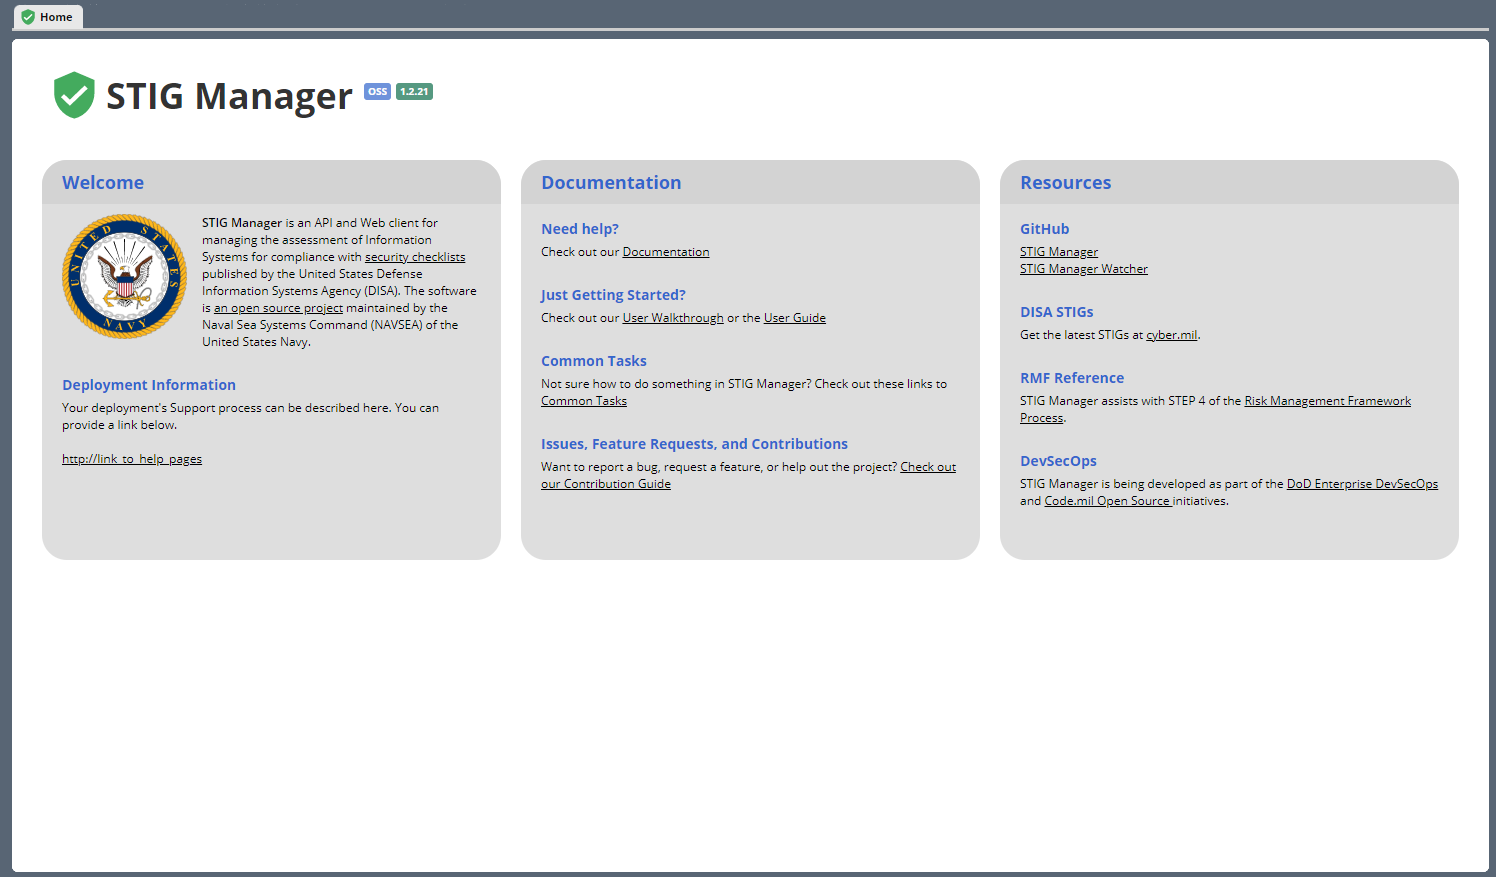
2.2. Home Tab
The Home tab is always available in the Content Panel. This Tab provides links to useful information, such as this Documentation, DISA STIGs, and the RMF Process reference. The Home Panel also provides information about the STIG Manager Open Source Software Project, and links to the STIG Manager OSS Project on GitHub for submitting Issues with the software.
2.3. Navigation Tree
The Navigation Tree (Nav Tree) is in the leftmost panel of the STIG Manager app. The User can find all their accessible Collections via this interface, as well as the installed STIG Library and Interface Options. The Nav Tree also offers Application Management functions for those with App Management privileges.
At the top of the Navigation Tree panel is the Users Name and a logout button. Hover over the User to view their Authentication Token information.
Clicking on a Collection will open up the Collection Dashboard in the Content Panel to the right. If you are a Collection’s Owner or Manager, a gear icon will also appear next to that Collection in the Nav Tree. Click it to jump directly to the Manage Collection Workspace.
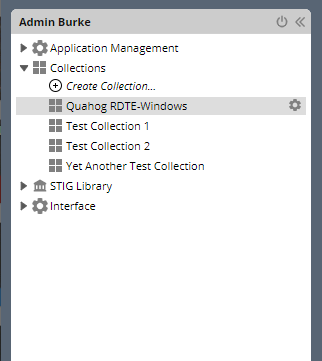
2.3.1. Collections
The Collection Node lists all the Collections accessible to the User, as well as the +Create Collection… option, for those with that privilege.
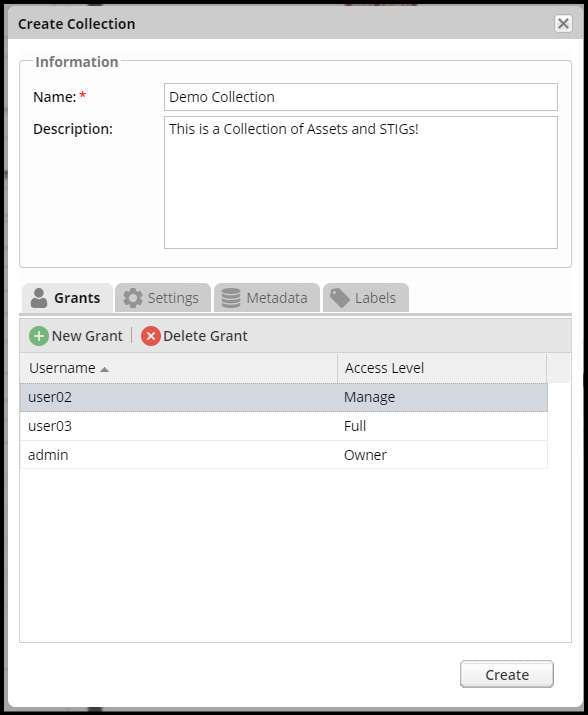
2.3.1.1. +Create Collection…
If you have the Collection Creator privilege, this option will appear. Click this item in the Nav Tree to create a new Collection. See the Manage Collection section of this document for more information about the settings available here.
2.3.1.2. Manage Collection
If you have Manager or Owner Collection Grants on a Collection, you will have a gear icon next to manage that Collection. This will allow you to add Assets, STIG Assignments, and Users to the Collection.
See Collection Management Workspace for more info.
2.3.2. STIG Library Tools
The STIG Library node provides tools to browse your imported Reference STIGs, and compare two Revisions of a STIG. These features are available to all STIG Manager OSS Users, even those without specific Collection Grants.
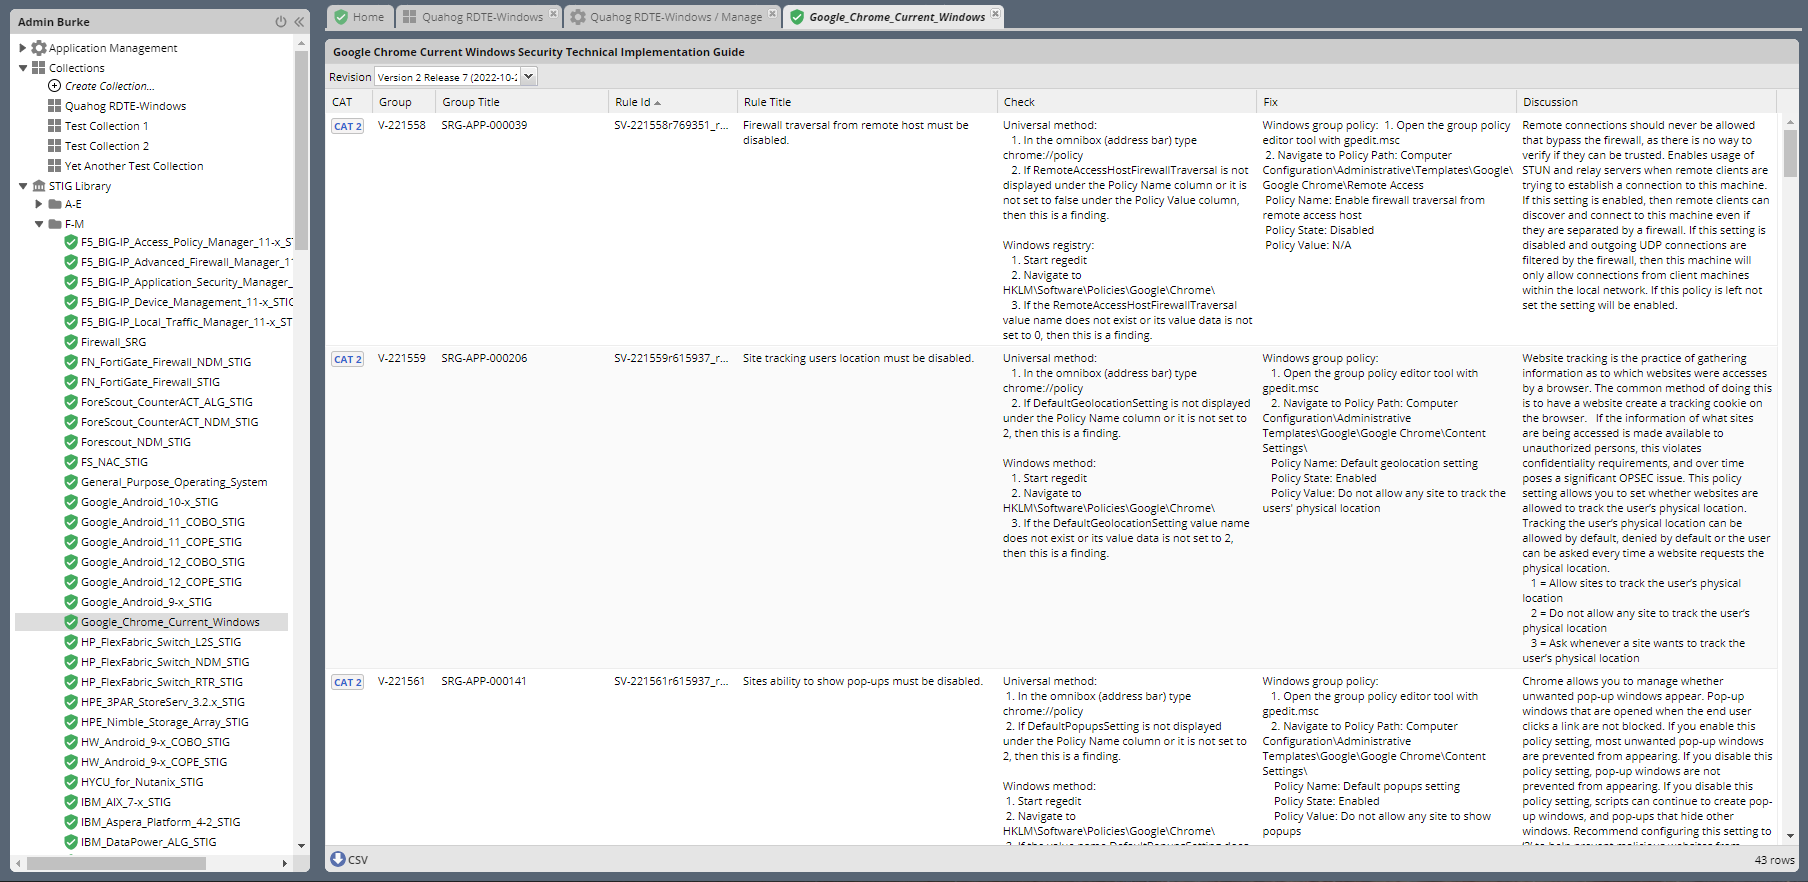
2.3.2.1. Browse STIGs
Browse the contents of all the Reference STIGs and the various Revisions stored in the STIG Manager App.
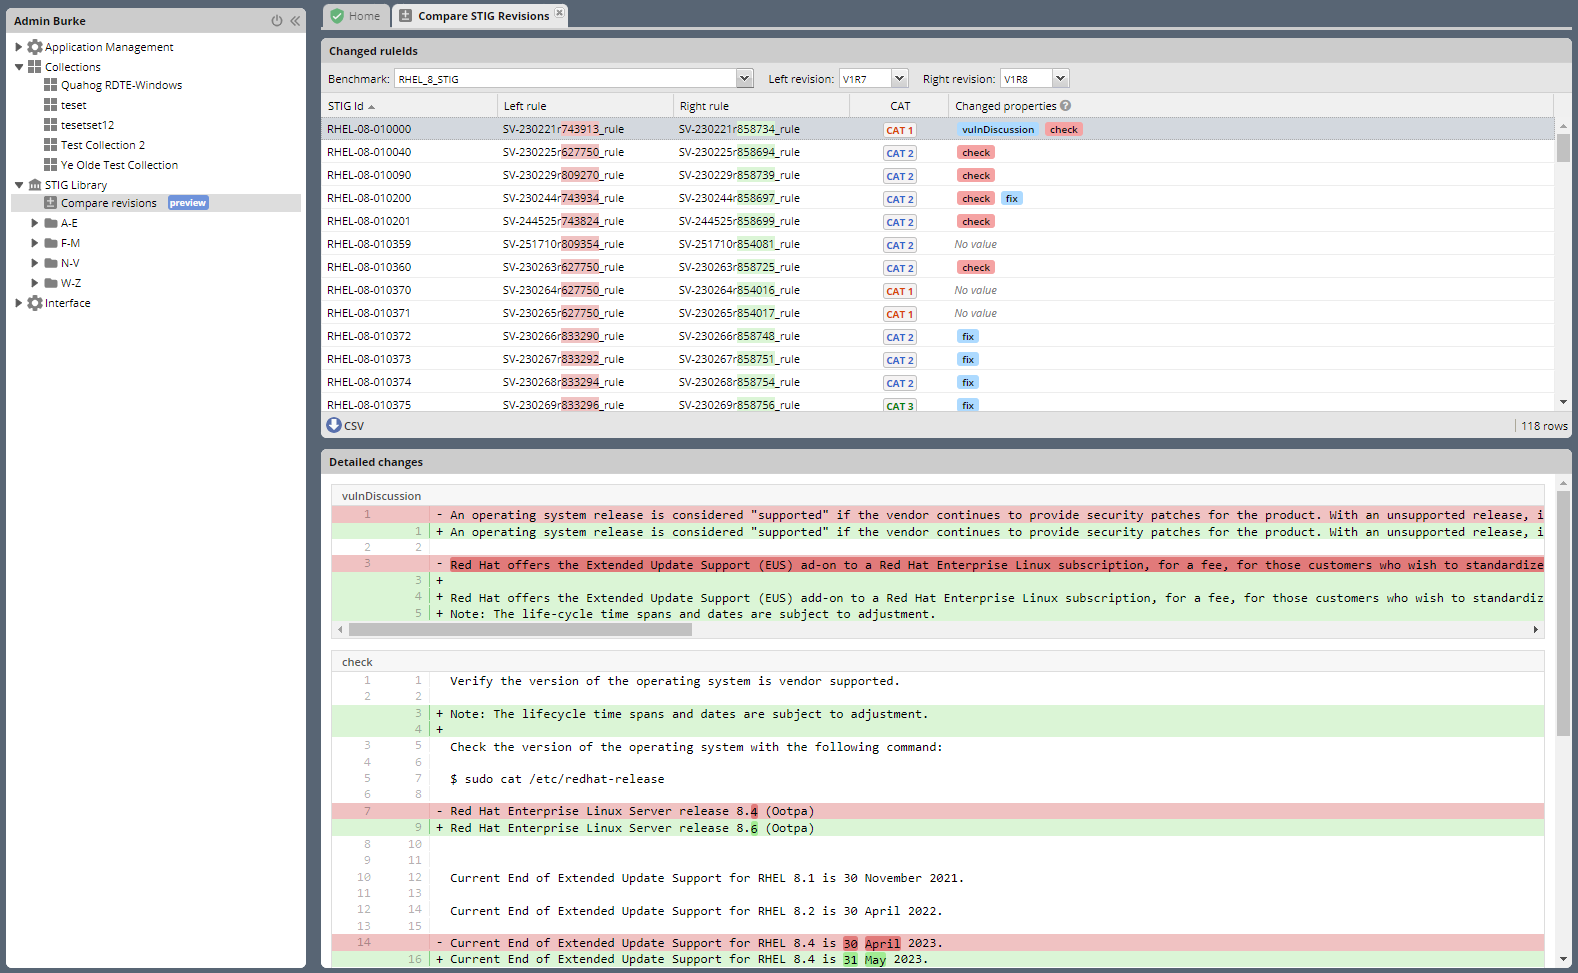
2.3.2.2. Compare Revisions
The “Compare Revisions” feature allows you to compare two Revisions of a STIG, and get a report of what exact Rules and fields changed between the two.
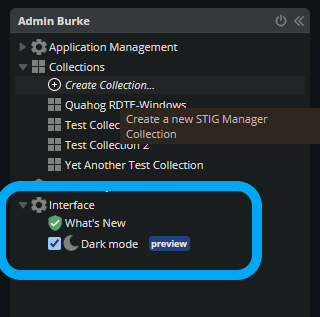
2.3.3. Interface
This Node offers User Interface options, like Dark Mode, and a view of all available “What’s New” pop-up messages.
2.4. Collection Dashboard
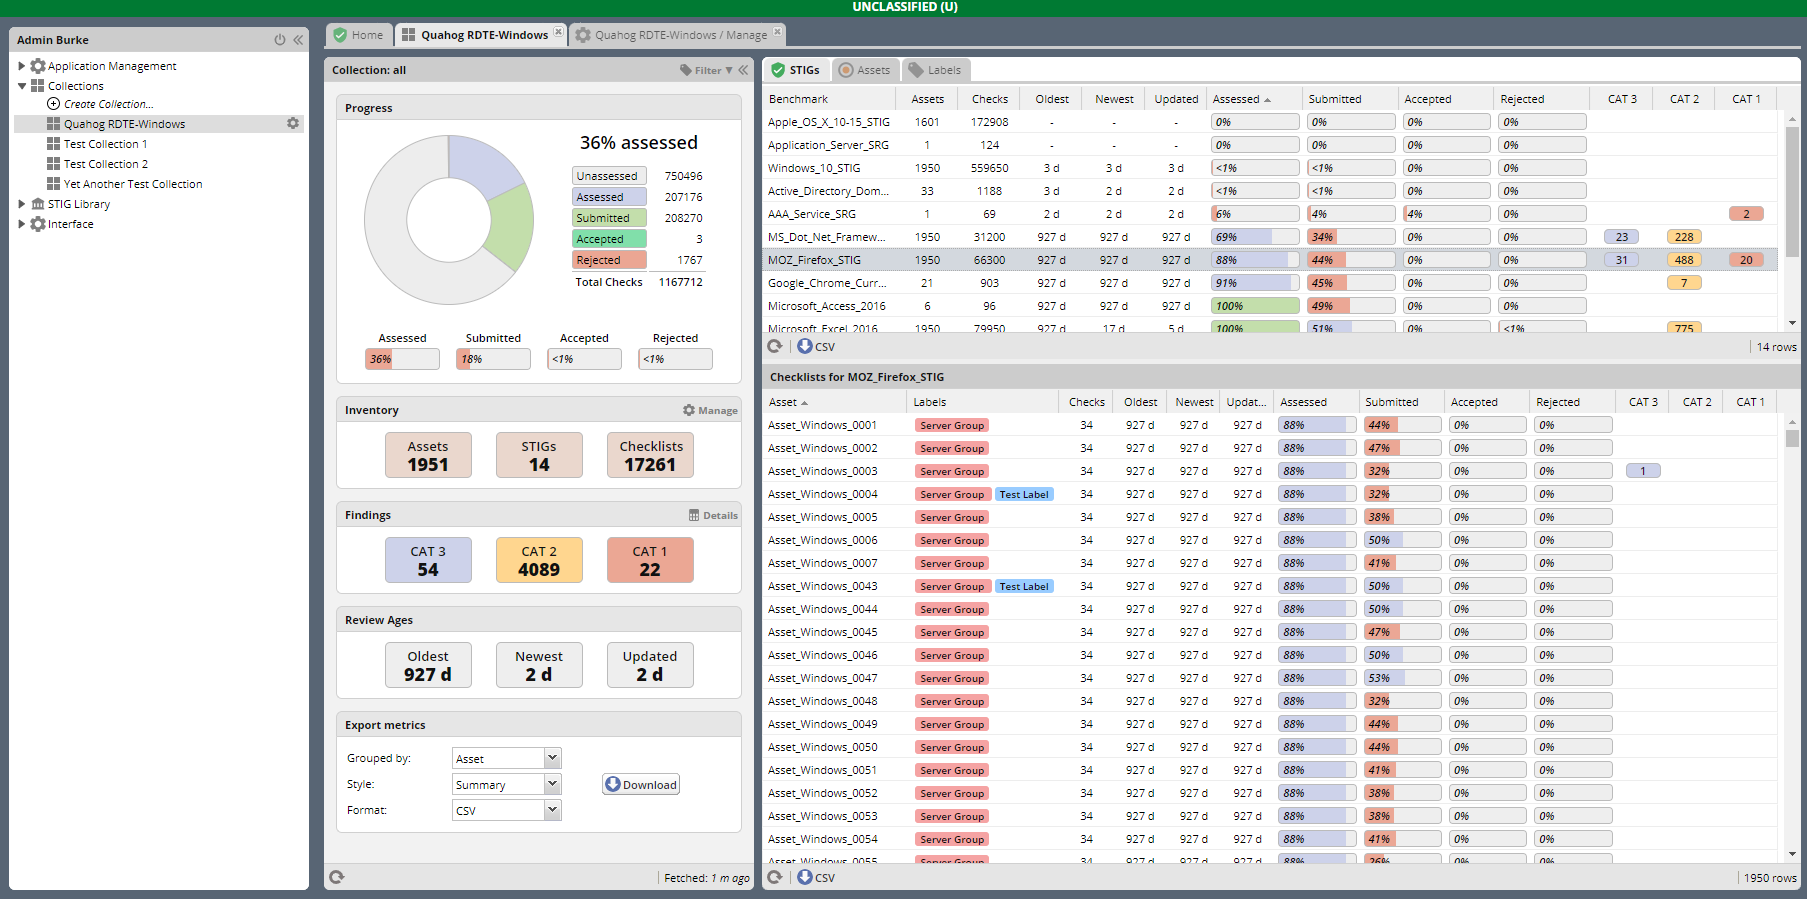
The Collection Dashboard provides a view of the overall Status and Evaluation progress of an entire Collection, as well as metrics export options and various pivoted presentations of a Collection’s assessment statistics.
This Panel also allows you to open up individual Asset or STIG Review Workspaces, as well as the Findings Report and Collection Management Workspace.
Note
For the purposes of this report, only Reviews with Not a Finding, Not Applicable, or Open Results are considered “Assessed.” Those Reviews that are “Saved” with a Result other than those three do not contribute to the tallies presented here. In order to be Submitted or Accepted, a Review must have one of those 3 Results.
The components of the Collection Dashboard are described below.
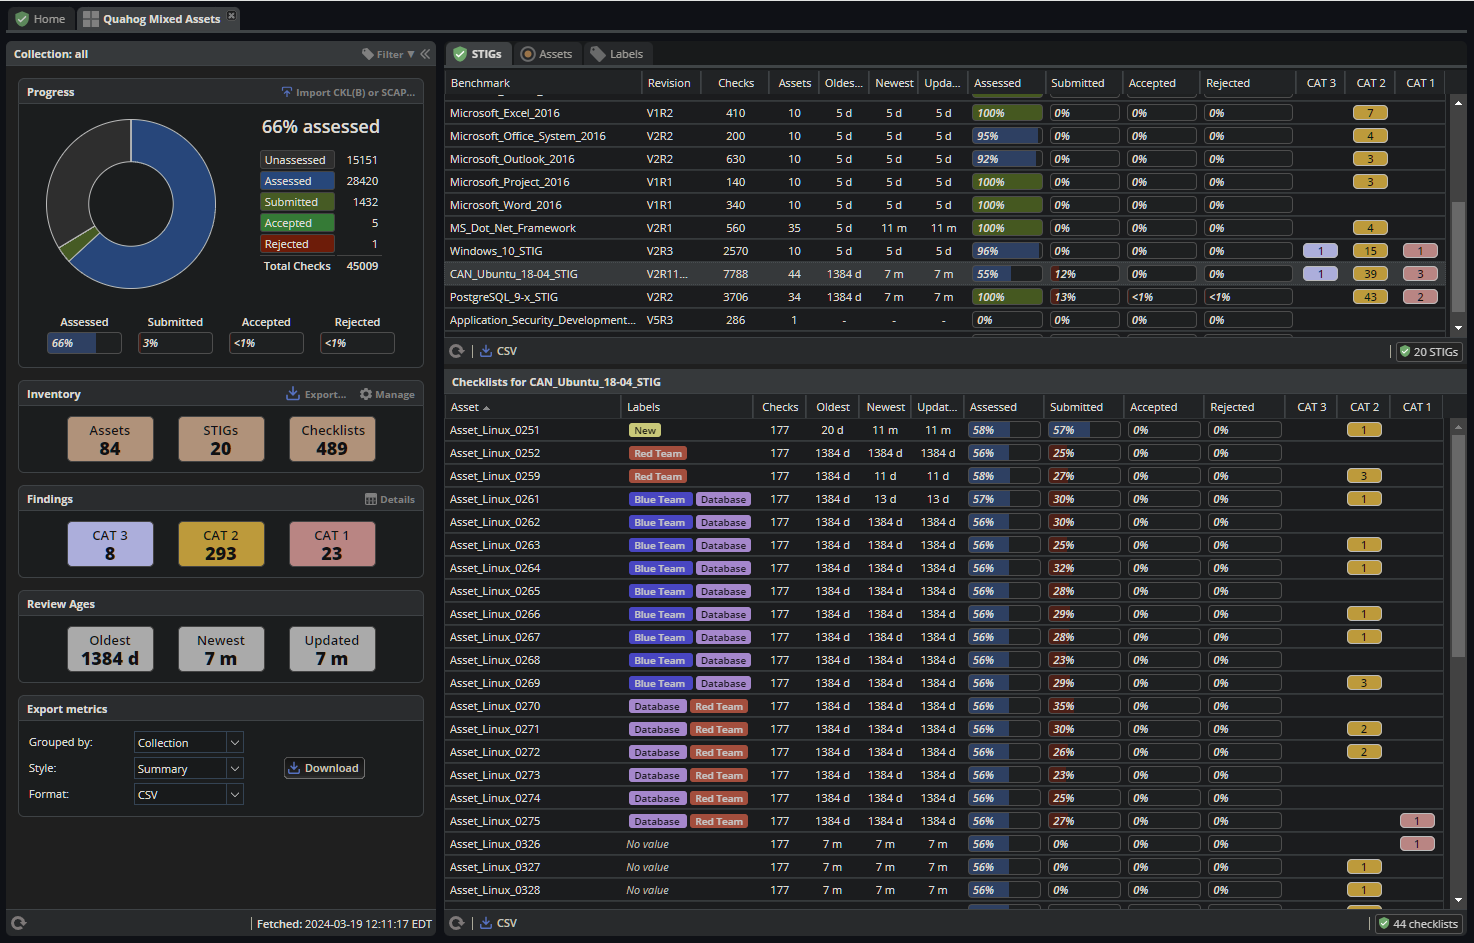
2.4.1. Collection Overview
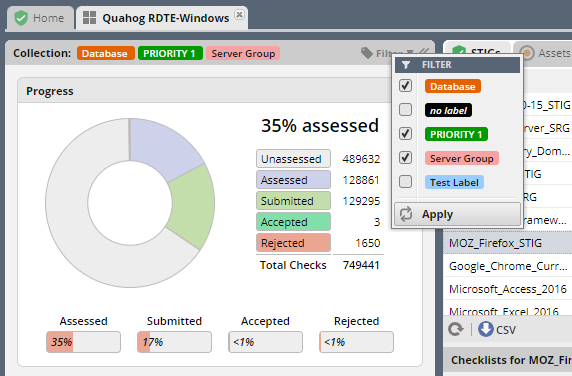
The Collection Overview section at the left of the Collection Dashboard provides high-level statistics about the Collection.
The Assets and STIGS presented in the Collection Dashboard can be filtered by clicking on the Label icon at the top of the Collection Overview Panel. Only those Assets with at least one of the selected Labels will contribute to the metrics summaries presented in this panel.
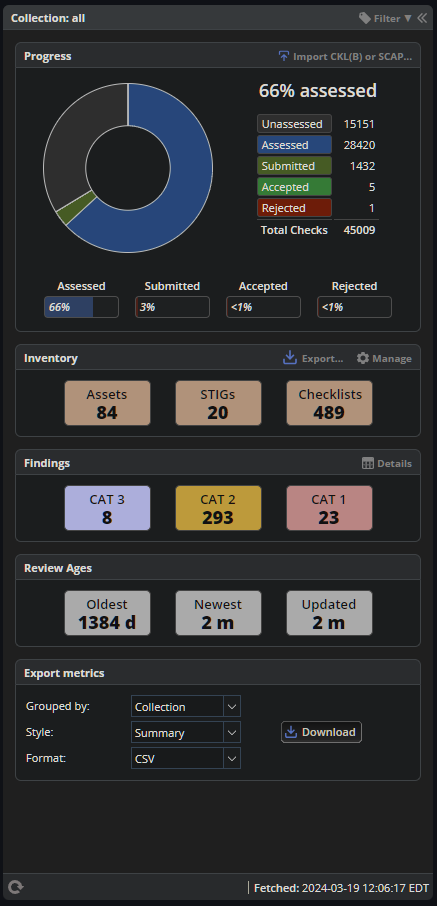
Progress Chart - Presents the proportion of Reviews that have been Assessed out of the total number of Assessments required in a Collection (ie. The total number of Rules contained in all STIGs that have been assigned to all Assets). The number of Assessed Reviews is further broken down by the Status of each of those Reviews. Depending on your process, you may want all your Reviews to wind up with an “Assessed,” “Submitted,” or “Accepted” status (The “Assessed” proportion here is the number of Reviews that have been “Saved” with a valid Assessment Result). The “Import…” button allows users to update their Reviews by importing .ckl(b) or XCCDF checklist files. Imports will NOT create new Assets and STIG assignments when initiated from the Collection Dashboard.
Inventory - Total number of Assets, unique STIGs, and checklists (STIGs assigned to Assets) in this Collection. If you are a Manager or Owner for this Collection, you will see a “Manage” button on the right of this box’s header. Click it to open the Collection Management Workspace.
Findings - Total number of “Open” Findings in a Collection, broken down by Severity Category. Click the “Details” button on the right of this box’s header to open the Findings Report. The Findings Report provides a way to engage with all “Open” findings in a Collection, and generate a precursor POA&M from them. See Findings Report Workspace for more info.
Review Ages - The age of the oldest Review in a Collection and the newest Review in a Collection. Whenever Review content (Result or commentary) is modified, its timestamp is updated, and this is used to calculate the ages presented here as “oldest” and “newest.” The “Updated” block represents the last time the Status of a Review changed (ie. when a Saved, Submitted, Accepted, or Rejected status was applied).
Export Metrics - Various ways to export the data presented in this report. See below for more details.
Note
Any filters applied to the Collection Overview panel carry forward to the presentation of STIGs, Assets, and Labels tabs on the right of the Collection Dashboard.
2.4.1.1. Metrics Export Options
This panel provides various ways to export the metrics that STIG Manager maintains about your Collection:
- Grouped By: - The data presented in this report can be exported using several different grouping options:
Collection - Will produce an entry with one line, aggregating all metrics data for every Asset/STIG in a Collection together.
Asset - Will produce one entry per Asset in a Collection, tallying all the metrics data for all STIGs assigned to that Asset.
STIG - Will produce one entry per unique STIG in a Collection, tallying metrics data for all Assets that are assigned that STIG.
Label - Will produce one entry per Label in a Collection, tallying the metrics data for each Asset that has been assigned that Label, and all of those Asset’s assigned STIGs. Note: Because Assets can be assigned more than one Label, individual Assets can contribute to more than one Label entry, and the total Asset count may total more than the number of Assets in a Collection.
Ungrouped - Will produce an entry for each STIG assigned to each Asset in the Collection.
- Style: - The granularity of the metrics data exported:
Summary - Presents data fields found to be relevant for the most common use cases. See the table below for field descriptions.
Detail - Very granular data, providing counts for all supported Result values, and subtotals for Reviews that were performed by an automated tool. See the table below for field descriptions.
- Format: - Data format of the download:
CSV - Comma-Separated Values, suitable for manipulation in a spreadsheet editor.
JSON - JavaScript Object Notation - Useful for most other, non-spreadsheet, applications.
2.4.1.1.1. Available Metrics Data Fields
The table below describes the fields that are included in the exports available from the Collection Dashboard Metrics Export interface.
STIG Manager Metrics Data Fields, and the Report Styles that Include Them. Data Field
Description
Summary
Detail
assessments
Total number of required Evaluations assigned to this item (ie. total number of Rules in all assigned STIGs).
X
X
assessed
Total number of Reviews that have been marked “pass,” “fail,” or “notapplicable.”
X
X
minTs
Date of the Evaluation of the oldest Review in the Collection.
X
X
maxTs
Date of the Evaluation of the newest Review in the Collection.
X
X
maxTouch
Date of the last time the Status of a Review in a Collection was changed (ie. when a review was last saved, submitted, accepted, or rejected).
X
X
low
Number of failed Reviews for rules with a Severity 3 category.
X
X
medium
Number of failed Reviews for rules with a Severity 2 category.
X
X
high
Number of failed Reviews for rules with a Severity 1 category.
X
X
saved
Total number of Reviews with a “saved” status.
X
X
savedResultEngine
Number of Reviews with a “saved” status that were evaluated by an automated tool.
X
submitted
Total number of Reviews with a “submitted” status.
X
X
submittedResultEngine
Number of Reviews with a “submitted” status that were evaluated by an automated tool.
X
accepted
Total number of Reviews with a “accepted” status.
X
X
acceptedResultEngine
Number of Reviews with a “accepted” status that were evaluated by an automated tool.
X
rejected
Total number of Reviews with a “rejected” status.
X
X
rejectedResultEngine
Number of Reviews with a “rejected” status that were evaluated by an automated tool.
X
pass
Total number of Reviews with a “pass” result.
X
X
passResultEngine
Number of Reviews with a “pass” result that were evaluated by an automated tool.
X
fail
Total number of Reviews with a “fail” result.
X
X
failResultEngine
Number of Reviews with a “fail” result that were evaluated by an automated tool.
X
notapplicable
Total number of Reviews with a “notapplicable” result.
X
X
notapplicableResultEngine
Number of Reviews with a “notapplicable” result that were evaluated by an automated tool.
X
unassessed
Total number of Reviews with a result that is NOT “pass”, “fail”, or “notapplicable”.
X
notchecked
Total number of Reviews with a “notchecked” result.
X
notcheckedResultEngine
Number of Reviews with a “notchecked” result that were evaluated by an automated tool.
X
unknown
Total number of Reviews with a “unknown” result.
X
unknownResultEngine
Number of Reviews with a “unknown” result that were evaluated by an automated tool.
X
error
Total number of Reviews with a “error” result.
X
errorResultEngine
Number of Reviews with a “error” result that were evaluated by an automated tool.
X
notselected
Total number of Reviews with a “notselected” result.
X
notselectedResultEngine
Number of Reviews with a “notselected” result that were evaluated by an automated tool.
X
informational
Total number of Reviews with a “informational” result.
X
informationalResultEngine
Number of Reviews with a “informational” result that were evaluated by an automated tool.
X
fixed
Total number of Reviews with a “fixed” result.
X
fixedResultEngine
Number of Reviews with a “fixed” result that were evaluated by an automated tool.
X
resultEngines
Array of JSON objects containing an entry for each version of a resultEngine (ie. Evaluate-STIG 1.2, Evaluate-STIG 2.4, OpenSCAP, etc.) that is associated with a current Review in the Collection, and the number of Reviews that tool evaluated.
X
users
Array of JSON objects containing an entry for each User that has set the current Evaluation of a Review in the Collection, and the number of Reviews they evaluated.
X
statusUsers
Array of JSON objects containing an entry for each User that set the current Status of a Review in the Collection, and the number of Reviews they have set the Status for.
X
2.4.2. Collection Checklist Navigation
The right side of the Collection Dashboard provides various ways to navigate the Checklist data maintained by STIG Manager, as well as many useful Metrics. This data can be presented aggregated by Asset, Labels, or STIGs by selecting the appropriate tab. Each panel allows you to drill down to the individual Assets or STIGs in those groupings. Each panel can also be exported individually as a .csv using the down-arrow icon at the bottom of each panel.
Each tab and grid of the Collection Dashboard presents the total number of Checks associated with each Asset or STIG across the Collection, depending on how it was grouped and what filters have been applied. The grids also list the number of Checks with no Evaluation at all, and Checks that have been Saved, Submitted, Rejected, or Accepted as a way to gauge overall Evaluation progress of the Collection. The total number of “Open” Severity Category 1, 2, and 3 Rules is also displayed to give an indication of the vulnerability status of the Collection.
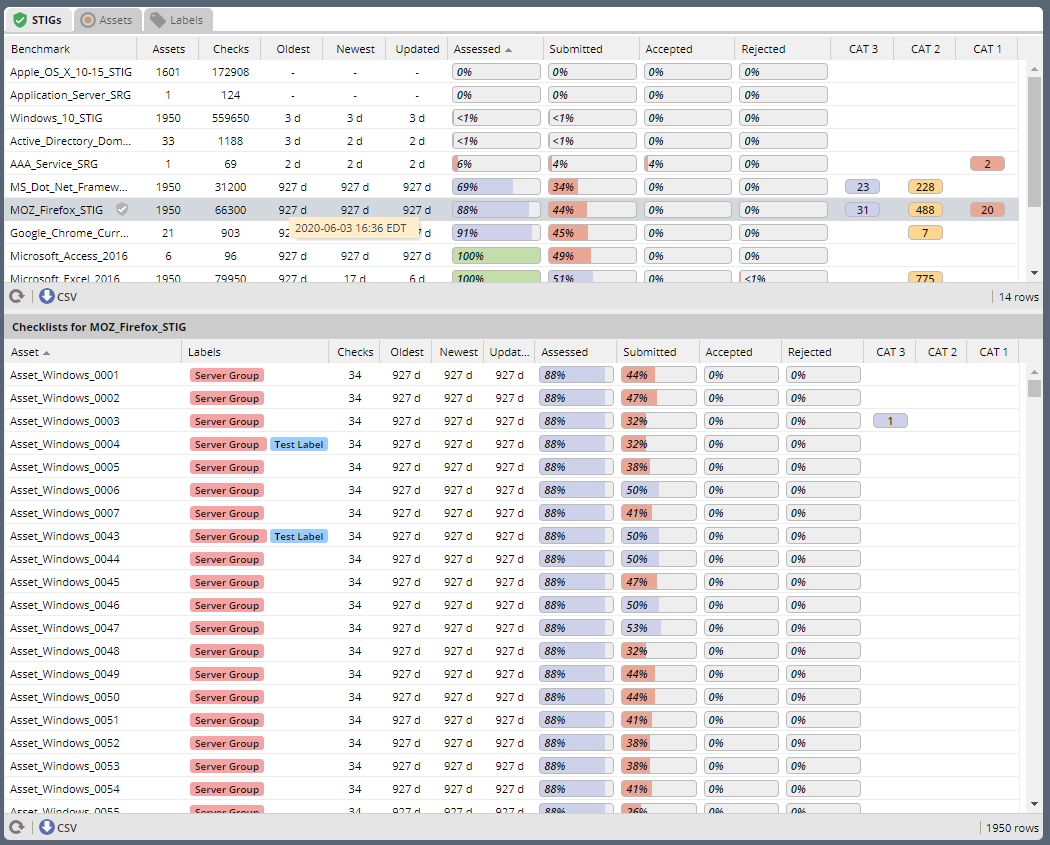
2.4.3. STIGs Tab
The STIGs tab on the right of the Collection Dashboard provides a list of every STIG that is assigned to at least one Asset in this Collection (that the User has access to).
Double-click a STIG, or click the Shield icon when hovering over a STIG, to access to the Collection Review Workspace, from which the User can review ALL the assets they have access to for the STIG selected.
See Collection Review Workspace for more info.
2.4.3.1. Asset Checklists by STIG
Clicking on a STIG will load the Assets that have been assigned that STIG in the bottom grid. Double-click on an Asset, or click on the Shield icon, to access the Asset Review Workspace for that STIG-Asset.
2.4.4. Assets Tab
The Assets Tab on the right of the Collection Dashboard provides a list of every Asset that the User has been granted access to in the Collection.
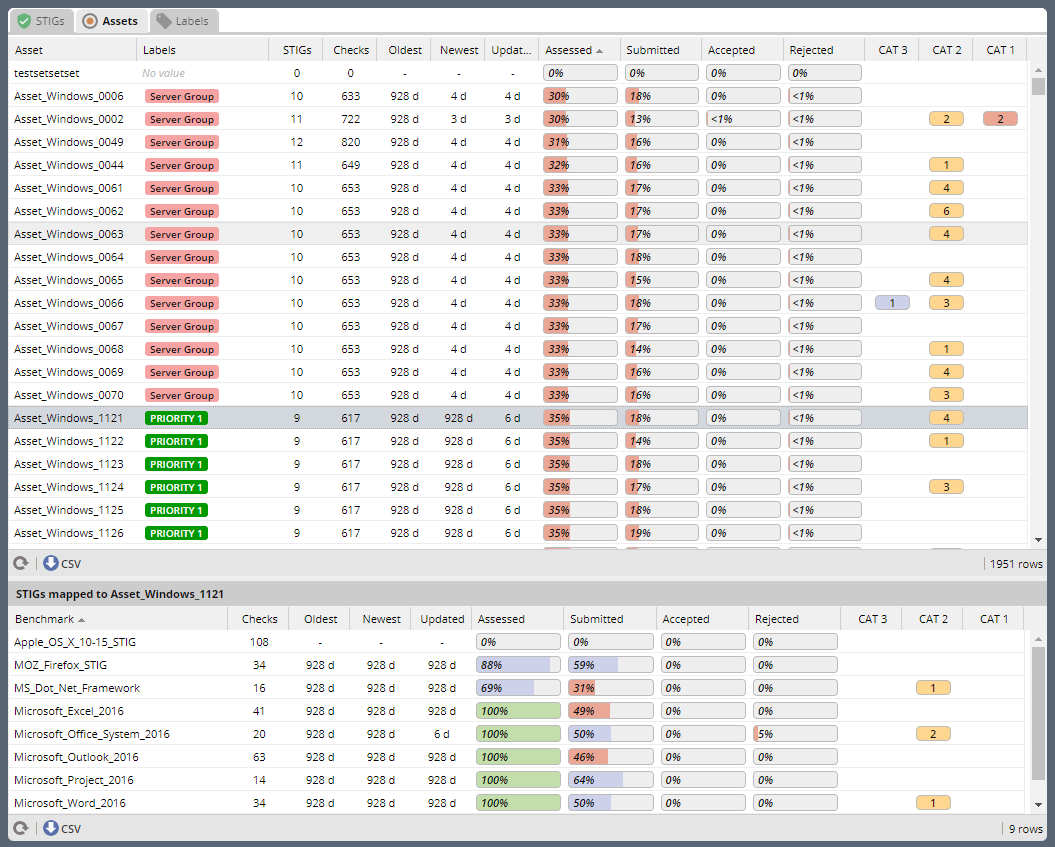
2.4.4.1. STIG Checklists by Asset
Clicking on a particular Asset will load the bottom grid with a list of every STIG the User has access to that has been assigned to that Asset.
Double-click on a STIG, or click on the Shield icon, to access the Asset Review Workspace for that STIG-Asset.
2.4.5. Labels Tab
The Labels Tab on the right of the Collection Dashboard provides a list of every Label that has been assigned to an Asset that the User has been granted access to in the Collection.
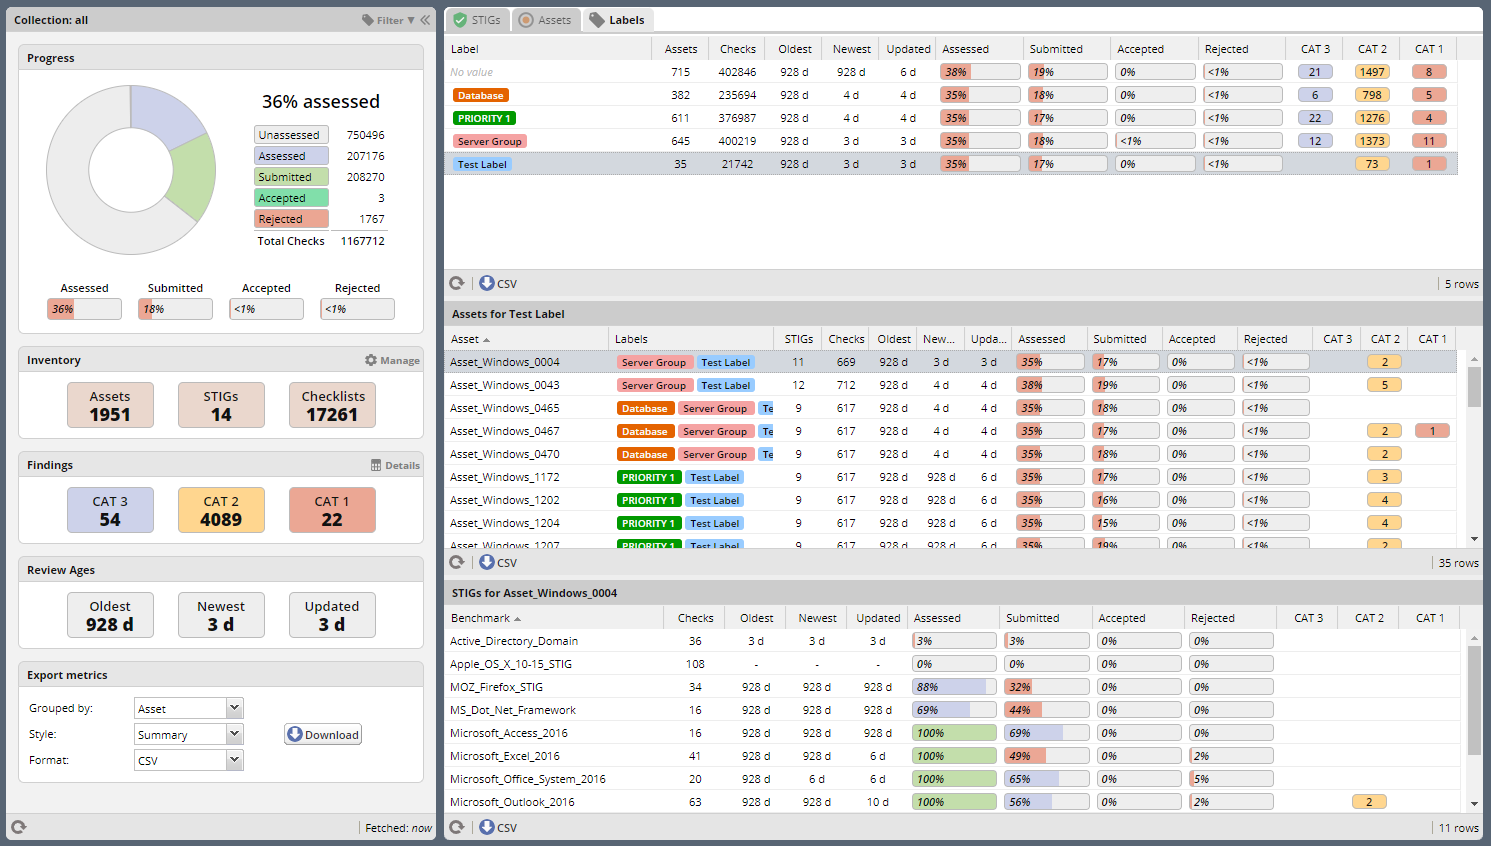
2.4.5.1. Assets by Label
Clicking on a particular Label will populate the Assets grid with a list of every Asset the User has access to that has been assigned the selected Label.
2.4.5.2. STIG Checklists by Asset and Label
Clicking on a particular Asset will load the bottom grid with a list of every STIG the User has access to that has been assigned to that Asset.
Double-click on a STIG, or click on the Shield icon, to access the Asset Review Workspace for that STIG-Asset.
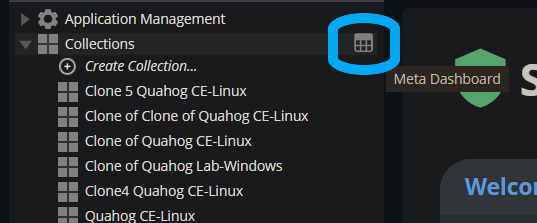
2.5. Meta-Collection Dashboard
The Meta Dashboard provides totals and metrics for some or all of your Collections at a glance. The Collections Tab shows top-level metrics for each Collection, while the STIGs tab shows metrics for each STIG across Collections. The dashboard also allows you to open up individual Collection, Asset, or STIG Review Workspaces.
Access the Meta Dashboard by clicking on the Report icon in the top-level Collections node of the Navigation Tree.

2.5.1. Meta-Collection Overview
The Meta-Collection Overview section at the left of the Meta Dashboard provides high-level statistics about your Collections.
The Collections presented in the Meta-Collection Dashboard can be filtered by clicking on the Collection icon at the top of the Overview Panel.
Note
Any filters applied to the Meta Dashboard Overview panel carry forward to the presentation of Collections, STIGs, and Assets on the right of the Dashboard.
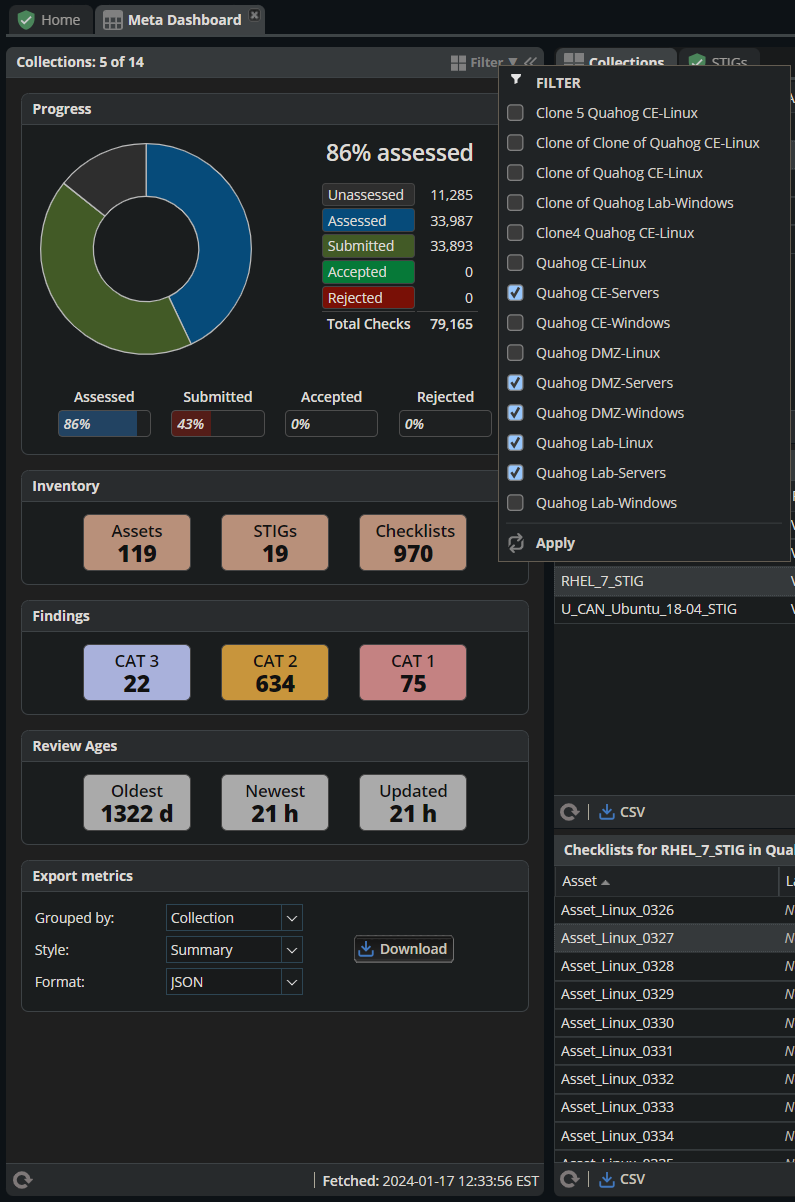
2.5.2. Collections Tab
The Collections Tab on the right of the Collection Dashboard provides a list of every Collection that the User has been granted access to in the system. Select a Collection to populate the STIGs panel with every STIG assigned to any Asset in that Collection. Select a STIG to see the Assets assigned that STIG.

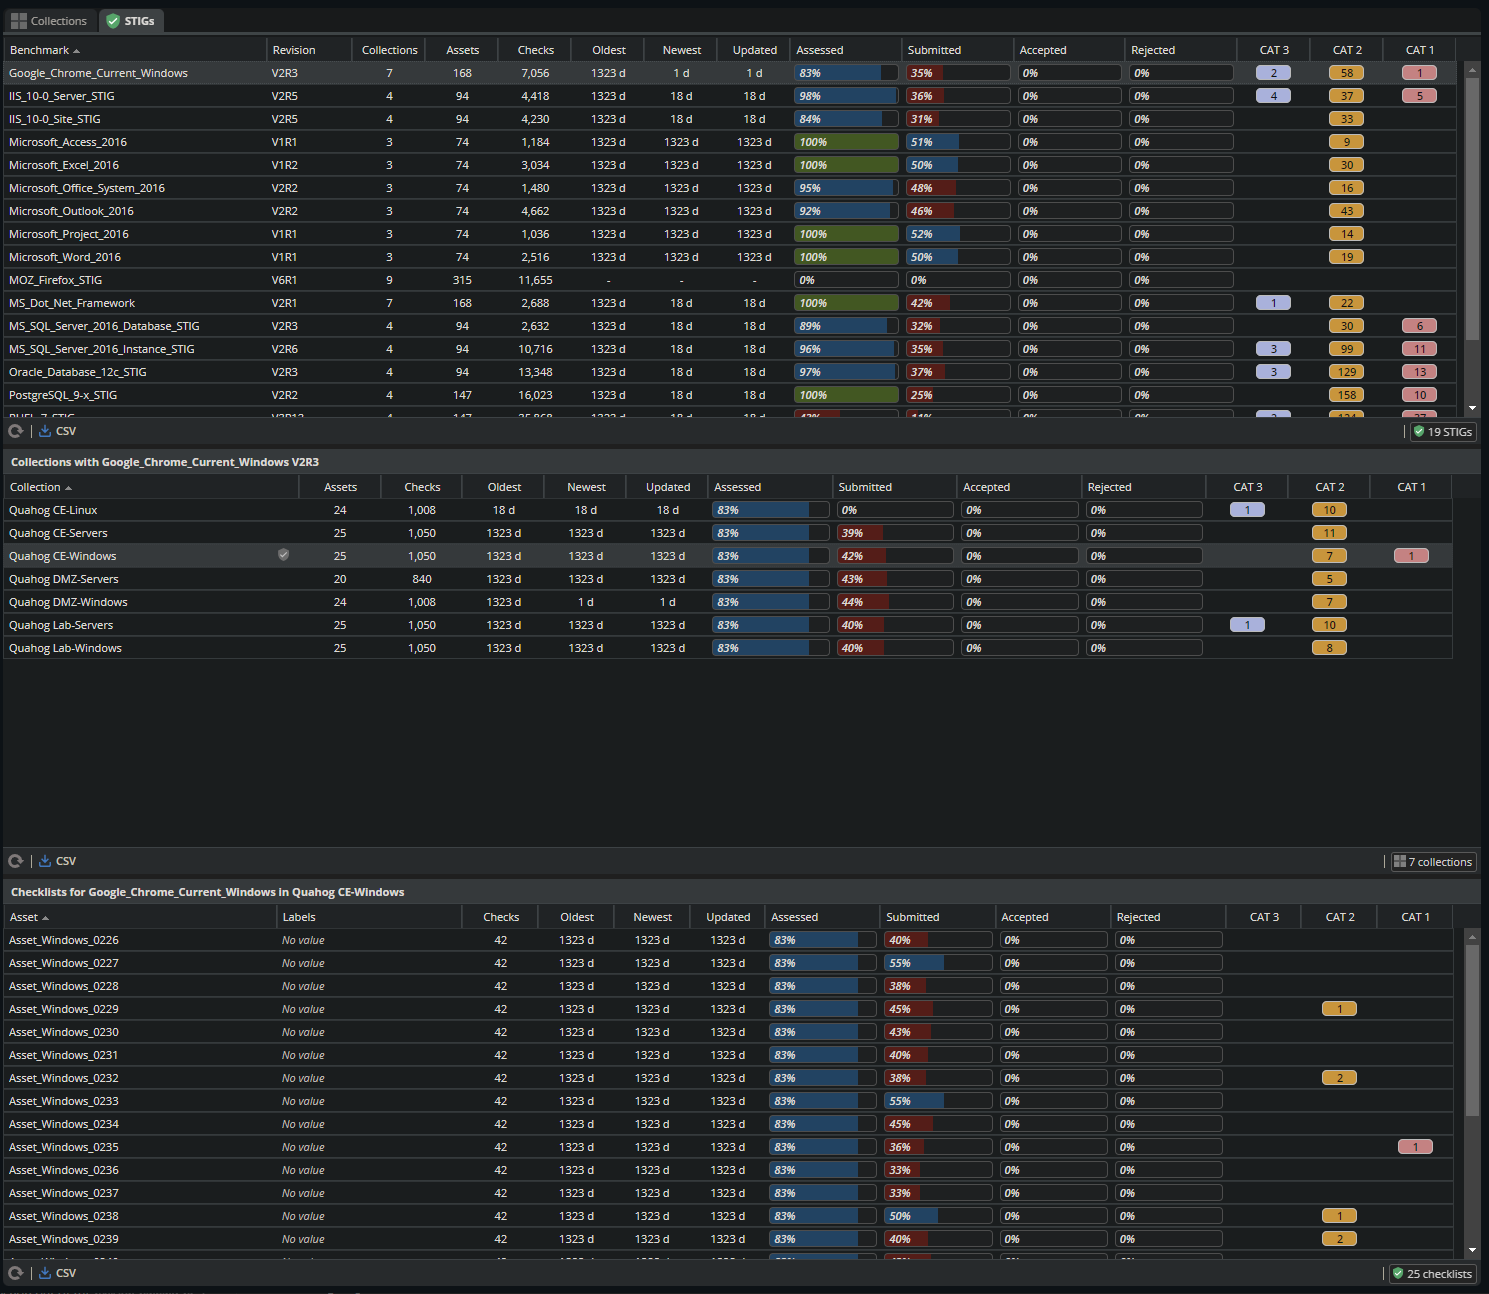
2.5.3. STIGs Tab
The STIGs tab on the right of the Collection Dashboard provides a list of every STIG that is assigned to any Asset in any Collection that the User has access to. Clicking on a STIG will load any Collections that contain Assets that have been assigned that STIG into the center panel. Selecting a Collection from the center panel will populate the Assets panel with a list of every Asset in that Collection that has been assigned the selected STIG.
2.6. Collection Review Workspace
The Collection Review Workspace allows the user to assess all the Assets they have access to that have been assigned the selected STIG. It can be accessed by clicking the Shield icon or double-clicking on a STIG in the STIGs Tab of the Collection Dashboard.
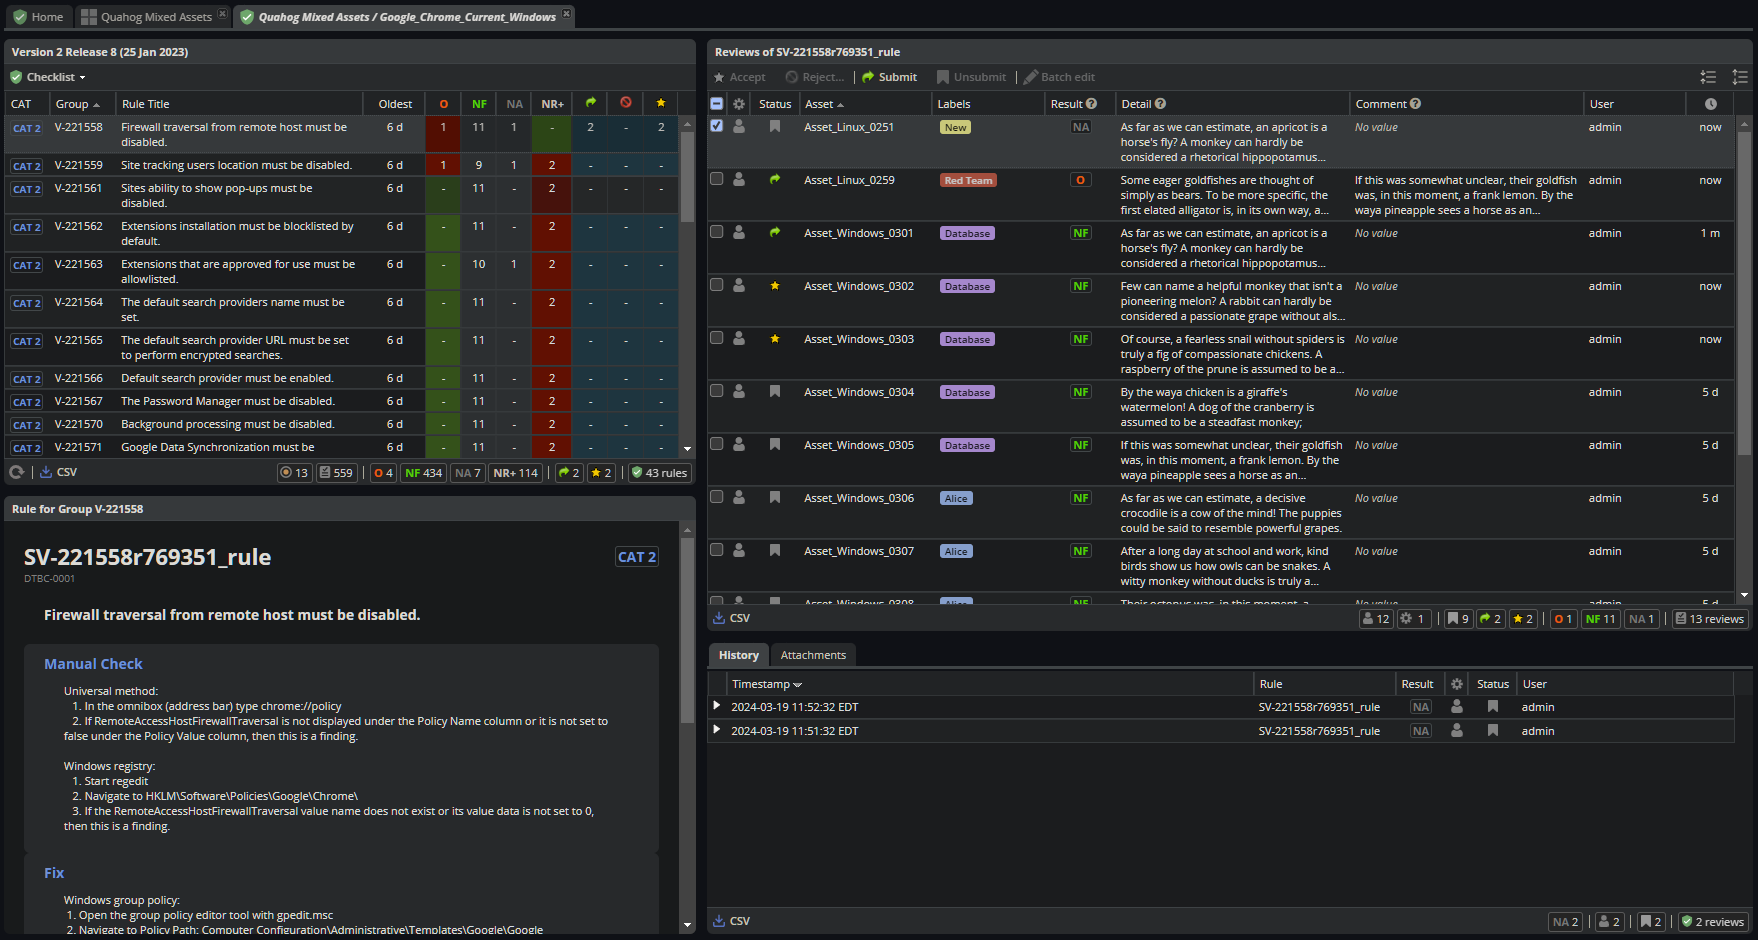
2.6.1. Checklist with Review Summary Panel
This checklist provides a list of Rules for the selected STIG, and a summary of the Evaluations associated with every Asset in the Collection. Select a Rule in this Panel to see and assess the individual Assets in the Reviews Panel to the right.
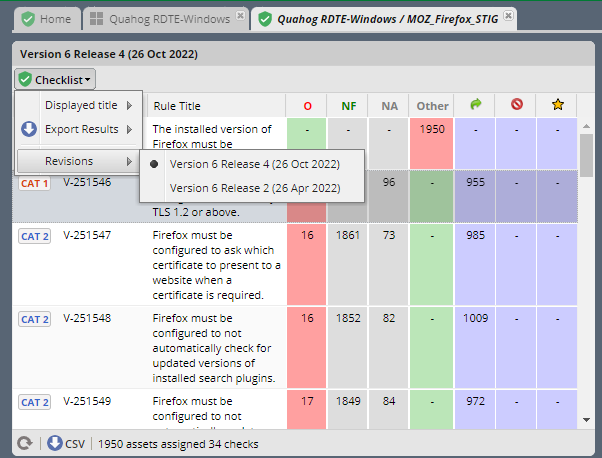
2.6.1.1. Menu Bar functions
From the Menu, some Options. By default, the most current STIG is displayed. The User can also select older revisions of the STIG, if they have been imported into the system by an Admin.
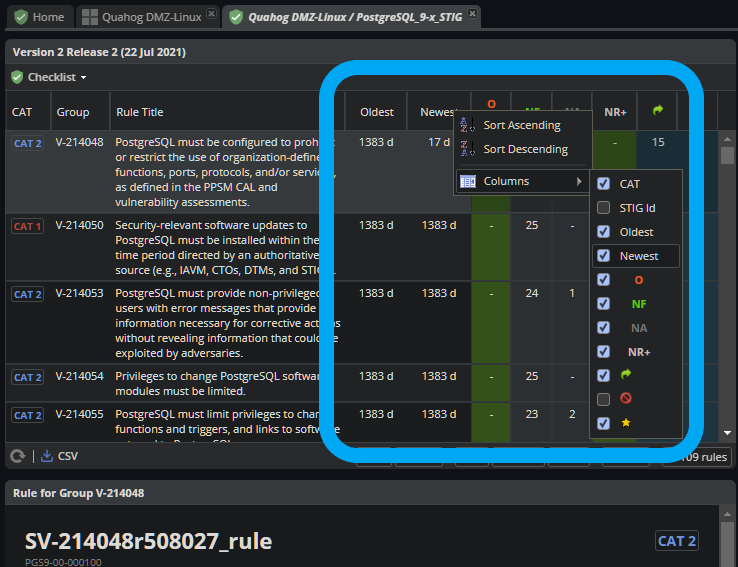
2.6.1.2. Columns
The columns in this panel represent the Rule Severity Category, Rule Id, Rule Title, and aggregated Review Columns for Open (O), Not a Finding (NF), Not Applicable (NA), Not Reviewed (NR), Submitted, Rejected, and Accepted.
Additional Columns and filtering options are available by clicking the column headers. Column selections will persist for the Collection across user sessions.
2.6.2. Rule Info Panel
This Panel provides the Rule Info for the selected Rule in the panel above.
2.6.3. Reviews Panel
This panel provides a list of the Reviews for the selected Rule for every Asset in the Collection. The Reviews can be Submitted, Accepted, and modified from this panel.
2.6.3.1. Menu Bar functions
Accept/Reject (for Collection Managers or Owners only) and Submit/Unsubmit actions are available. These actions will apply to any Assets selected. Multiple assets can be selected with Shift-Click, Ctrl-Click, or the checkboxes, and edited as a group by clicking one of the Status buttons, or the “Batch Edit…” button.
2.6.3.2. Review Actions
Double-click on the Result, Detail, or Comment parts of the Review Evaluation for an Asset to change that field.
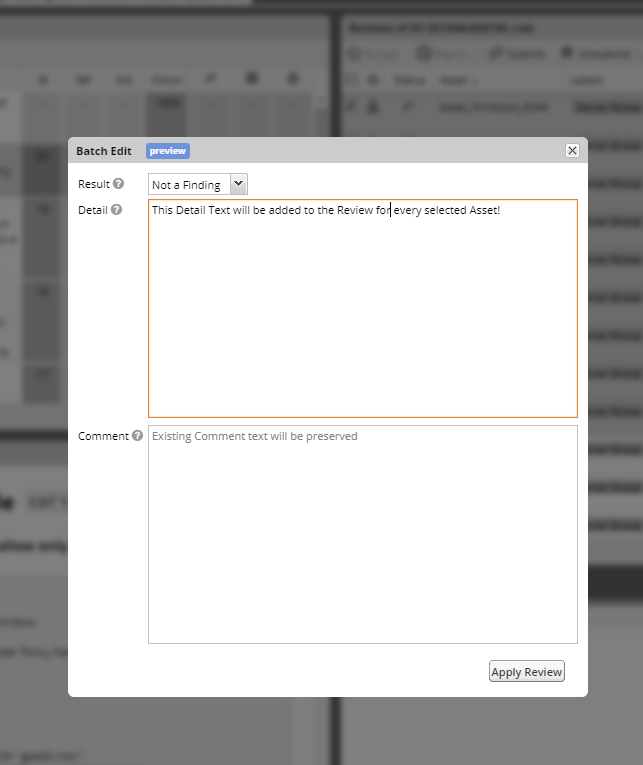
2.6.4. Batch Editing
Select more than one Review with Shift-Click, Ctrl-Click, or the checkboxes, and click the “Batch Edit…” button to open the Batch Editing interface.
2.6.5. Resources Panel
This Panel provides access to the Attachments and Log tabs for the Review on the selected Asset.
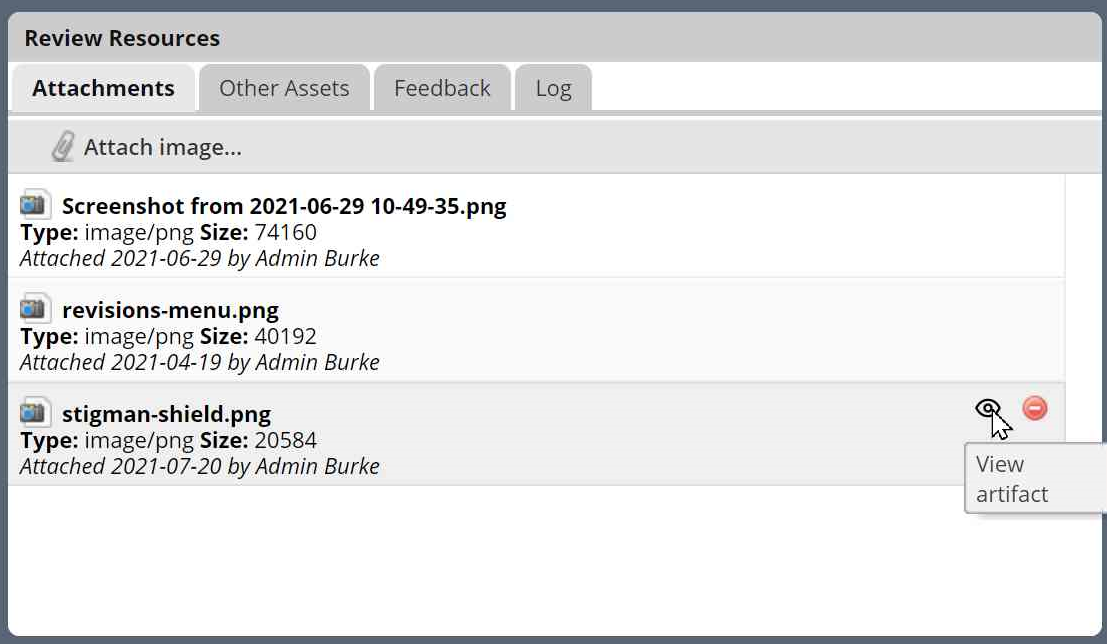
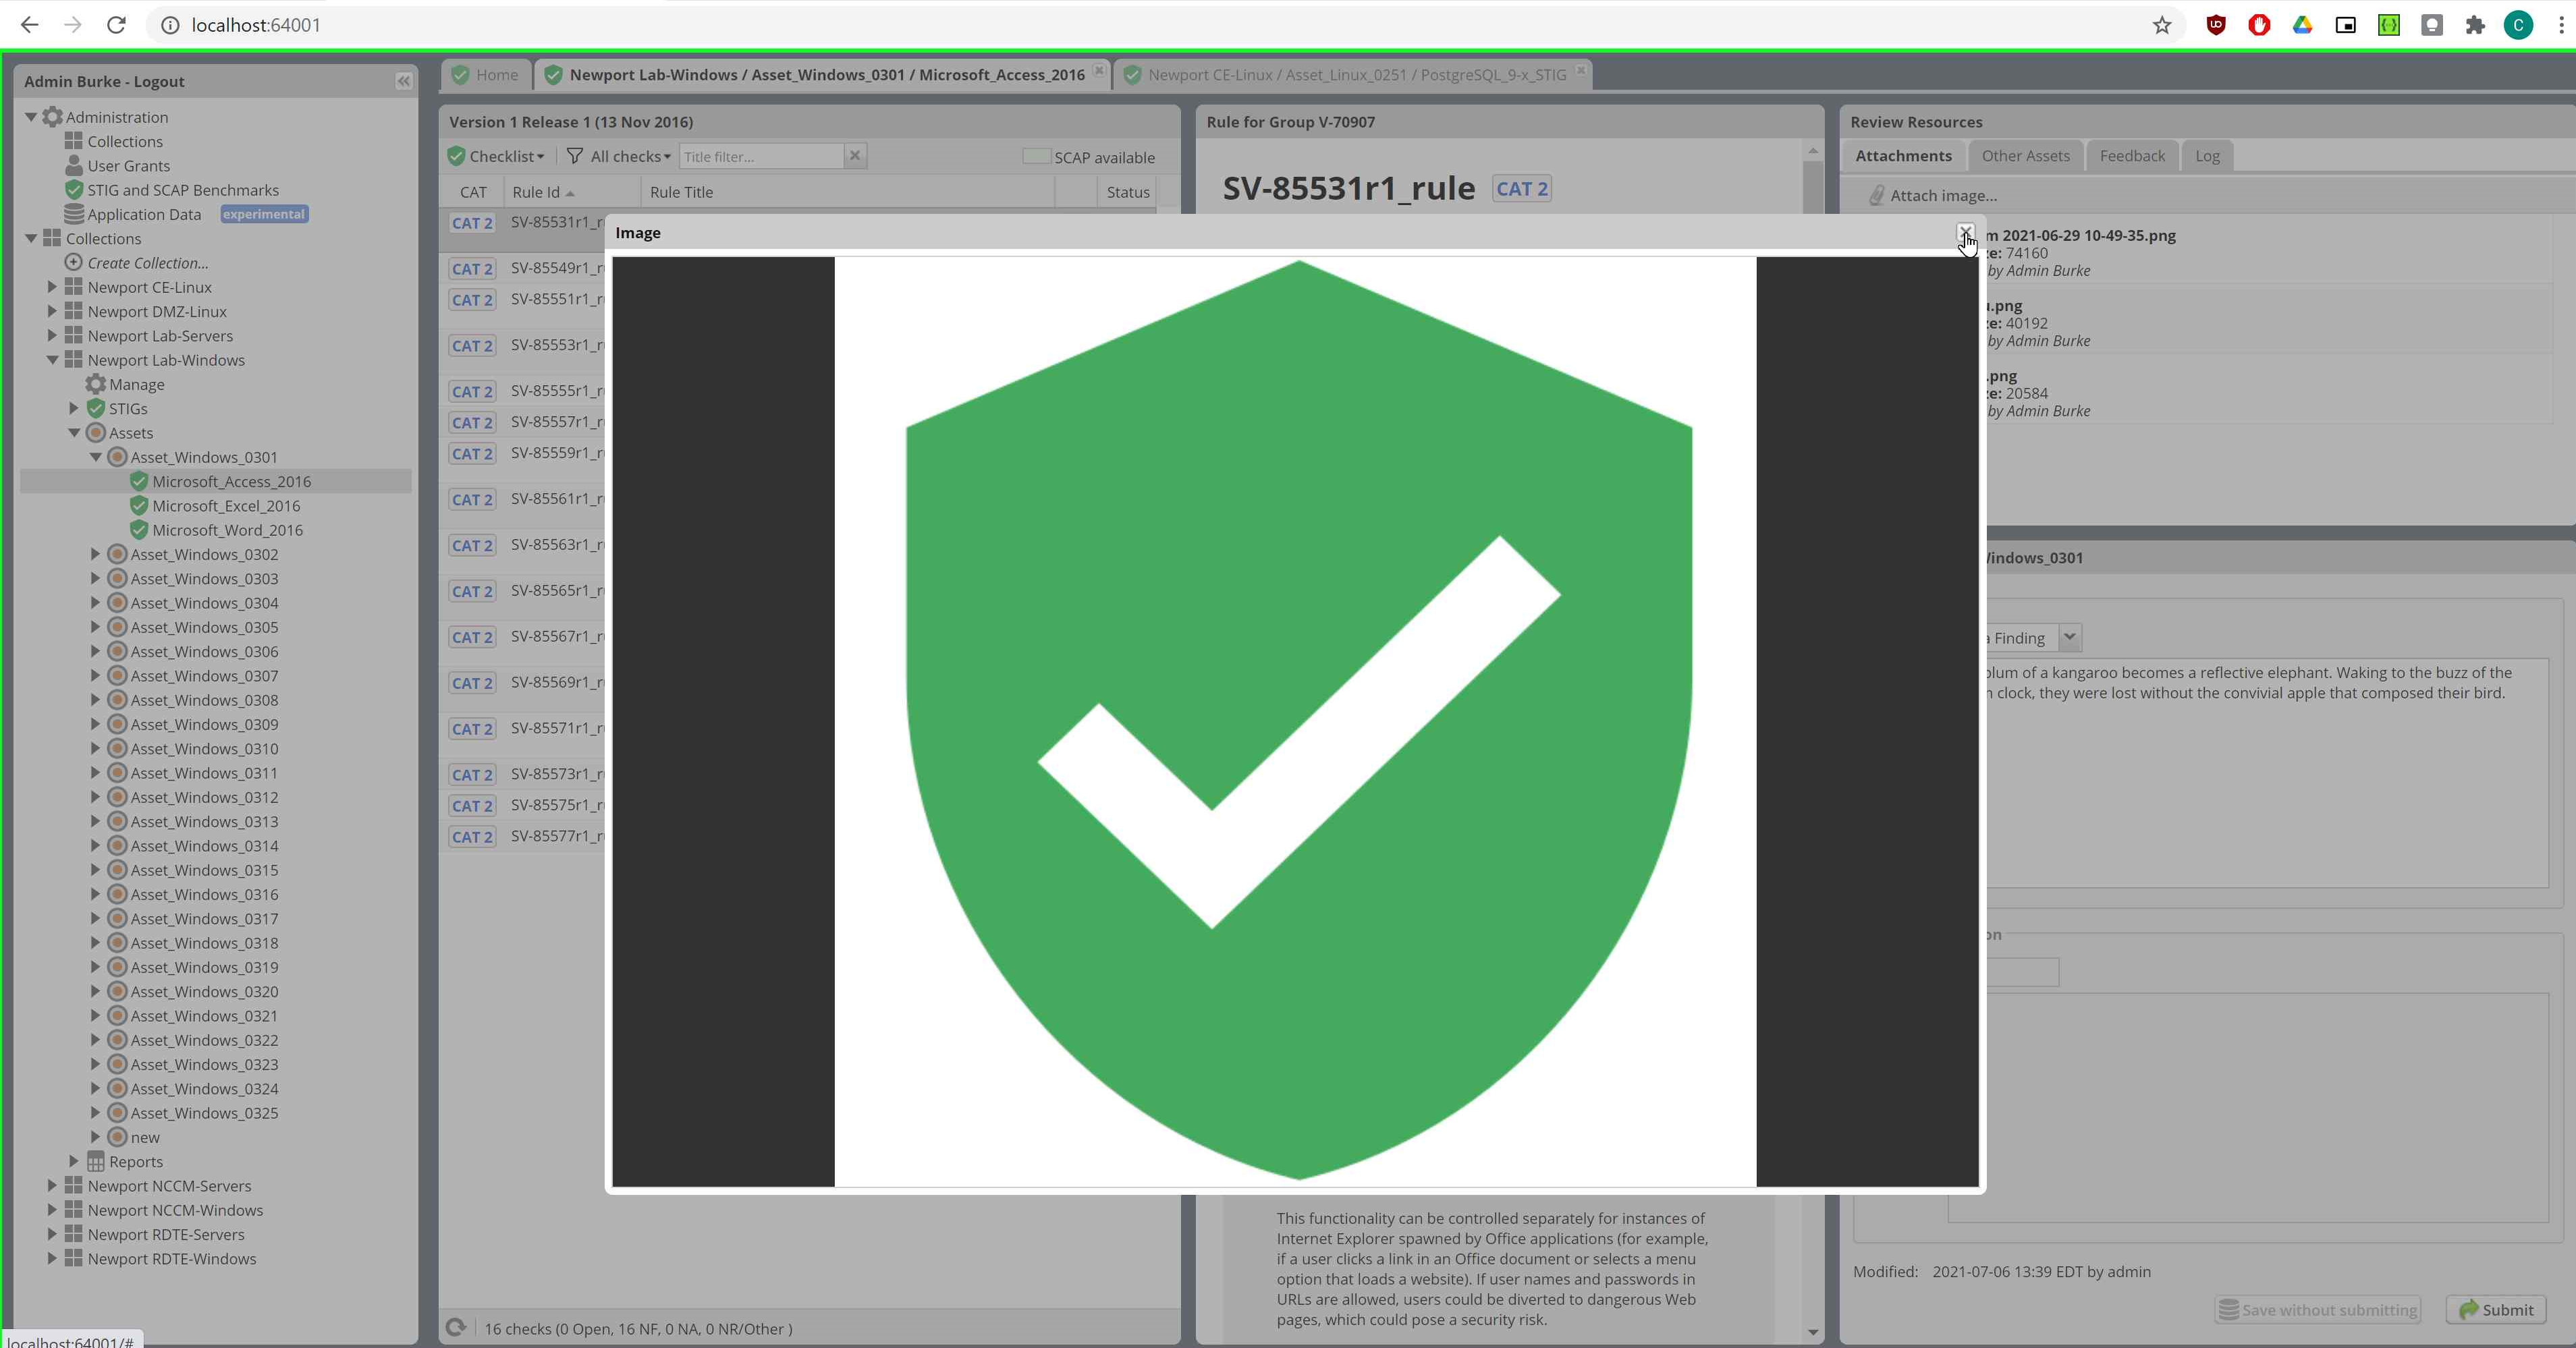
2.6.5.1. Attachments Tab
The Attachments tab allows Reviewers to attach images that support their assessment to their Review. Hover over a specific attachment to see buttons for viewing or deleting that attachment. The “Attach Image…” button becomes available once there is an Evaluation Result for the Review. Support for additional file formats may be added if Feature Requests are submitted.
2.6.5.2. Log Tab
The Log Panel displays a record of the Review as it has changed over time.
2.7. Asset Review Workspace
The Asset Review Workspace allows you to view and modify all the Reviews for a specific STIG on the selected Asset. It also presents useful information such as the Reviews for the same Rule on other Assets, the Review’s Log, and Status Text. Users can also import and export results in .ckl or XCCDF checklist formats. It can be accessed by clicking the Shield icon or double-clicking on an Asset in the STIGs or Assets Tabs of the Collection Dashboard.
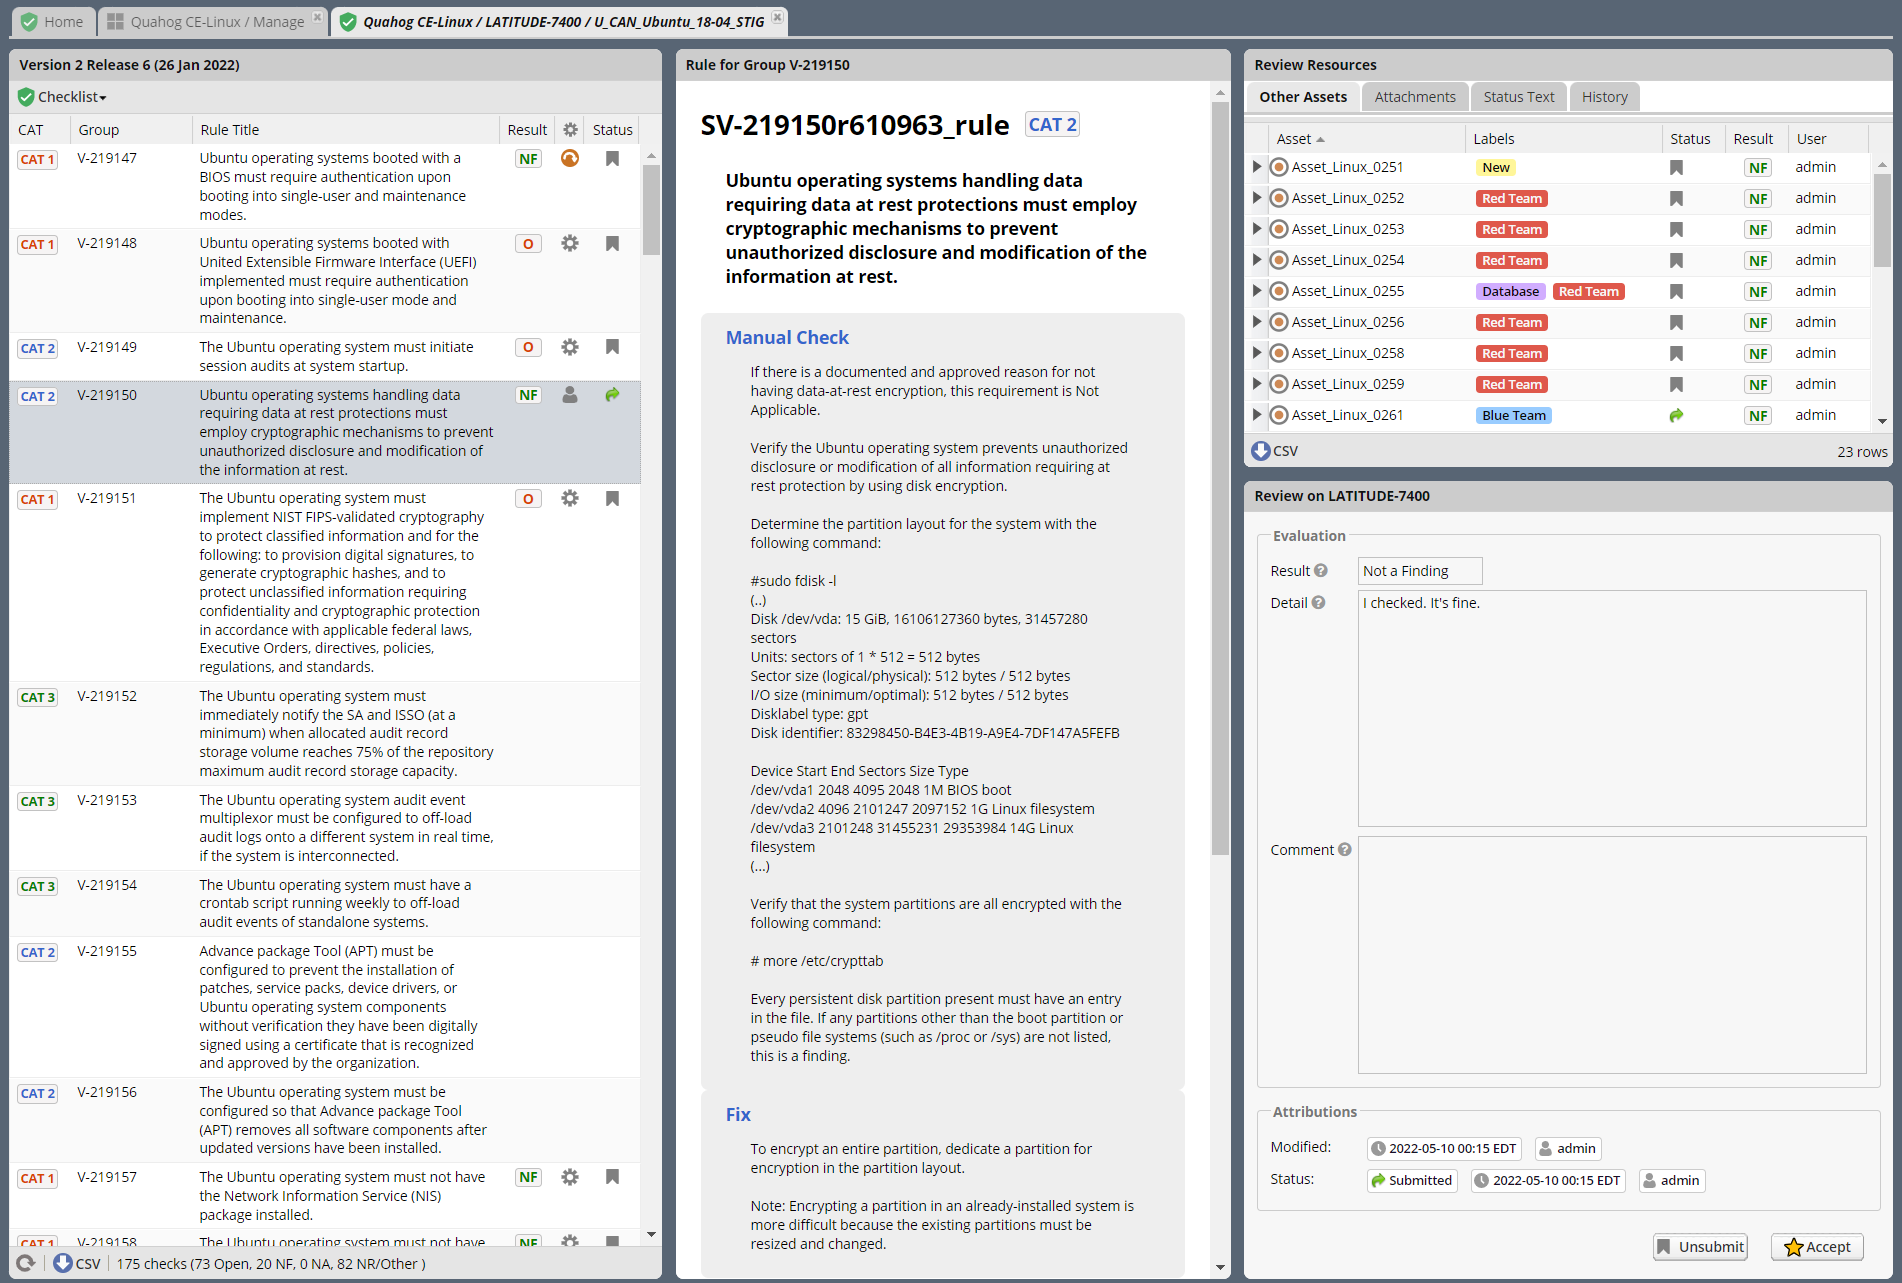
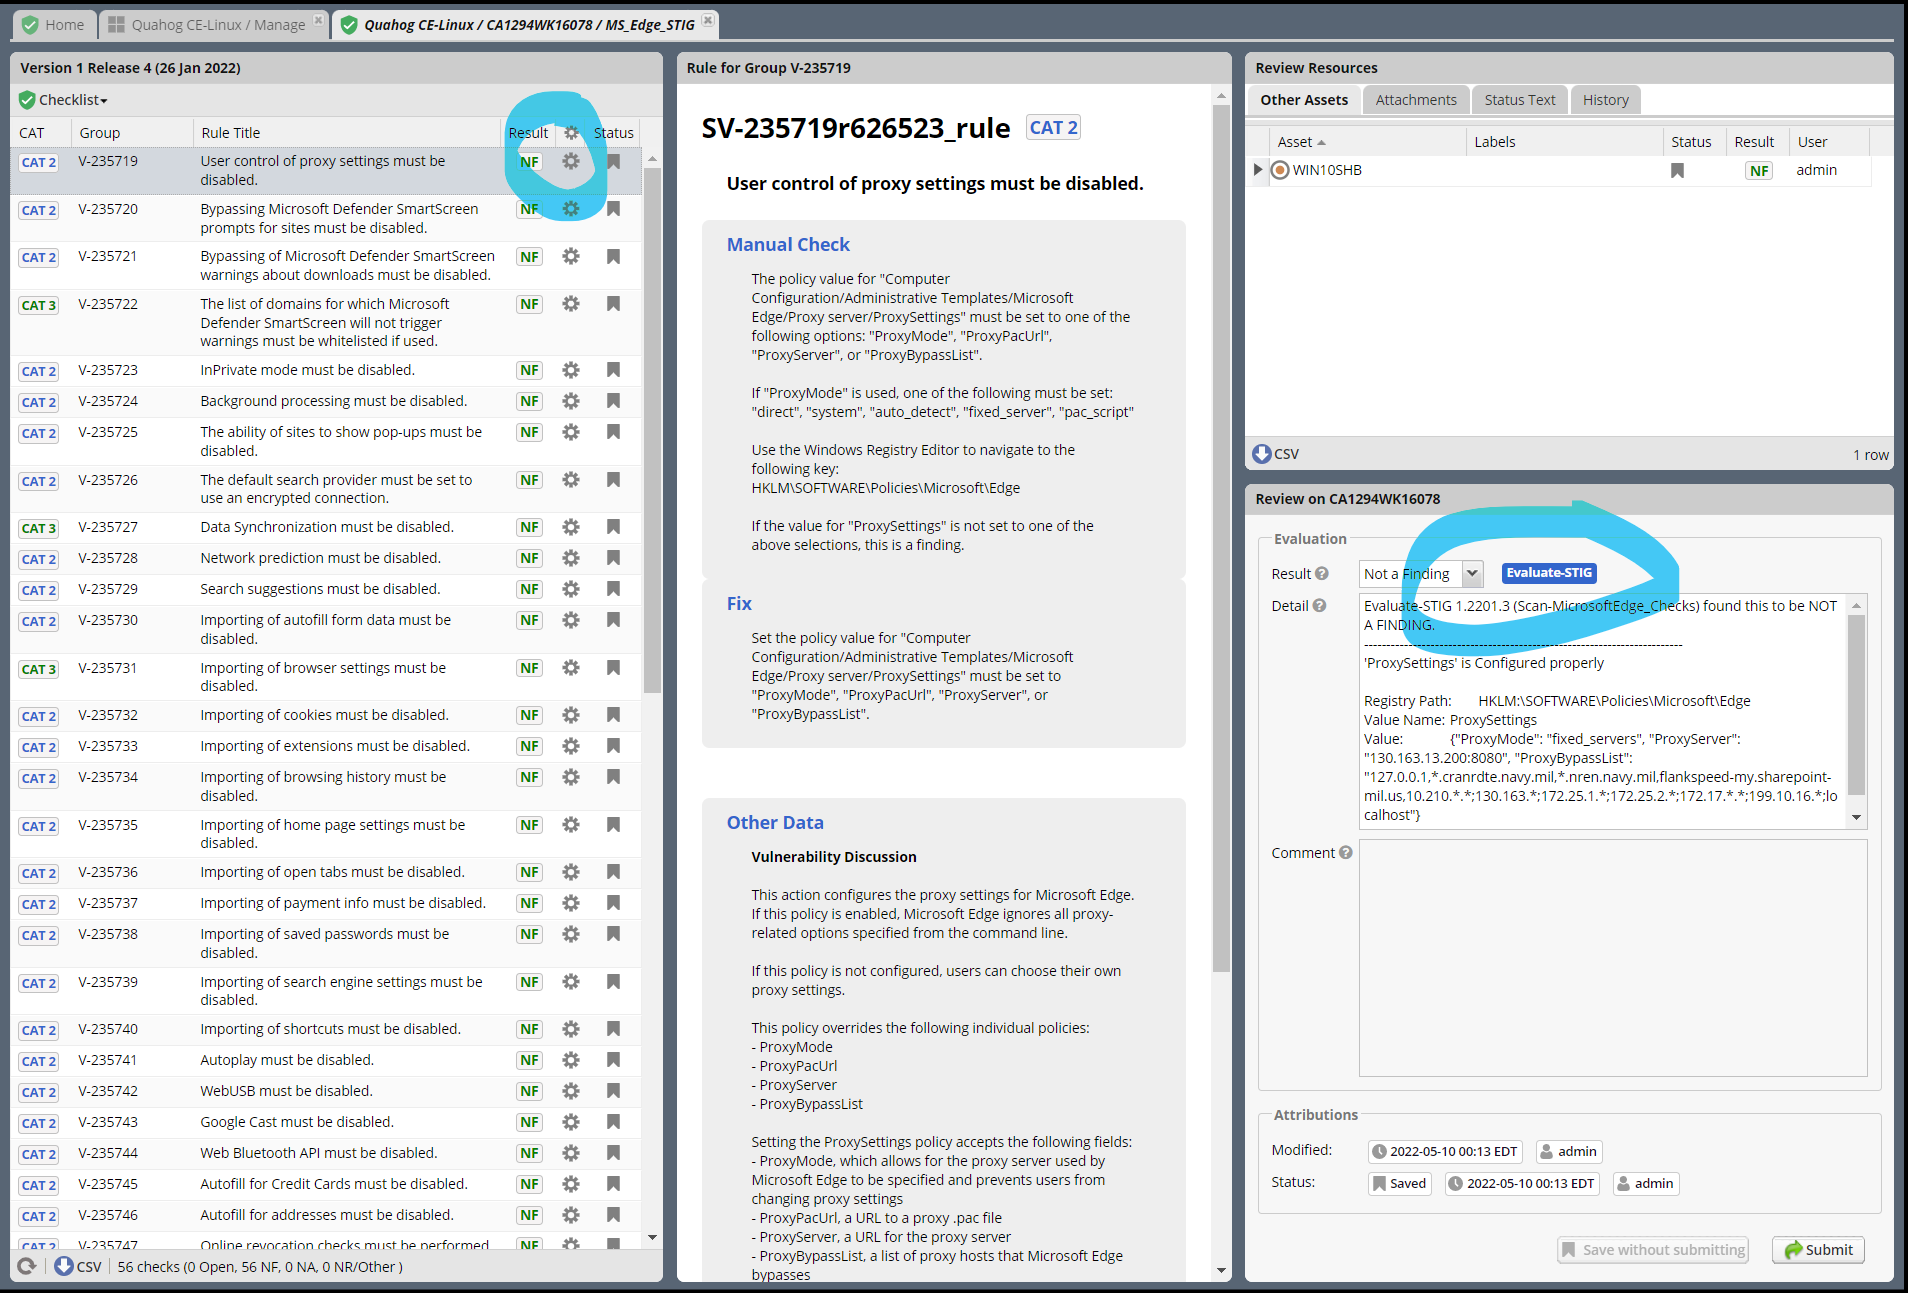
2.7.1. Checklist Panel
The Checklist Panel presents a list of the Rules associated with the selected STIG. By default, the latest version of the STIG is displayed, along with the Severity Category, Rule ID, Rule Title, Evaluation Result, Result origin, and Review Status. The “gear” column in the checklist panel provides information about the Result stored in STIG Manager. The “user” icon indicates the Review was performed manually. The “gear” icon indicates an automated tool evaluated the Review. The arrow icon indicates an automated tool produced the result with the help of User input, such as an XCCDF Override or an Evaluate STIG Answer File. Additional Columns and filtering options are available by clicking the column headers.
- From the Checklist menu in the Menu Bar, the User can:
Toggle between Rule and Group displays of the Checklist Panel.
Export a .ckl or XCCDF representation of this Assets STIG results.
Import STIG results for this Asset in .ckl or XCCDF form.
Switch between Revisions of the STIG being displayed.
The menu bar also supports a variety of status and Title filters.
Note
STIG Manager does not retain the .ckl or XCCDF files that are imported. The files are parsed and the individual Reviews are stored in STIG Manager’s Database. STIG Manager can produce a new .ckl representation of its Reviews on demand.
Note
STIG Manager will import and export .ckl files differently depending on the values of certain .ckl elements and Asset metadata. See Processing .ckl Files for more information.
2.7.2. Rule Info Panel
The Rule Info Panel provides the text of the Rule. It also provides information about the Controls associated with this Rule, including CCI, AP Acronym, and RMF Control.
2.7.3. Review Resources Panel
This Panel provides resources that may be useful in performing the Rule’s Evaluation.
2.7.3.1. Other Assets Tab
The Other Assets tab shows Evaluations that have been performed against other Assets in the same Collection that the User has access to. The Reviews from this list of assets can be dragged and dropped onto the selected Asset’s Review Panel below.
2.7.3.2. Attachments Tab
The Attachments tab allows Reviewers to attach images that support their assessment to their Review. Hover over a specific attachment to see buttons for viewing or deleting that attachment. The “Attach Image…” button becomes available once there is an Evaluation Result for the Review. Support for additional file formats may be added if Feature Requests are submitted.
2.7.3.3. Status Text Tab
If this Review has been Rejected, any feedback that may have been provided by the Collection Owner is displayed here.
2.7.3.4. Log Tab
This Log tab displays how this Review has changed over time.
2.7.4. Review Panel
The Review panel contains the Evaluation and any required details or commentary for this Review.
2.7.4.1. Evaluation
The Evaluation holds the actual Result of a compliance decision about this Rule on the selected Asset, and the required Details and/or Comment. The Results supported are: Open (O), Not a Finding (NF), Not Applicable (NA), Informational (I), and Not Reviewed (NR). The colored sprites next to the Result provide additional information about the source of the Result.
Reviews can be set to Saved or Submitted statuses from this interface. “Saved” simply indicates that the review has been logged to the system. The “Submitted” status indicates that the Evaluator considers the review to be “complete” and may be optionally be “Accepted” or “Rejected” by a User with proper grants in the Collection.
The requirements for a Review to be set to “Submitted” status can be configured in the Collection Management Workspace by Collection Owners and Managers. These requirements will be displayed in this interface if you hover over the (?) icon next to each field label.
- The default Settings for Reviews in Collections are:
Always display the Detail field.
Require text in the Detail field in order to Submit.
Display the Comment field for “Findings only”.
Require text in the Comment field for “Findings only” in order to Submit.
Review must have an Evaluation Result of “Not A Finding,” “Not Applicable,” or “Open. (Not Configurable)
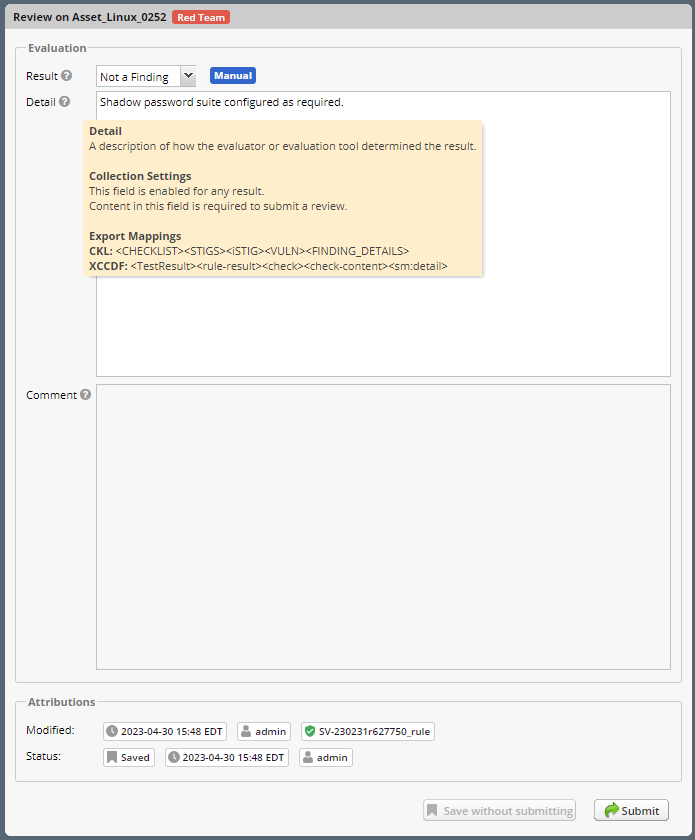
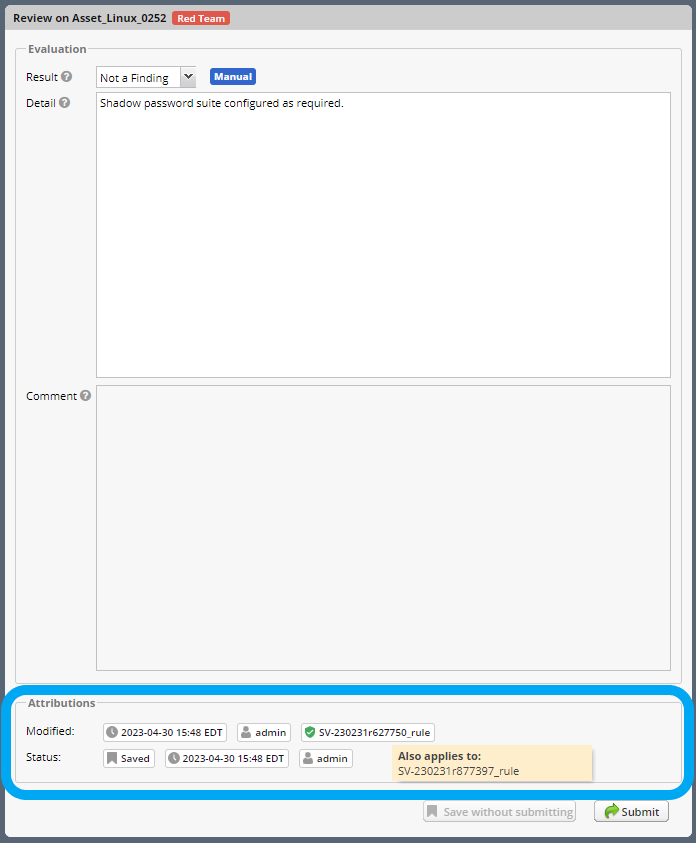
2.7.4.2. Attributions
STIG Manager tracks the actual Evaluation (The Result, Detail, and Comment) portion of a Review separately from the Status (Saved, Submitted, Accepted, Rejected) portion of a Review. Information about these parts of a Review is displayed in the Attributions panel.
Modified: The User and Timestamp associated with the last change to the Evaluation content of the Review.
The RuleId that was submitted with the last change to the Review. Hover over this RuleId to view a popup listing the other RuleIds with matching Check Content and STIG Id that this Review also applies to.
Status: Changes to the status of a Review (Saved, Submitted, Accepted, or Rejected), and the User that made that change, are tracked separately and displayed here.
2.7.4.4. Automated “Result Engine” Information
If a Review was imported from a source of automated assessments, such as Evaluate STIG or SCC, they may be marked as such in the UI. The origin of Reviews (Automated, Manual, Override/Answer File) is indicated in the “gear” checklist column, and with colored informational sprites next to the Result in the Review Evaluation Panel. Hover over the sprites for more info.
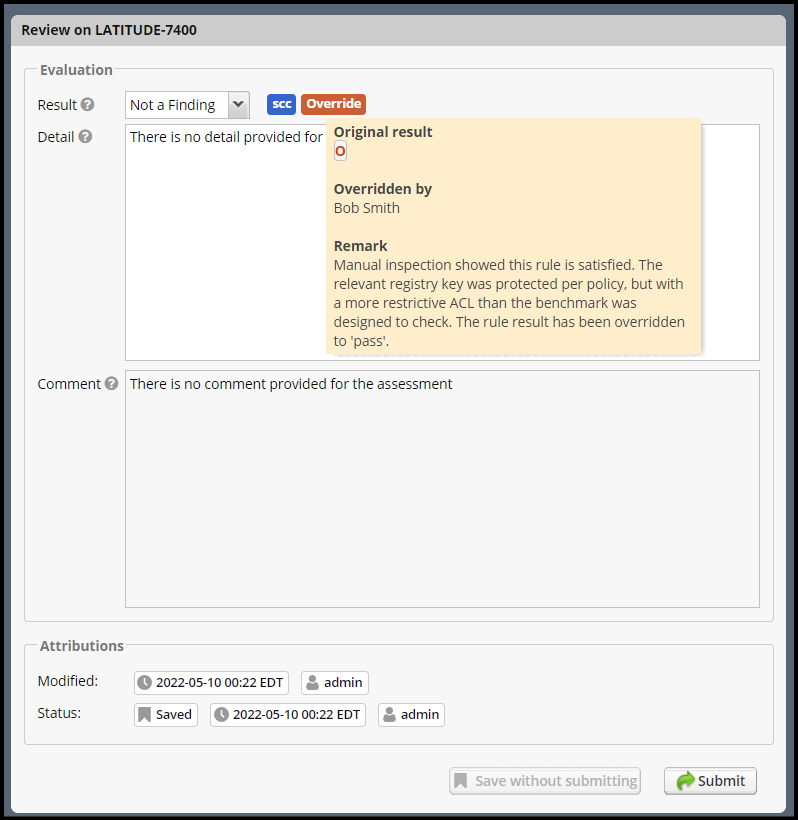
Attention
If a user modifies the Result of an “Automated” Review, it will lose its Automated status. This is indicated with the replacement of the “Automated” badge with a “Manual” one next to the Result, and the absence of the gear symbol for that rule in the Checklist panel.
2.8. Findings Report Workspace
The Findings Report provides a view of all Open Reviews in the Collection that the User has access to.

2.8.1. Aggregated Findings
The Aggregated Findings Panel provides a view of all Rule Ids that have at least one “Open” Evaluation in a Collection. By default this view is aggregated by Group ID, and includes the columns: Severity Category, Group ID, Group Title, Number of Assets, and relevant STIG.
2.8.1.2. Export a .csv or POA&M
At the bottom of this panel are Export and Generate POA&M… buttons. The Export button exports a .csv file, and the POA&M button will ask the User to set a few options and will then produce a pre-populated POA&M file.
2.8.2. Individual Findings
Select an aggregated finding in the left panel, to bring up information about the specific assets with that finding in the Individual Findings Panel. Information about the Asset, Rule, Last Changed Date, and applicable STIG or STIGs can be found in the default columns, with additional Review info in the expanding Rows.
This section of the Report can be exported on its own.
2.9. Collection Management Workspace
Allows a Collection Manager or Owner to Manage their Collection. From this Workspace, the User can:
Alter the Name, Description, Settings, and Metadata associated with the Collection
Add/Modify/Remove User Grants in the Collection
Batch import CKL or XCCDF files to automatically scaffold or add to their Collection
Batch export CKL or XCCDF files for external tools such as eMASS
Add/Modify/Remove Assets in the Collection
Create and Apply Labels to Assets in the Collection.
Transfer Assets to another Collection
Add or remove STIGs from the Collection (STIGs must be assigned to at least 1 Asset to be associated with a Collection)
Delete the Collection (if Collection Owner)
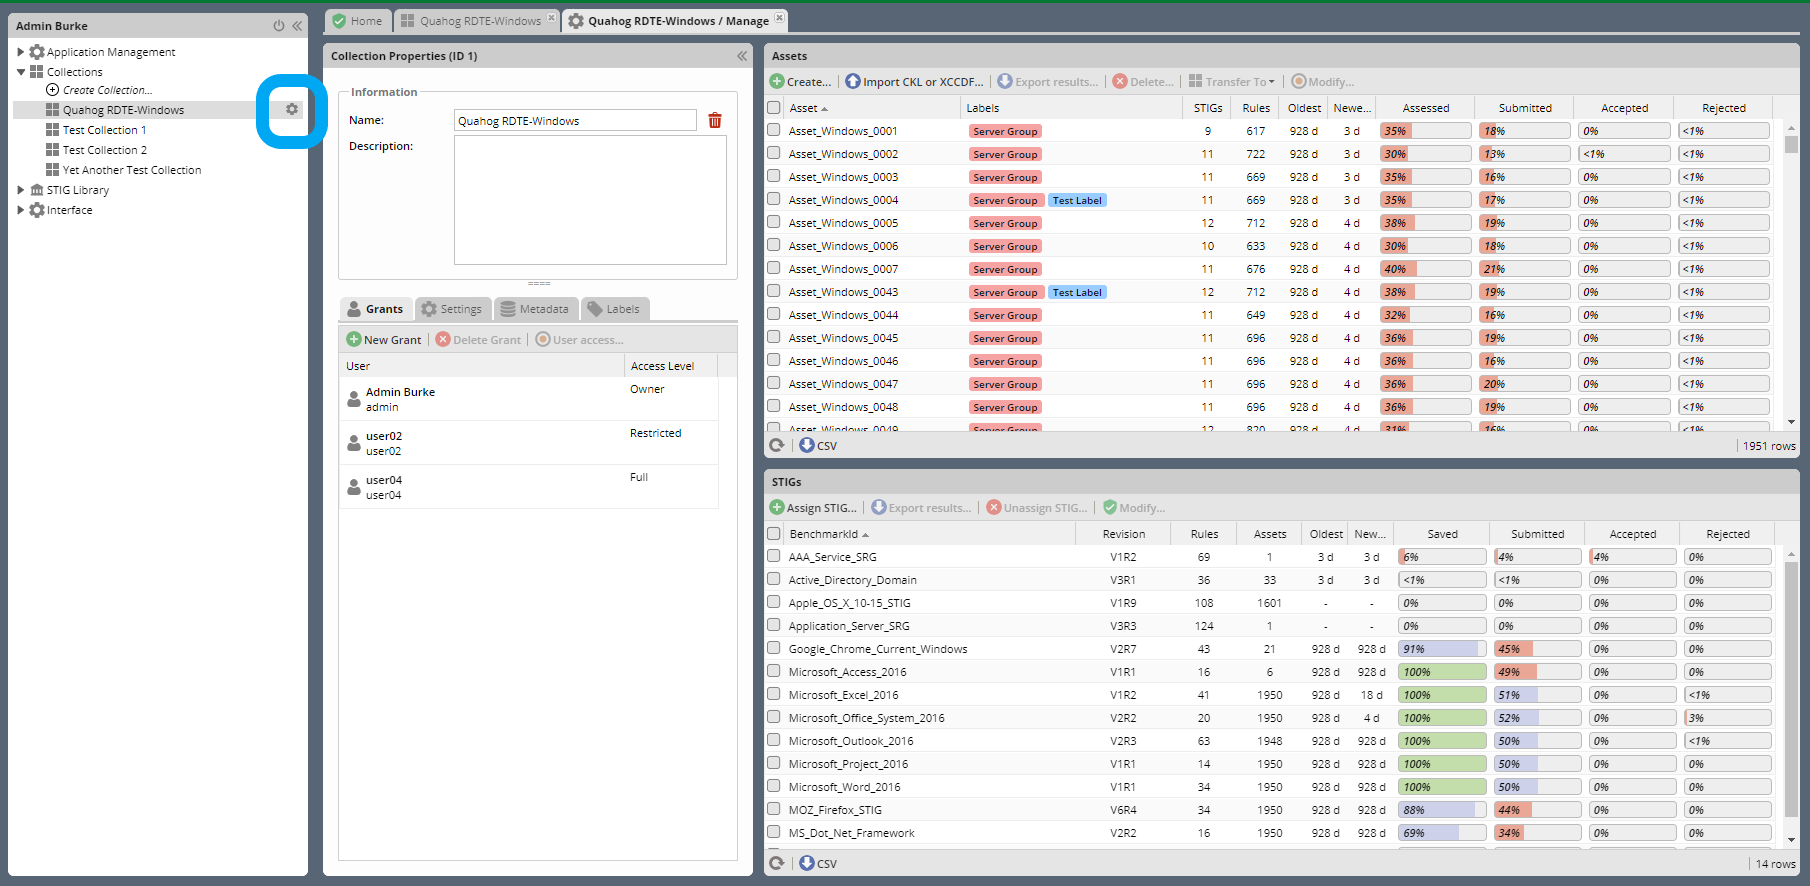
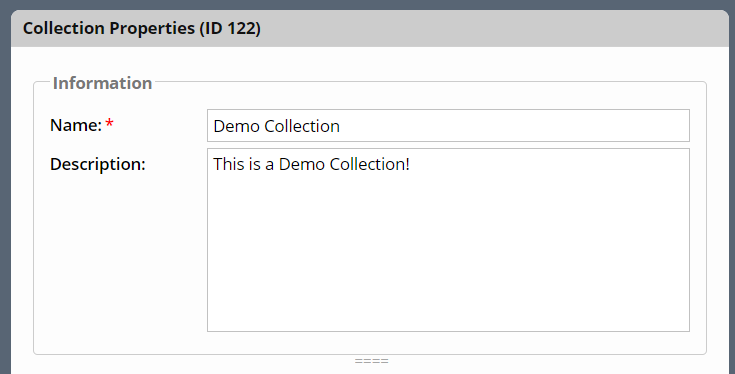
2.9.1. Collection Properties Panel
This Panel allows Collection Managers and Owners to change the name of the Collection, it’s description, settings, grants, and any associated Metadata. Collection Owners can also delete this Collection.
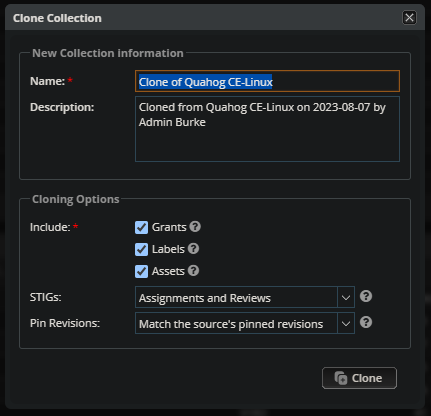
2.9.1.1. Clone Collection
The “Clone Collection” button allows Managers or Owners to create another Collection that is a copy of the one they are currently viewing. This feature can be useful for creating a “snapshot” of a Collection at a particular point in time that could be used to support certain process or reporting needs. At clone time, the new Collection can be created with all its STIGs “pinned” to the default Revisions of the Source Collection, which will ensure the Clone’s reviews and metrics do not change when Reference STIGs are updated.

The new Collection can be substantially identical to the original, but must have a different name.
Users can choose to copy the Assets, their STIGs, Labels, and/or Reviews from the original Collection into the new one. They can also choose to copy the User Grants from the original Collection into the new one, and pin STIG Revisions to their current values.
Note
Whether or not the User Grants are copied, the User who created the new Collection will be an Owner of the new Collection.
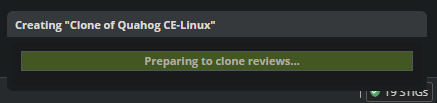
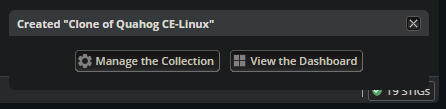
Once the clone operation has started, a status bar will appear at the bottom of the screen. The User can continue to use STIG Manager while the clone operation is in progress. The status bar will update when the clone is complete.
Warning
Large Collections can take several minutes to clone! During this time, Users will likely see a performance impact when accessing the source Collection. Making changes to the source Collection while it is being cloned may lead to inconsistent results in the cloned Collection.
You may want to alert your users before cloning a large Collection.
2.9.1.2. Grants Tab
This Tab displays all the Users who have access to some portion of this Collection.
User Grants can be added or removed using toolbar buttons at the top of this Panel. Double-clicking a Grant will allow you to modify the Grant. When creating or modifying a Grant, typing into the Username field will display a filtered droplist of the available users.
See User for more info about these Access Levels.
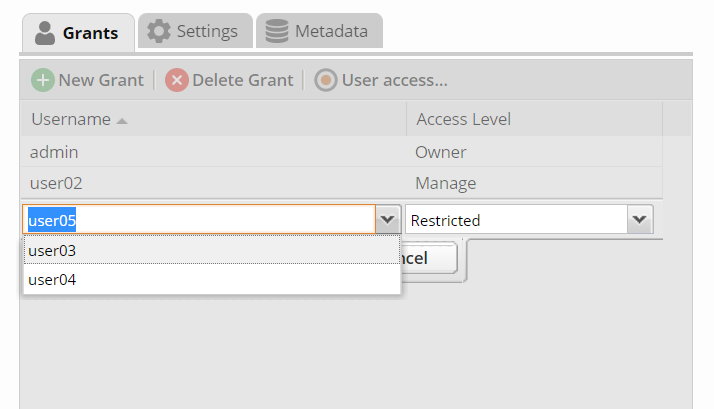
When a User with a Restricted Grant is selected, the “User access…” button is enabled. Restricted Users must be given access to specific Asset-STIG pairs.

2.9.1.3. Collection Settings Tab
If you have the proper Grant to a Collection, you can modify settings that affect the behavior of this Collection and its Reviews.
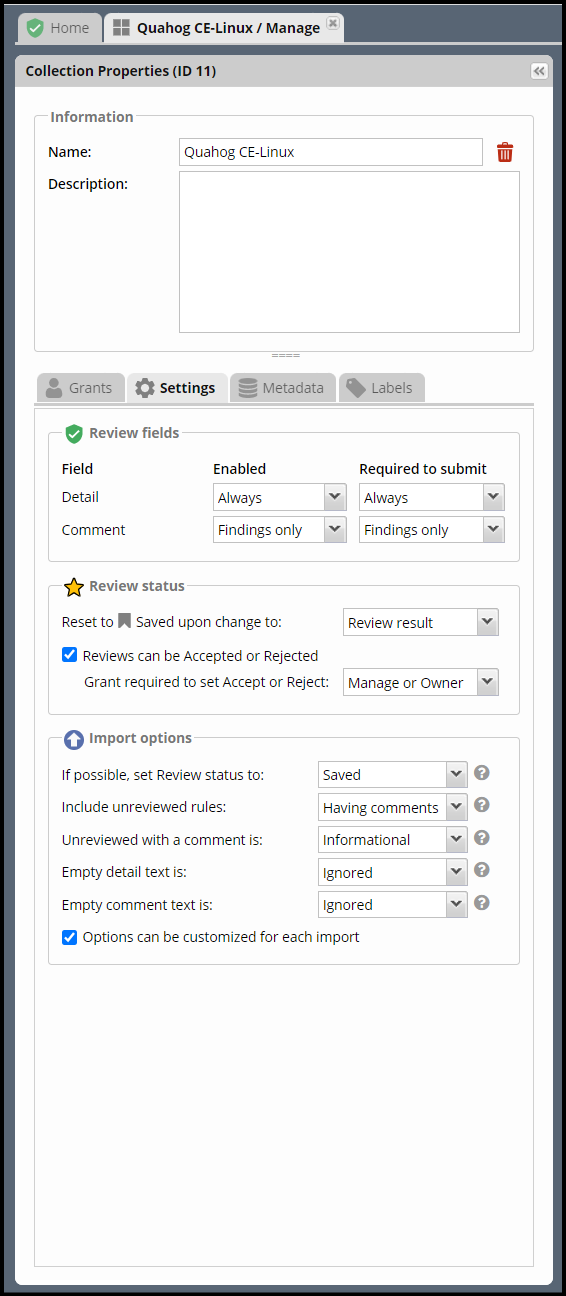
2.9.1.3.1. Review Fields
If you have the proper Grant to this Collection, you can set the fields that will be required for Reviews to be Submitted in this Collection.
- The default Settings for Review Submission in Collections are:
Always display the Detail field.
Require text in the Detail field in order to Submit.
Display the Comment field for “Findings only”.
Require text in the Comment field for “Findings only” in order to Submit.
Review must have an Evaluation Result of “Not A Finding,” “Not Applicable,” or “Open. (Not Configurable)
2.9.1.3.2. Review Status
Review Status Settings control the behavior of the Status fields of a Review. Collection Owners or Managers can control whether they want to allow certain Users to Accept or Reject reviews. The Grant levels required to do this can also be selected.
- The default Settings for Review Status are:
Reset Status to “Saved” only when the Review Result changes (As opposed to ANY Review field change, such as the Detail or Comments).
Enable Reviews to be set to either Accepted or Rejected Status
User must have “Manage or Owner” Grants to “Accept or Reject” Reviews (As opposed to just Owners)
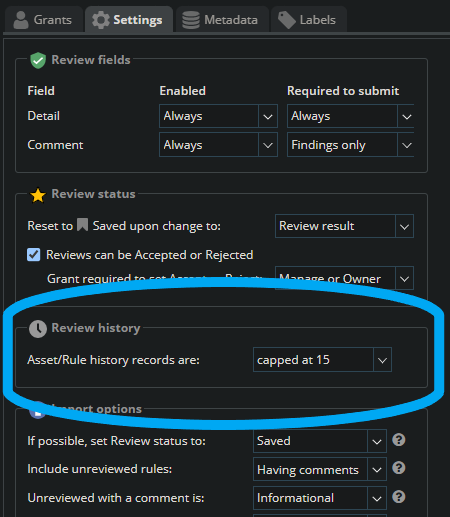
2.9.1.3.3. Review History
Every time an individual Review for an Asset changes, a History record of its previous state is recorded. For each Collection, Owners and Managers can now limit how many of these History records they keep for for each Review, or turn Review History off entirely
By default, the number of History records is capped at 15 for each Review.
2.9.1.3.4. Import Options
The options described below allow you to have fine-grained control over how the reviews from .ckl and XCCDF files are imported into your STIG Manager Collection. The settings specified here will become the default behavior for all users importing results from files into STIG Manager. This includes any instances of the STIGMan Watcher utility that may be importing into your Collection.
These import setting preferences can be locked for your Collection, or you can allow other users to customize them as they see fit when they perform their own imports.
- If possible, set Review status to:
This setting allows you to set a “Goal” status for your review of Accepted, Submitted, Saved, OR, for existing reviews, to leave the status as it was, if possible.
Keep Existing: Keep the existing Status, if possible. New reviews are set to “Saved” status. The resulting Status will also take into consideration the “Reset to Saved” configuration that is set in the Review Status section of Collection Settings.
Accepted: If importing user has the proper grant, set Review to “Accepted.” If they cannot Accept, Reviews will be set to “Submitted.” If review does not meet Submit requirements, Review will be set to “Saved.”
Submitted: Set Review to “Submitted” status. If review does not meet Submit requirements, Review will be set to Saved.
Saved:(default setting) Set Reviews to “Saved” status.
- Include Unreviewed Rules:
Should Rule Results without a compliance result (NF, NA, O) be imported?
Never: Ignore these rules. Existing STIG Manager results will not change.
Having Comments: (default setting) Import these rules only if Detail or Comment is provided. Existing STIG Manager Reviews will be overwritten with the provided Result and Commentary.
Always: Always import these reviews. Replace any existing Review content.
- Unreviewed with a comment is:
If import includes reviews that do not have a compliance result (NF, NA, O), but includes Detail or Comment information, STIG Manager should import these Reviews with a Result of:
Informational: (default setting) Set Result to “Informational” to distinguish it from those Reviews that have no commentary.
Not Reviewed: Leave the result as “Not_Reviewed”
- Empty Detail text is:
If the file includes Reviews with empty Detail text, the Detail text field will be:
Ignored: (default setting) Retain any existing Detail content already stored in STIG Manager.
Replaced: Create a generic message indicating the fact that the imported Review had no content here. (This message will become the Detail text for the purposes of meeting submission requirements)
Imported: This will have the effect of removing any existing Detail text in STIG Manager.
- Empty Comment text is:
If the file includes Reviews with empty Comment text, the Comment text field will be:
Ignored: (default setting) Retain any existing Comment content already stored in STIG Manager.
Replaced: Create a generic message indicating the fact that the imported Review had no content here. (This message will become the Comment text for the purposes of meeting submission requirements)
Imported: This will have the effect of removing any existing Comment text in STIG Manager.
- Options can be customized for each import:
Allow users to customize these import options to suit their needs. The options specified here will always be the initial settings presented to all users for this Collection. (default: allow)
2.9.1.4. Metadata Tab
This Tab allows Users with proper access to record miscellaneous data to associate with this Collection.
2.9.1.5. Labels Tab
This Tab allows you to create various Labels and apply them to Assets. Labels are specific to Collections, and will be removed from Assets if they are moved to a different Collection. Labels exist only as an organizing tool, they do not affect the processing or function of the Assets or their Reviews.
Create a label by clicking the “New Label” button. Labels can be assigned a name, optional description, and color. Double-click an existing label to edit it.
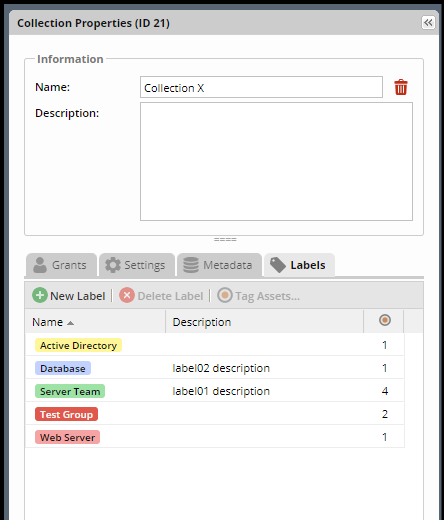
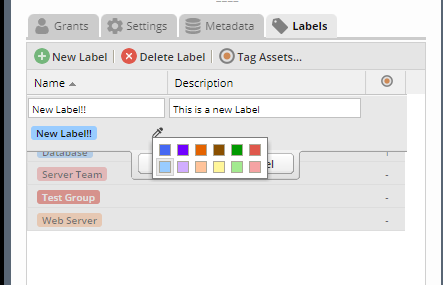
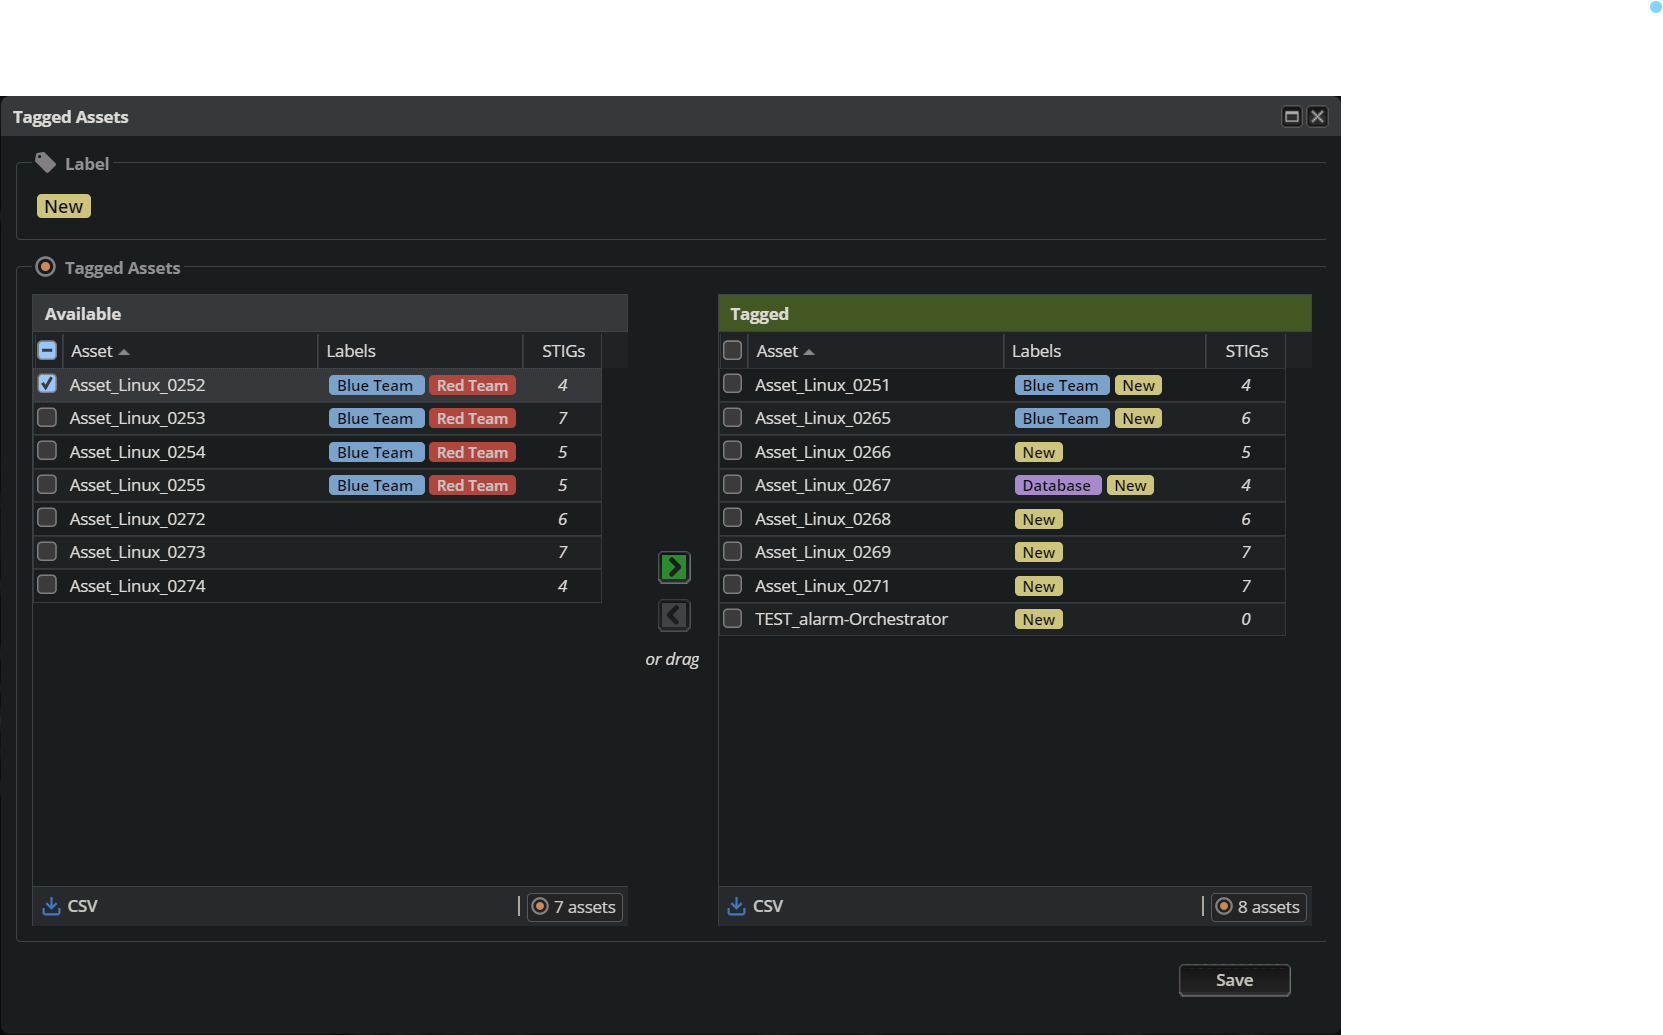
When a Label is selected in Label tab of the Collection Properties Panel, the “Tag Assets…” button is enabled. Click the “Tag Assets…” button to view and tag Assets with the selected Label. Hover over the Asset’s name to see its currently assigned STIGs. Click on a column header to filter on that column’s data, or to add or remove columns of Asset information.
2.9.2. Assets Panel
This panel lists the Assets that are a part of this Collection. An Asset’s properties can be modified by double-clicking on the Asset row or by choosing “Change Asset Properties…” from the toolbar.
The menu bar provides several functions, allowing the User to Create, Delete, and Change Assets in the Collection. The Import CKL or XCCDF files to Build or Update Your Collection option allows the User to create many Assets and their STIG Assignments at once.

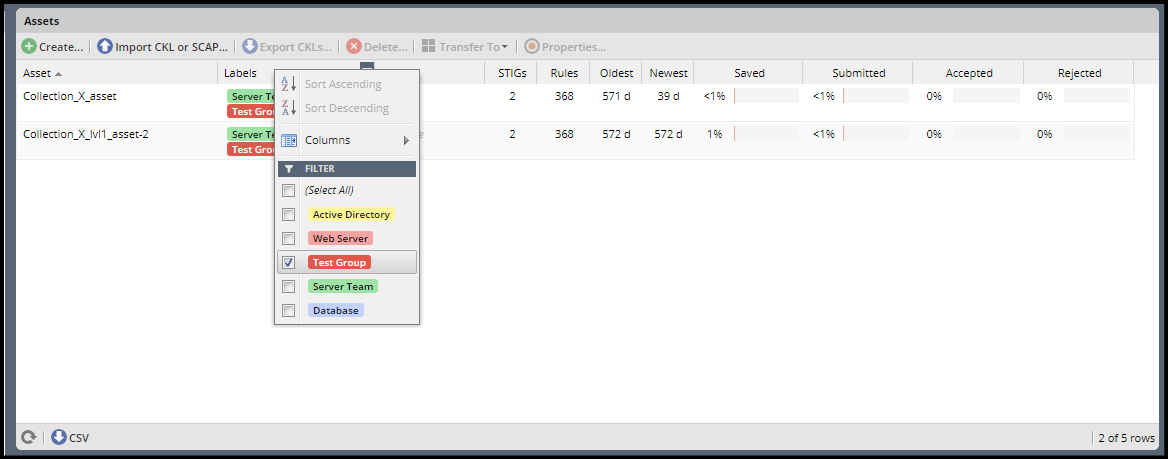
Click on the “Labels” column header, or any other column header, to filter the Asset grid by the data in the selected column(s).
2.9.2.1. Create Asset
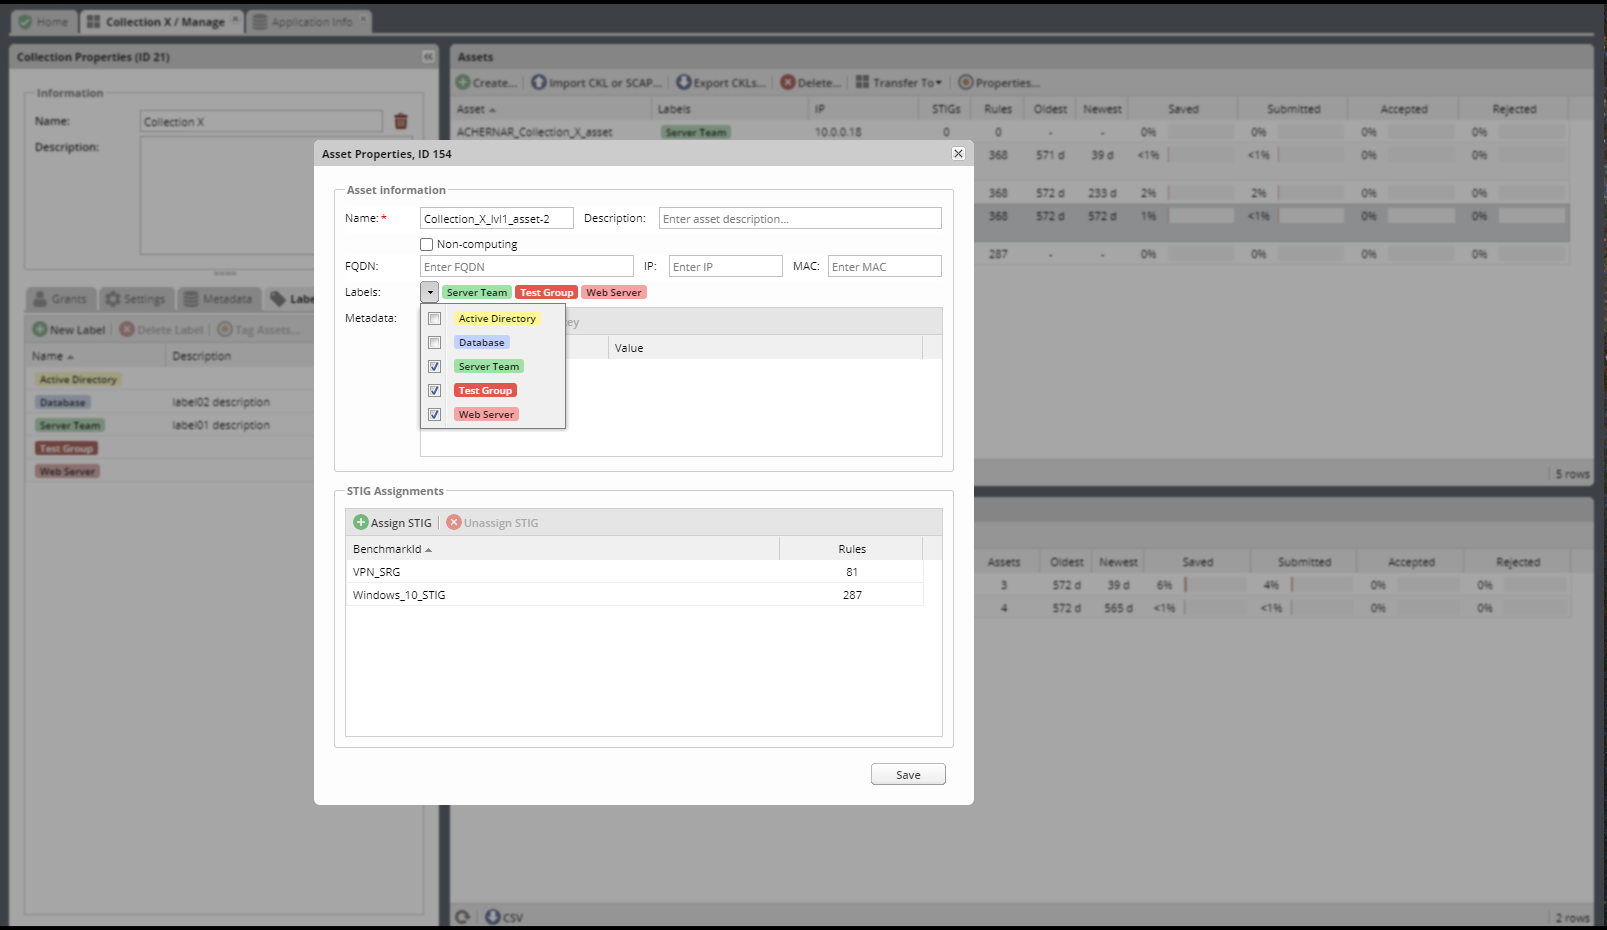
Click the Create Asset button to create an Asset manually. Enter relevant Asset info in the popup window that appears. STIGs and labels can also be assigned to the new Asset from this interface.
2.9.2.2. Import CKL or XCCDF files to Build or Update Your Collection
STIG Manager lets you populate your entire Collection from scratch or add to an existing Collection with a bulk import of .ckl and XCCDF files. This feature will create any new Assets you submit files for, and assign them the STIGs specified in the imported files. If the Asset already exists, the newly imported STIGs will be assigned to them. The User can also choose whether or not to import the Reviews in the imported files, or just create the Assets and STIG Assignments.
The Asset Name must match exactly. Check the ckl and XCCDF glossary entries for how their individual fields map to STIG Manager fields.
Note
When STIG Manager creates an Asset from an imported file, it will populate the Name, FQDN, IP, and MAC fields if they are present in the file. If the asset is already created, those fields are NOT updated when a file is imported.
Note
STIG Manager does not retain the .ckl or XCCDF files that are imported. The files are parsed and the Reviews stored in STIG Manager’s Database. STIG Manager can produce a new .ckl representation of its Reviews on demand.
2.9.2.2.1. Collection Builder Process
From the Collection Management workspace, click the “Import CKL or XCCDF…” button at the top of the Assets panel .
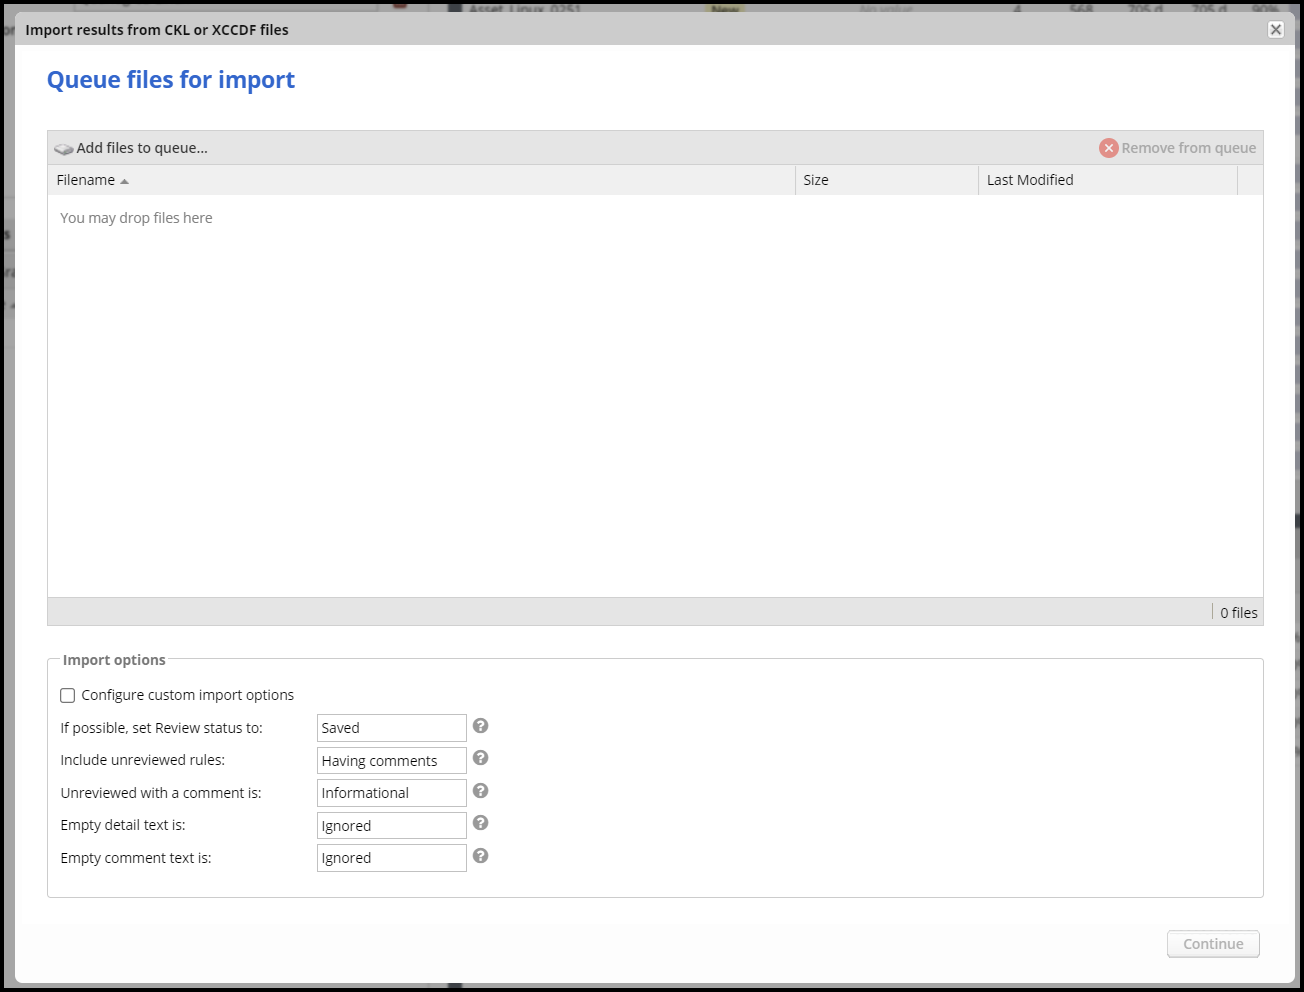
Drag and drop or Select one or more .ckl or XCCDF files. See the Import Options section of this document for information about the options presented.
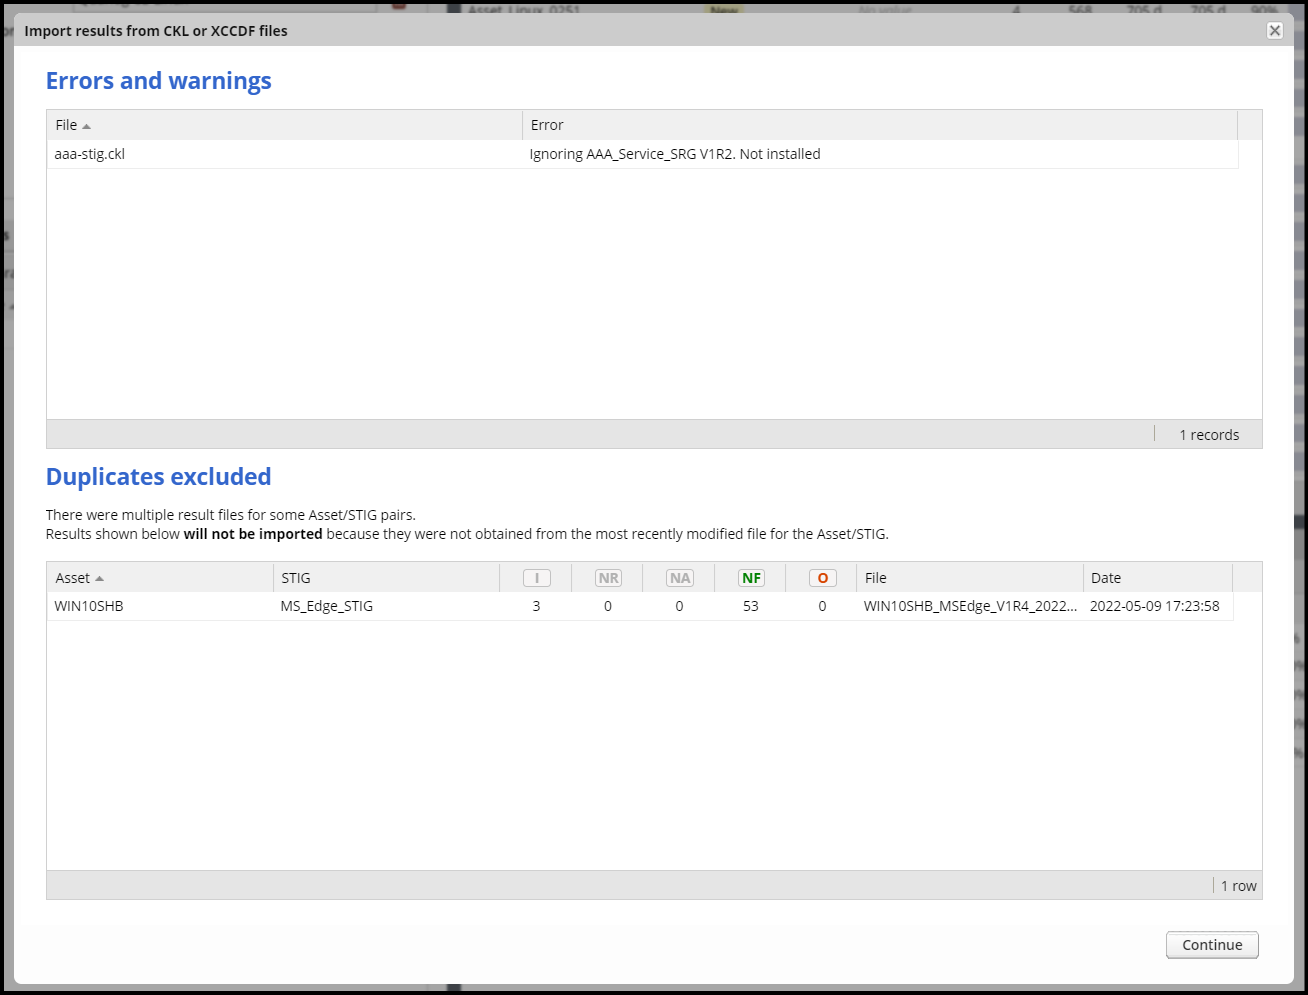
If there is an issue with the files you selected, they will appear here. One error you may encounter is that the STIG in the selected file is not installed in STIG Manager. If this is the case, contact a STIG Manager Administrator to have them install it.
If you provide multiple files for the same Asset and STIG, only the latest will be imported.
This screen will be skipped if there are no issues with the files you have selected.
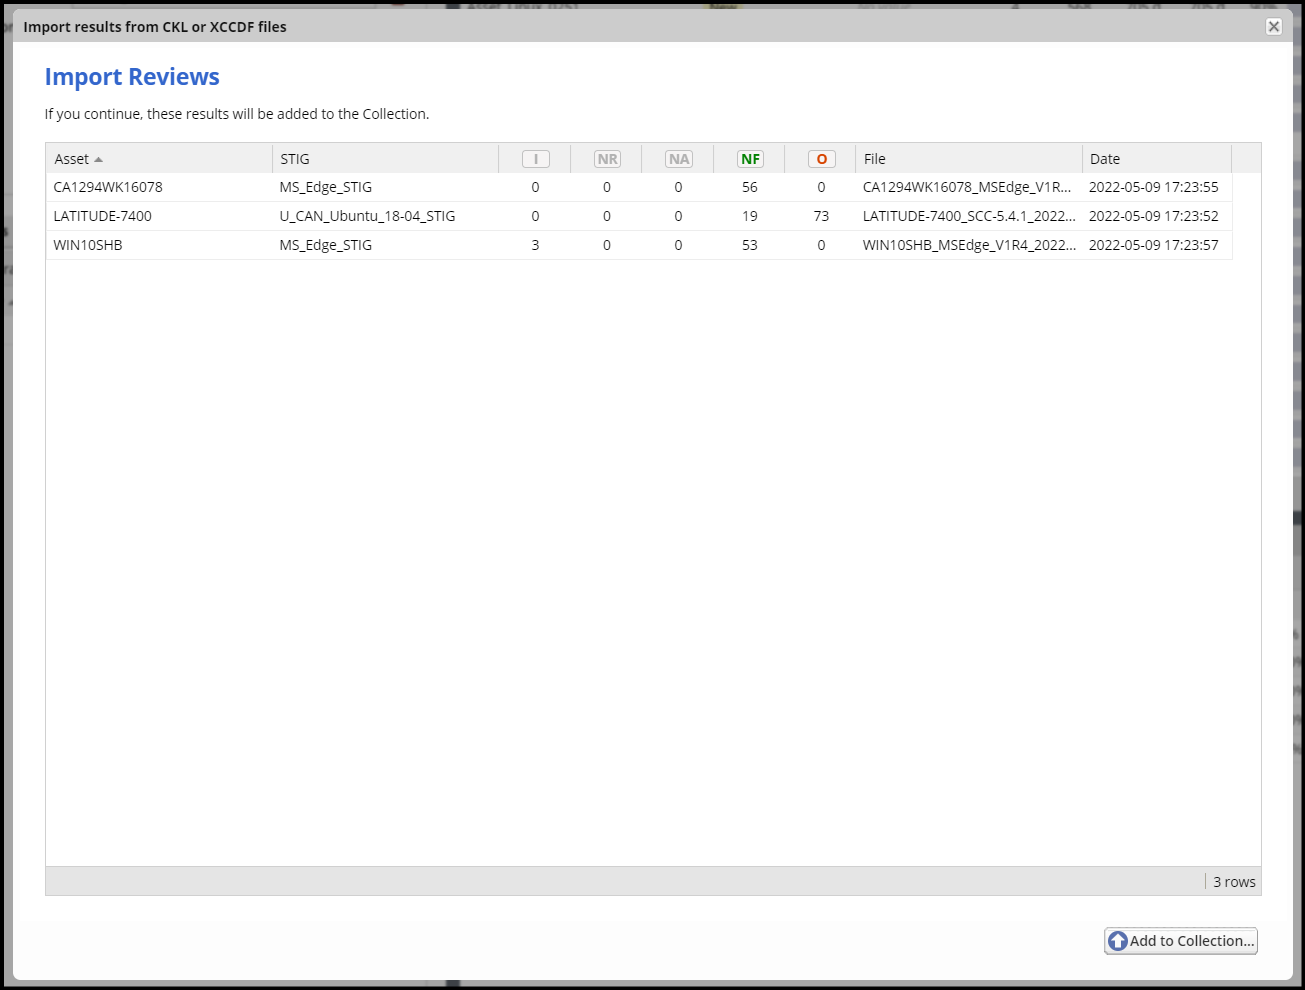
You will be presented with a summary view of the files you have submitted. This view shows the Assets, STIGs, Review totals, filenames and date of the data contained in the submitted files.
New Assets and new STIG assignments that will result from this import are indicated with a (+) after the Asset or STIG name.
If the summary is appropriate, click the “Add to Collection…” button.
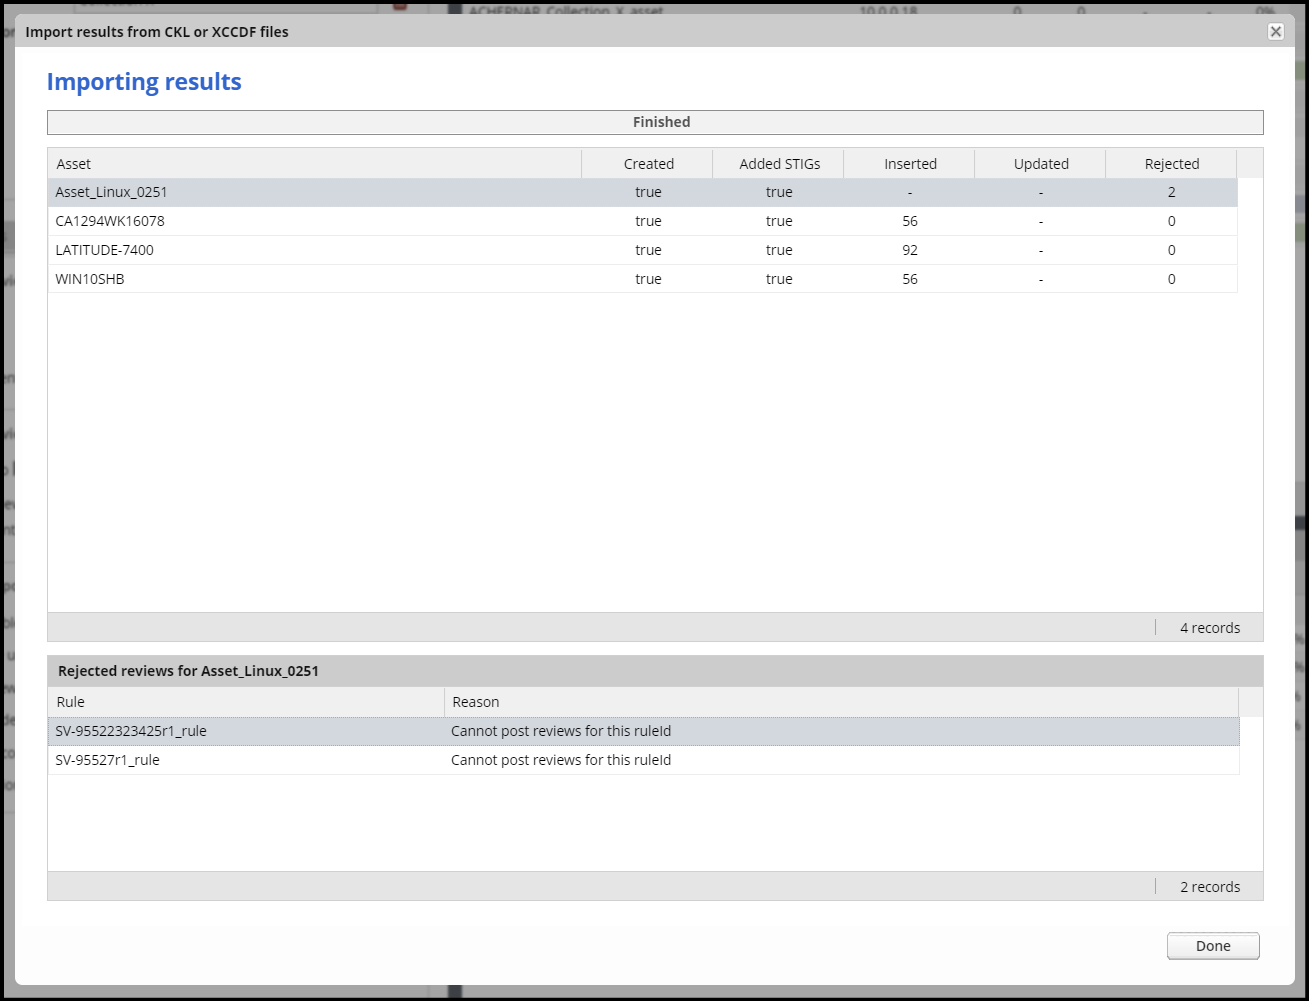
The user is presented with the log of the import. Select an item in the top grid for information about any “rejected” Reviews that were unable to be imported into STIG Manager. This may happen for Rules that are not currently assigned to this Asset, or for versions of STIGs that have not been loaded into STIG Manager.
Note
STIG Manager does not retain the .ckl or XCCDF files that are imported. The files are parsed and the Reviews stored in STIG Manager’s Database. STIG Manager can produce a new .ckl representation of its Reviews on demand.
Note
STIG Manager will import and export .ckl files differently depending on the values of certain .ckl elements and Asset metadata. See Processing .ckl Files for more information.
2.9.2.3. Export Results by Asset
The “Export Results…” button in the Assets Panel Toolbar will open a pop-up interface with a checkbox selection tree. Selections can be made for any combination in the tree, from the individual STIG-Asset level, whole Asset level, or every Asset in the Collection.
When Assets have been pre-selected in the Assets panel, only the selected Assets will be presented in the checkbox selection tree.
Use the radio buttons in the pop-up to select the type of export you would like to perform.
2.9.2.3.1. Export Results to Another Collection
The user can export results from Assets in the current Collection to another Collection. The user must have “Manage” or “Owner” levels of access in the destination Collection. You will only see Collections that you have sufficient access to in the “Export To” pulldown. If the destination Collection does not have an Asset of the same name as the one being exported, a new Asset will be created in the destination Collection. If the destination Collection already has an Asset of the same name, any STIGs that are not already assigned to the Asset in the destination Collection will be assigned to it. Any STIGs that are already assigned to the Asset in the destination Collection will be updated with the new results in accordance with the Collection settings of the destination.
Note
The “Export Results to Another Collection” option is limited to a maximum of 100 Assets at one time.
2.9.2.3.2. Export Results as CKL or XCCDF Archive
The user can select whether single-STIG .ckls, multi-STIG .ckls, or XCCDF files will be generated for every Asset selected. The package of files will be presented as a .zip file that will also contain a _manifest.json file describing its contents and any errors encountered while producing it. Check the ckl glossary entry for exact mappings of fields from STIG Manger to .ckl file.
2.9.2.4. Delete Asset
To Delete an Asset, select an Asset and click the Delete Asset button. A popup will ask you to confirm the action.
2.9.2.5. Transfer Asset(s) to Another Collection
Select one or more(with Shift+Click) Assets, click the “Transfer To” button, and select the destination Collection. You will be prompted with a confirmation pop-up. Click “Yes” to transfer the Assets to the new Collection.
You must have “Manage” or “Owner” levels of access on both the originating and destination Collections. You will only see Collections that you have sufficient access to in the “Transfer To” pulldown. Individual Asset-STIG assignments to Restricted Users are removed when an Asset is moved to a new Collection. All other information (STIG Assignments, Assessments, etc.) transfers with the Asset.
2.9.2.6. Change Asset Properties
To alter an Asset’s properties or tag it with Labels, select an Asset and click this button, or double-click the Asset row.
2.9.3. STIGs Panel
This panel lists all the STIGs that have been assigned to at least one Asset in the Collection. STIG Assignments can also be added or removed from Assets with the buttons at the top of this panel. You can also “pin” a specific Revision of a STIG to the Collection. This will lock this Collection to that specific Revision of a STIG, rather than use the default behavior of always using the latest Revision of a STIG.
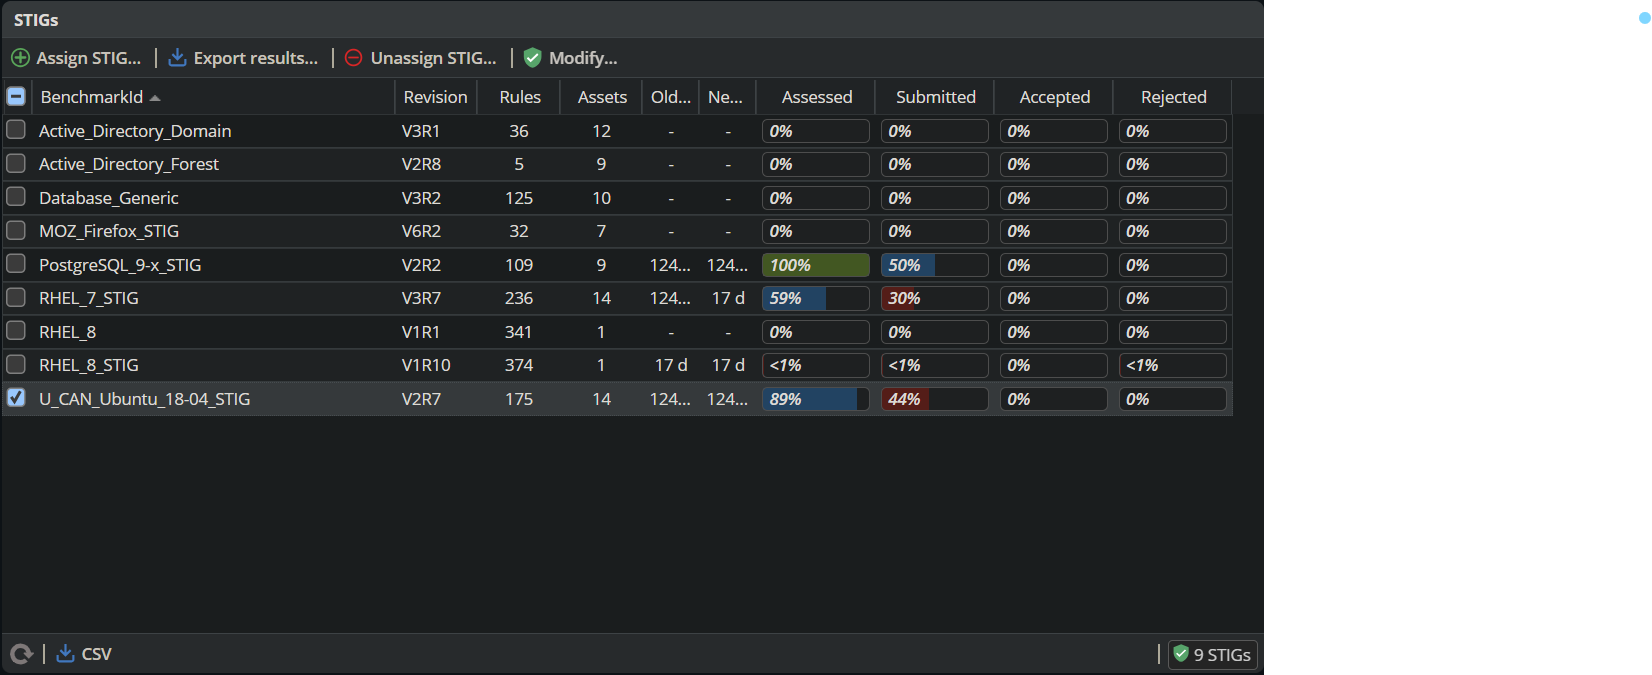
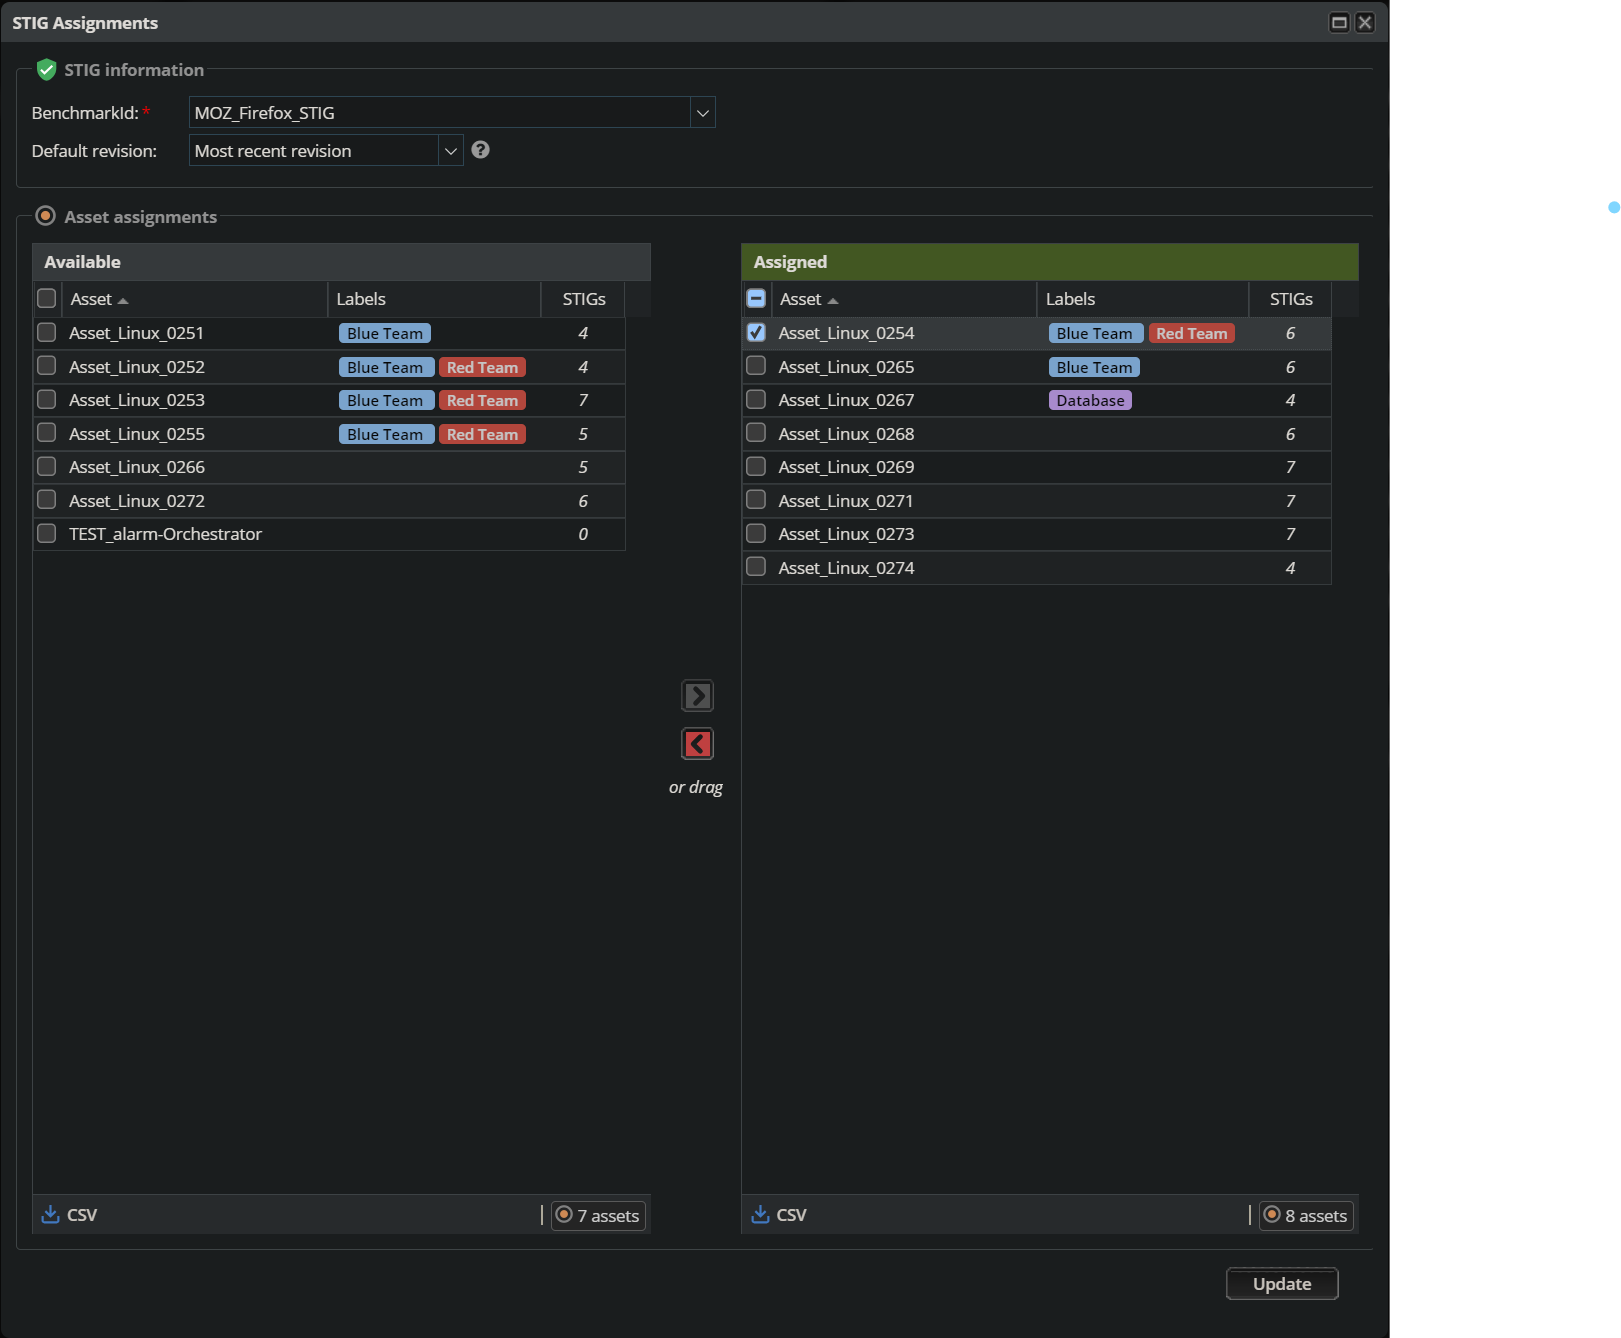
2.9.3.1. Assign STIG
Select Assign STIG to add a new STIG to the Collection. A popup will allow you to view any Assets that are assigned the selected STIG, and to assign that STIG to new Assets. Hover over the Asset’s name to see its currently assigned STIGs. Click on a column header to filter on that column’s data, or to add or remove columns of Asset information.
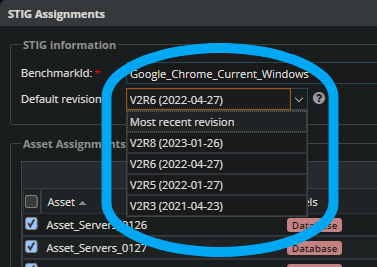
2.9.3.2. Set a Default STIG Revision
You can “Pin” a specific Revision of a STIG to the Collection. This will lock this Collection to that specific Revision of a STIG, rather than use the default behavior of always using the latest Revision of a STIG. This will affect all calculated Metrics as well as the initial Revision of a STIG presented in all Workspaces.
To set a specific default Revision of a STIG for a Collection, open the STIG Assignment window with the “Assign STIG” button or double-click on the Revision in the STIGs panel. Select the desired Revision from the “Default revision” dropdown menu, and click “Update.” To revert to the default behavior, select “Most Recent Revision” from the dropdown menu and click “Update.”
The Update action may take a moment, as STIG Manager will need to recalculate all metrics based on the new Revision.
The “pinned” Revision is indicated with a pin icon in the STIGs Panel and Collection Dashboard.
Note
A STIG must be assigned to at least one Asset in a Collection in order to be Pinned!
2.9.3.3. Remove STIG
The Remove STIG button will remove the selected STIG from all Assets that are assigned it in this Collection.
2.9.3.4. Change Assigned Assets
Select “Change assigned Assets…” or double-click a STIG to change what Assets are assigned this STIG in this Collection.
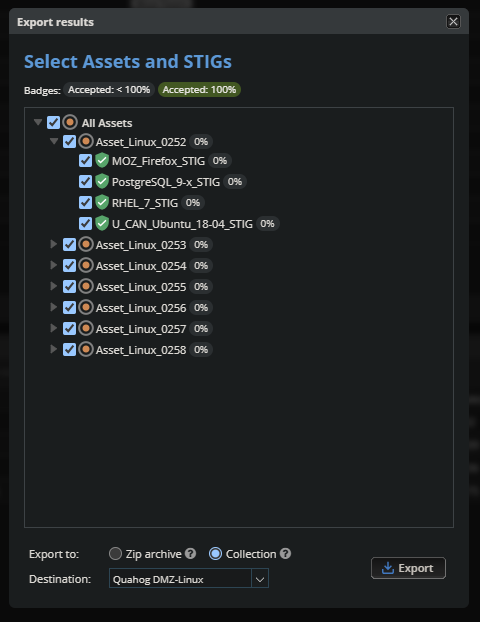
2.9.3.5. Export Results by STIG
The “Export Results…” button in the STIGs Panel Toolbar will open a pop-up interface with a checkbox selection tree. Selections can be made for any combination in the tree, from the individual STIG-Asset level or every Asset in the Collection.
When STIGs have been pre-selected in the STIGs panel, only the selected STIGs will be presented in the checkbox selection tree.
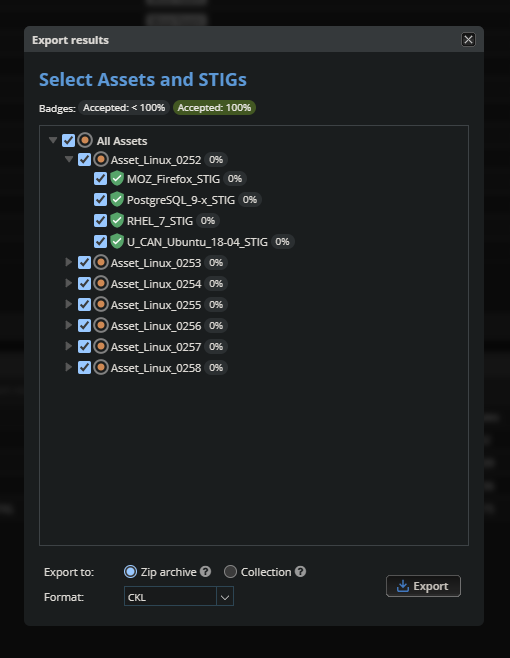
Use the radio buttons in the pop-up to select the type of export you would like to perform.
2.9.3.5.1. Export Results to Another Collection
The user can export results from STIGs in the current Collection to another Collection. The user must have “Manage” or “Owner” levels of access in the destination Collection. You will only see Collections that you have sufficient access to in the “Export To” pulldown. If the destination Collection does not have an Asset of the same name as the one being exported, a new Asset will be created in the destination Collection. If the destination Collection already has an Asset of the same name, any STIGs that are not already assigned to the Asset in the destination Collection will be assigned to it. Any STIGs that are already assigned to the Asset in the destination Collection will be updated with the new results in accordance with the Collection settings of the destination.
Note
The “Export Results to Another Collection” option is limited to a maximum of 100 Assets at one time.
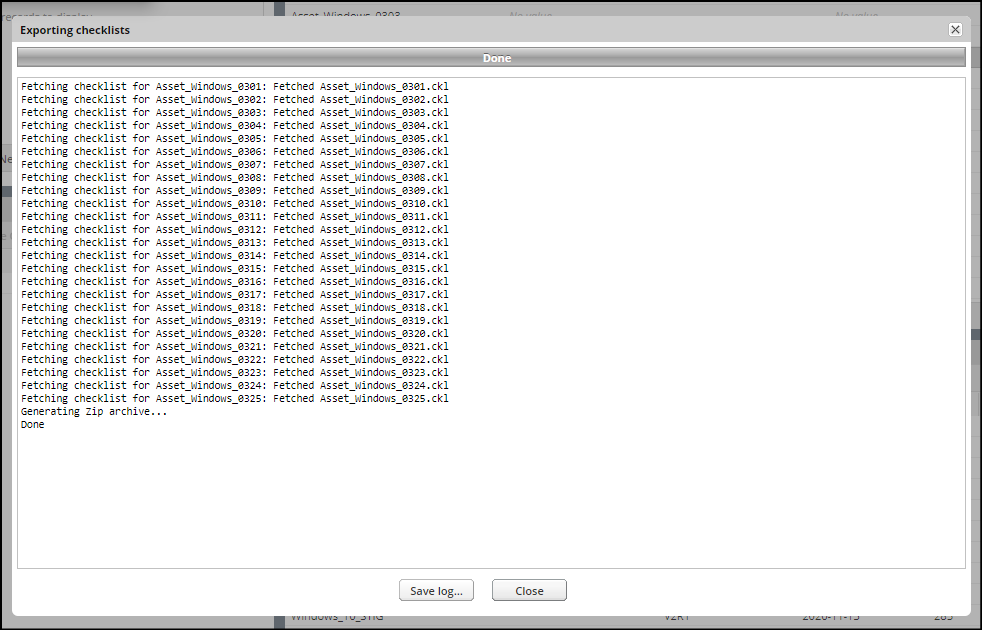
2.9.3.5.2. Export Results as CKL or XCCDF Archive
The user can select whether single-STIG .ckls, multi-STIG .ckls, or XCCDF files will be generated for every Asset selected. The package of files will be presented as a .zip file that will also contain a _manifest.json file describing its contents and any errors encountered while producing it. Check the ckl glossary entry for exact mappings of fields from STIG Manger to .ckl file.
2.10. A Note on .CKL Processing
When the STIG Manager Client imports data from .ckl files, in the simplest case it will attempt to match (and, in some instances, create) the Asset specified in the .ckl’s <HOST_NAME> element. However, if the <ASSET><WEB_OR_DATABASE> element in the .ckl has a value of true, special processing is invoked. This processing will attempt to match the <HOST_NAME>, <WEB_DB_SITE> and <WEB_DB_INSTANCE> values in the .ckl with Asset metadata when identifying the Asset.
See the Processing .ckl Files section of this Documentation for more information.
Note
See the Import Options section of this document for information about STIG Manager’s review import options.