1. STIG Manager User Walkthrough
This User Walkthrough will walk you through a typical use case for STIG Manager, from creating your own Collection, creating Assets in that Collection, to evaluating STIGs and creating a POAM from your findings. Depending on your role in your organization, not all of these steps may apply to you, but should be helpful in providing context for the use of this tool. If you are comfortable, feel free to skip around using the sidebar navigation to the left.
For more detailed information about every STIG Manager function available to users, please see the STIG Manager User Guide.
STIG Manager’s primary organizational structure is the Collection. Collections are composed of:
STIGs attached to those Assets
User Grants providing access to some or all of the Assets/STIGs in that Collection
This Walkthrough will step you through creating each of these items.
Attention
Collections can be structured as an RMF Package, but do not need to be. It is recommended that large packages be broken up into more easily-manageable Collections, to which Users can be granted higher access and, therefore, greater autonomy.
1.1. Authentication
When first accessing STIG Manager, you will be redirected to the Authentication Provider’s Log In screen (Keycloak, Okta, F5, etc.). Your method of authentication will depend on your Organization’s specific deployment (CAC, username/password, account brokering, etc). Once complete, you will be redirected back to the STIG Manager User Interface.
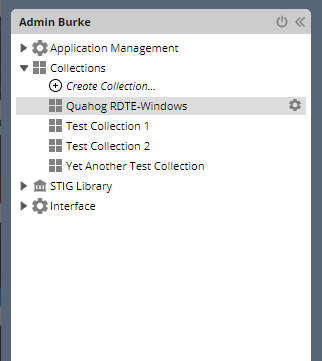
1.3. Create your first Collection
You may have already been given access to some Collections in STIG Manager, or you may not have the Collection Creator privilege. If your Nav Tree is already sufficiently populated, feel free to skip to the Evaluate Asset STIG Compliance section.
By default, most users will have the Collection Creator role, allowing them to create their own Collection of Assets and their STIGs, and to provide access to them to other users in the system.
After logging into the system, click the +Create Collection item in the Nav Tree on the left.
You will be prompted for your Collection name, and some other info. Only a Collection name and Owner are required. Your Username will be prepopulated as an owner. Additional Grants, Settings and Metadata can stay as they are at this time. Click “Create” when finished. You will be taken to the Collection Configuration tab for this new Collection. You can access this Collection Configuration tab later using the “gear” icon next to your Collection in the Nav Tree, or the “Manage” button from the Collection Dashboard.
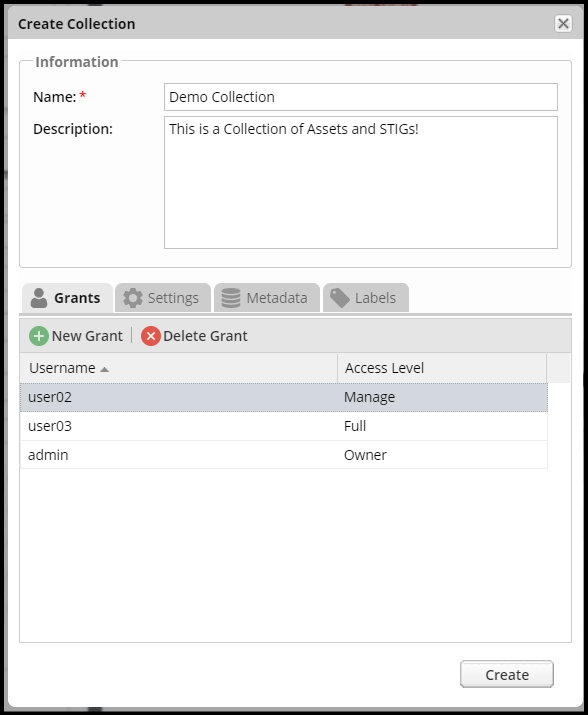
Create Collection Popup
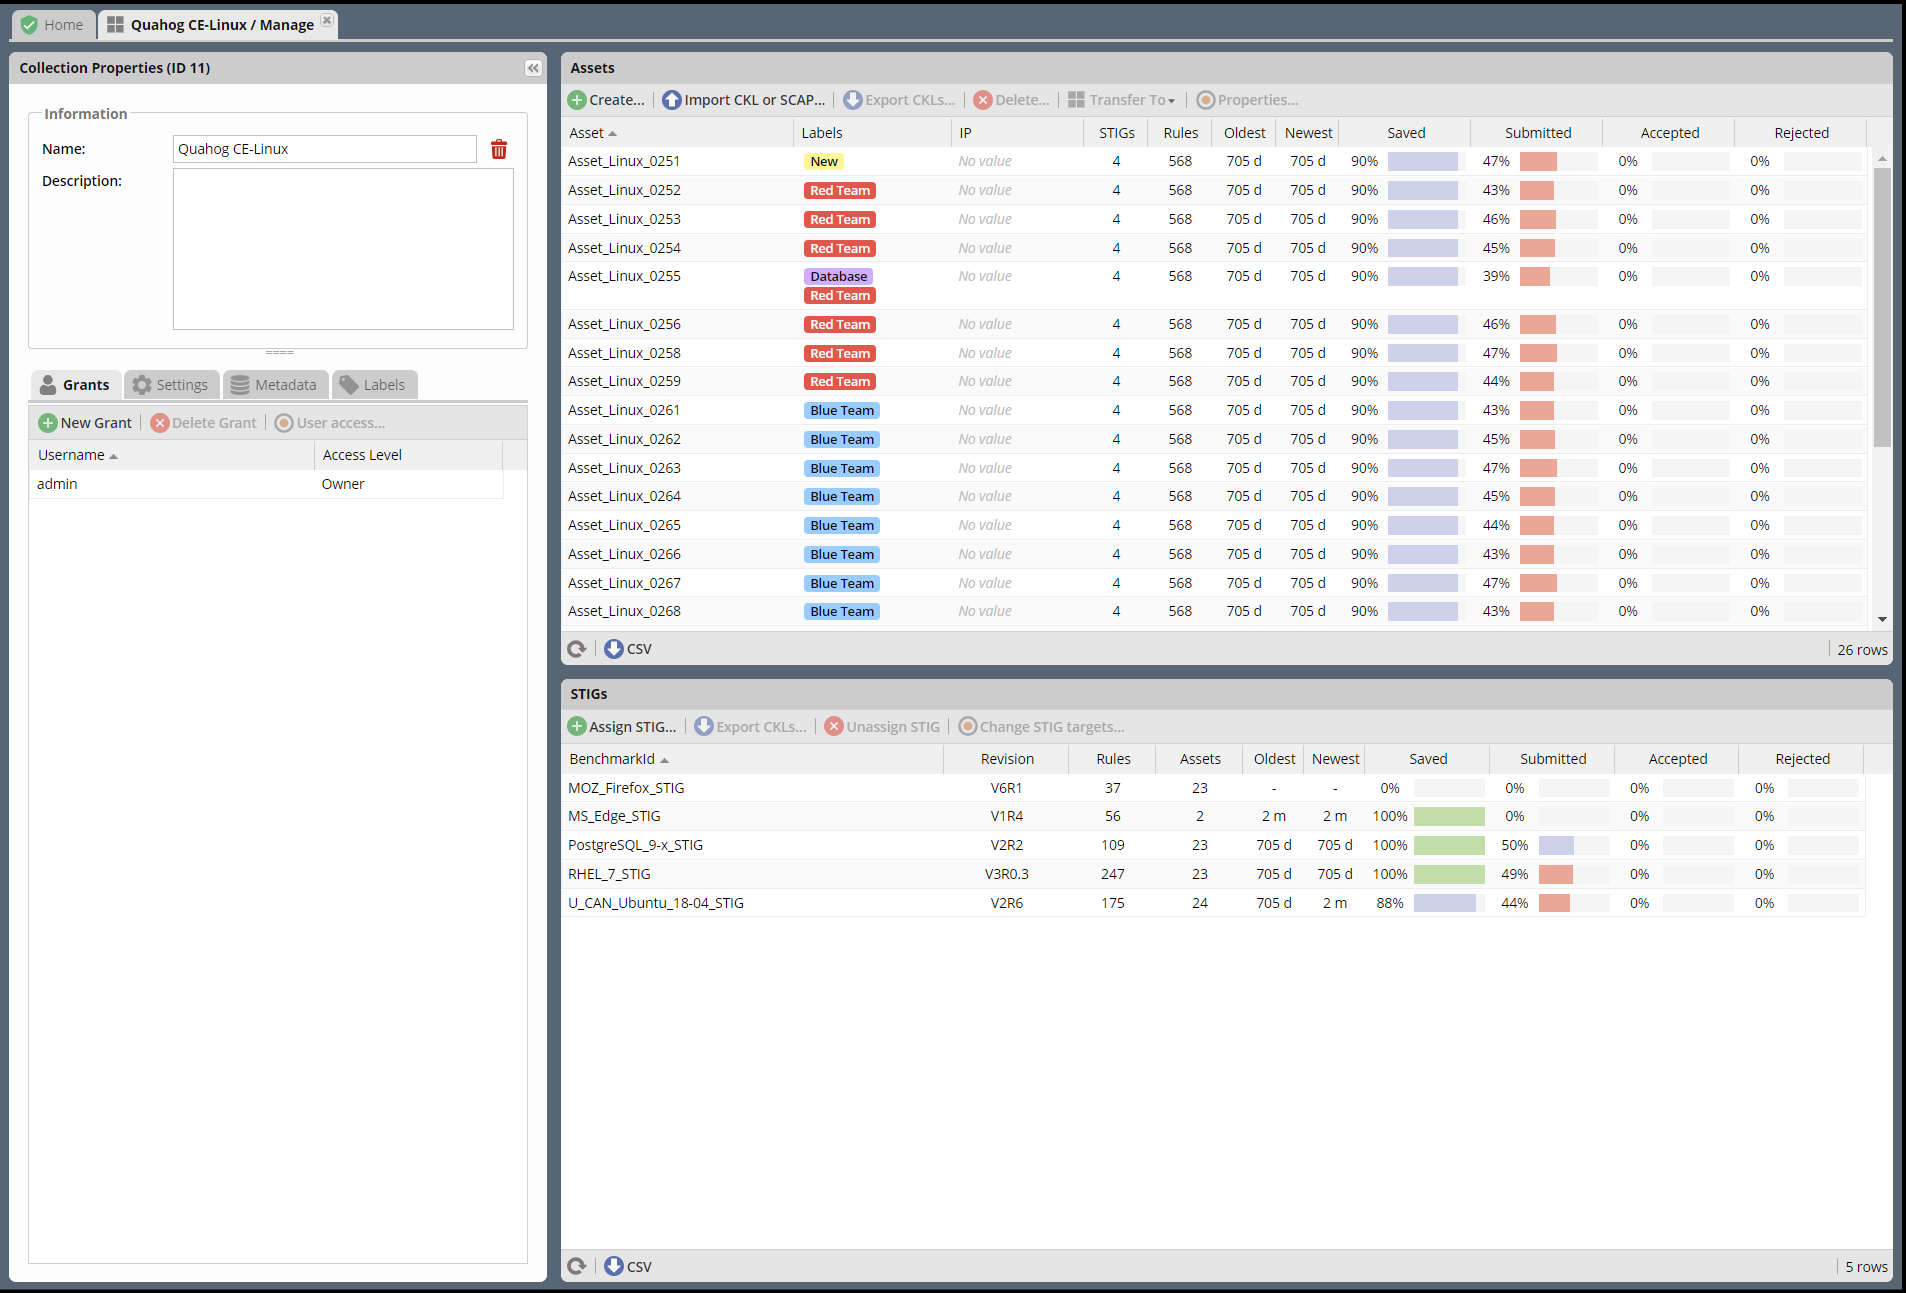
1.4. Create Assets in your Collection
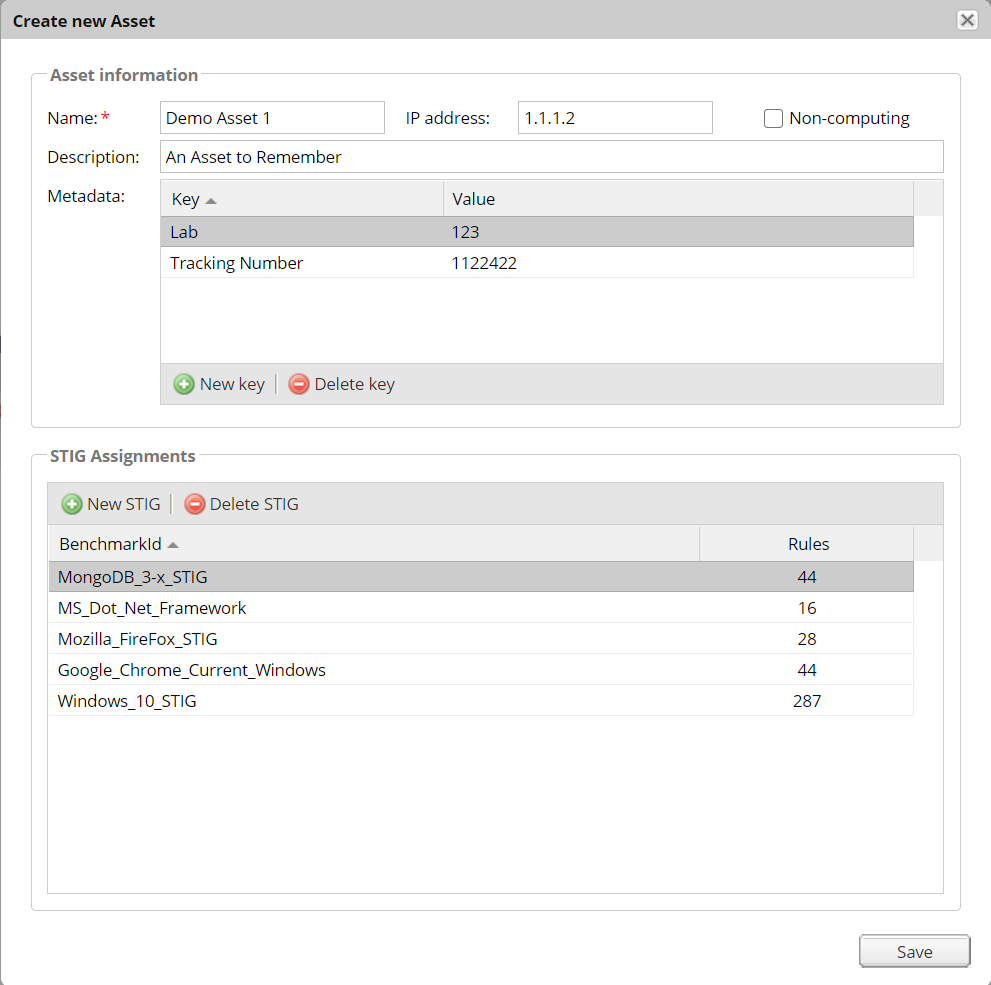
From the Collection Configuration tab, use the “Create Asset…” button in the Asset panel toolbar to create a couple sample assets. You can also attach STIGs from the “Create new Asset” popup at this time. The only required field is “Name,” which must be unique in this Collection. * You can change all the properties of your asset, including attached STIGs later by double-clicking an asset or using the “Change Asset properties…” button in the Assets toolbar.
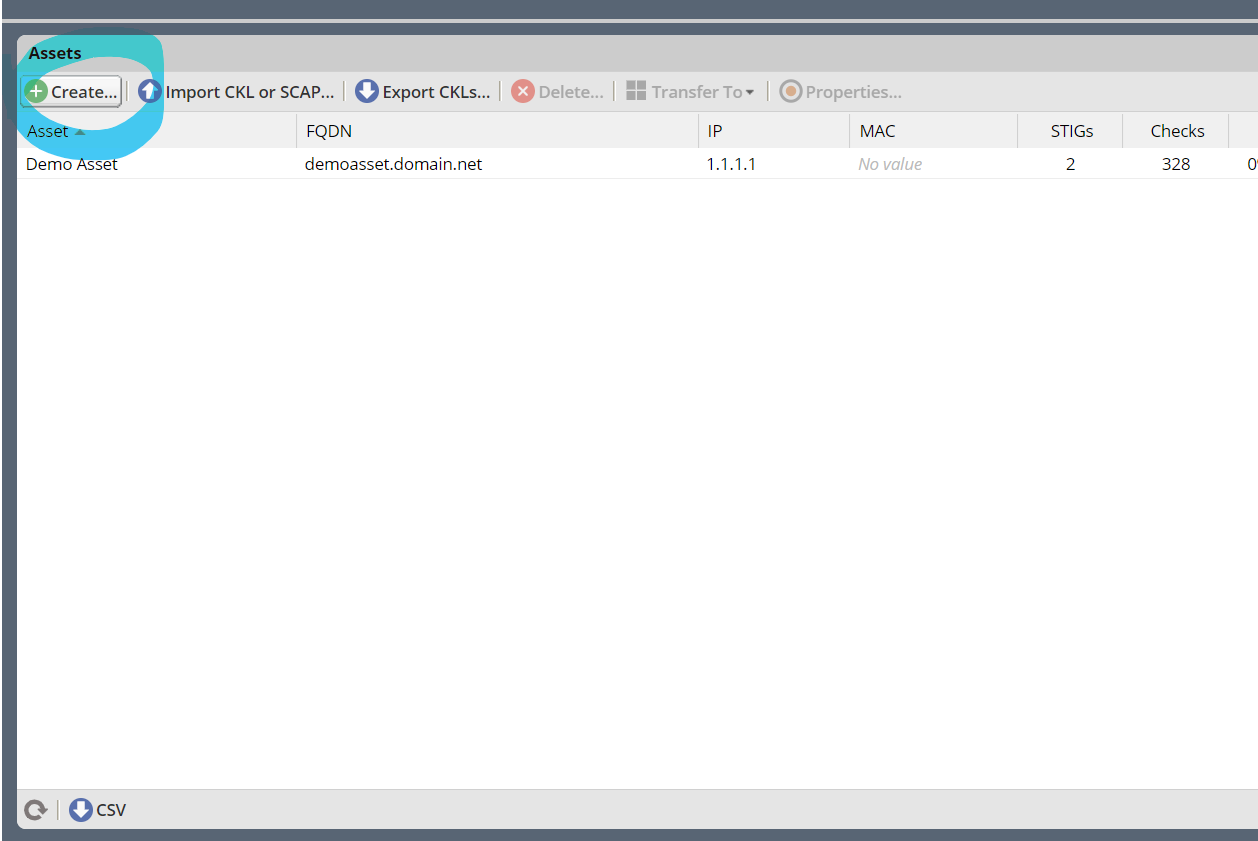
Note
Assets and their STIG attachments can also be created automatically in bulk by importing STIG Viewer .ckl or XCCDF files using the “Import CKL or XCCDF…” button. More info about the Collection Builder function can be found in the User Guide.
1.5. Attach STIGs to Assets in your Collection
Add or remove STIGs by double-clicking on an Asset in the Collection Management screen, and making the desired changes in the Asset Pop-up. Click the “Assign STIG” button in the popup to do this. Try to attach the same STIG to more than one Asset. It will help demonstrate the Collection Review feature later. Click “Save” on the popup when finished.
STIGs can also be assigned by double-clicking on a STIG in the Collection Configuration tab, and clicking “Assign Assets” button in the popup.
The Assets you create and the STIGs you attach to them are presented in the Collection Management tab (In the Asset and STIG panels on the right) as well as the Nav Tree entry for that collection on the left.
1.6. Grant Users access to your Collection
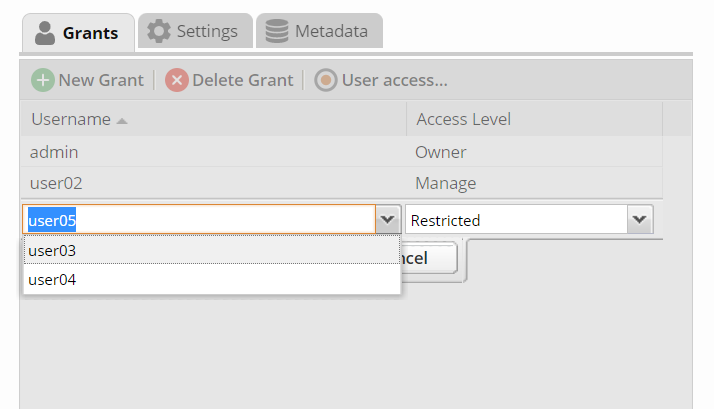
Grant other Users access to your Collection by clicking the “New Grant” button in the Grants panel toolbar. Grants are composed of a Username and an Access Level. Use the Row Pulldown to select Users and their Grants.
When you grant Users access to your Collection, or when you are granted access to another Collection by someone else, that Collection will appear in the Nav Tree on the left upon refresh of the app.
In order to be useful, Users with Restricted access to a Collection must be assigned specific STIGs on specific Assets using the “Restricted User access list…” button in the Grants panel toolbar.
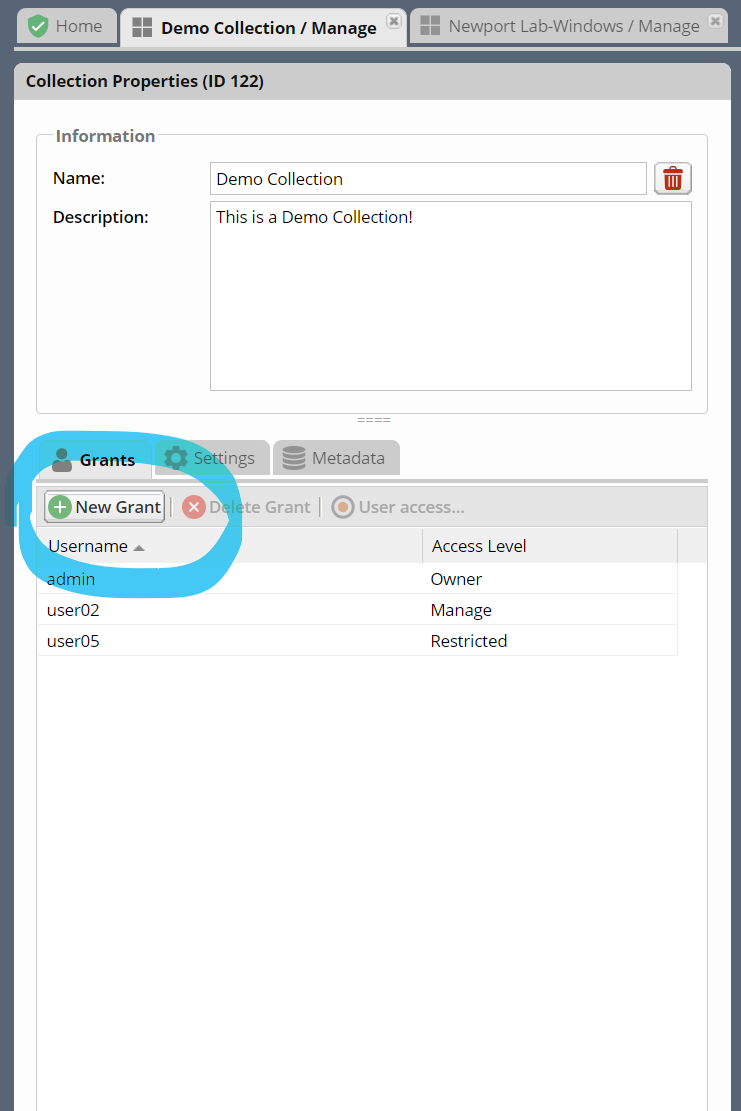
You can control what level of access other Users can have to your Collection by assigning them specific Access Levels.
Access Level |
Description |
|---|---|
Restricted |
Can review specific STIGs on specific Assets only. |
Full |
Can review any Asset/STIG in the Collection. |
Manage |
Everything in the “Full” level. Can Add/Remove Assets, STIGs, and Users. Optionally responsible for “Accepting” and “Rejecting” reviews from evaluators. |
Owner |
Everything in the “Manage” level. Can Delete the Collection. Responsible for “Accepting” and “Rejecting” reviews from evaluators. |
1.7. Evaluate an Asset for STIG compliance
In the Nav Tree, click on the Collection you just created to open the Collection Dashboard.
Select the “Assets” tab on the right of the Collection Dashboard.
Select an Asset to see its associated STIGs.
Double-click on a STIG listed under the Asset, or click the “shield” icon that appears when hovering over that row.
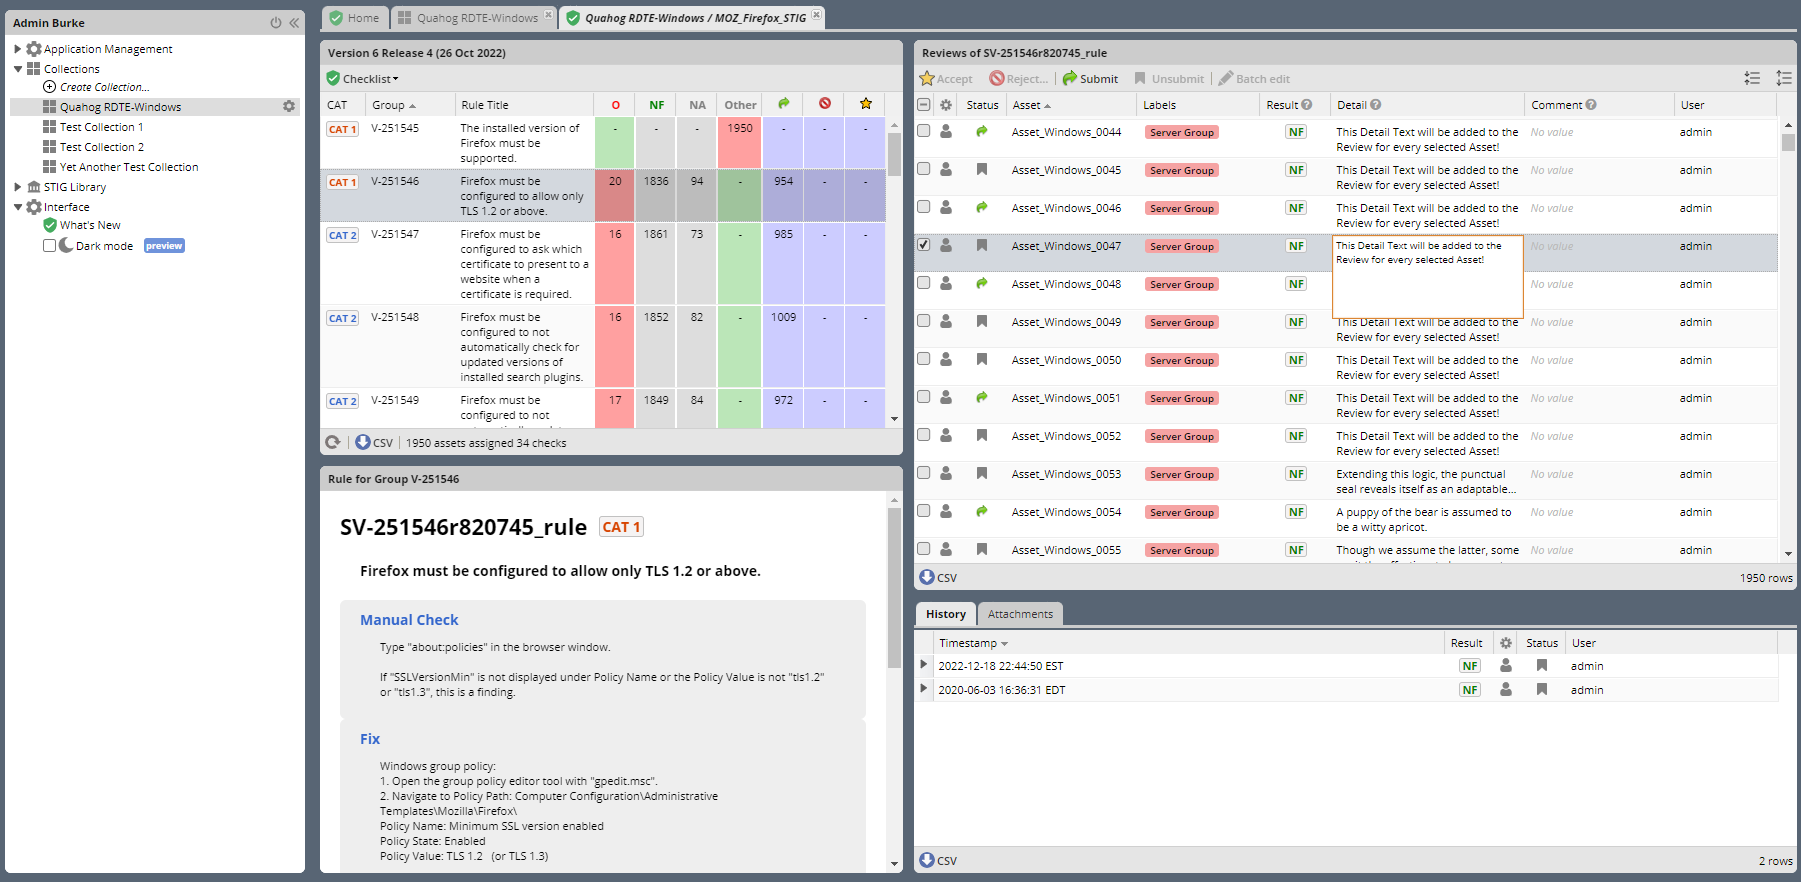
You will now be presented with the Evaluation tab for that STIG on that Asset, which contains several panels. The first Rule in the STIG will be selected for you.
The STIG Checklist panel on the left lists every rule in the STIG, their evaluation status, and some other helpful info. Click a Rule to load that Rules information, and start a Review of it.
The Rule Content panel in the center contains the selected Rule’s info such as the Rule Title, Manual Checks, Fix info, and associated CCIs.
The Review Resources panel in the top right contains other Reviews you have performed for the selected Rule against other assets, a history of this Review’s status, and any Feedback you have received about this Review from the Collection Owner. Reviews from “Other Assets” can be dragged and dropped onto the current assets Review.
The Review panel in the lower right is where you will actually log your Evaluation of the Rule. It contains fields to record Review Results, Detail, and Comments. This panel also indicates who last modified the Review in the “Attributions” box.
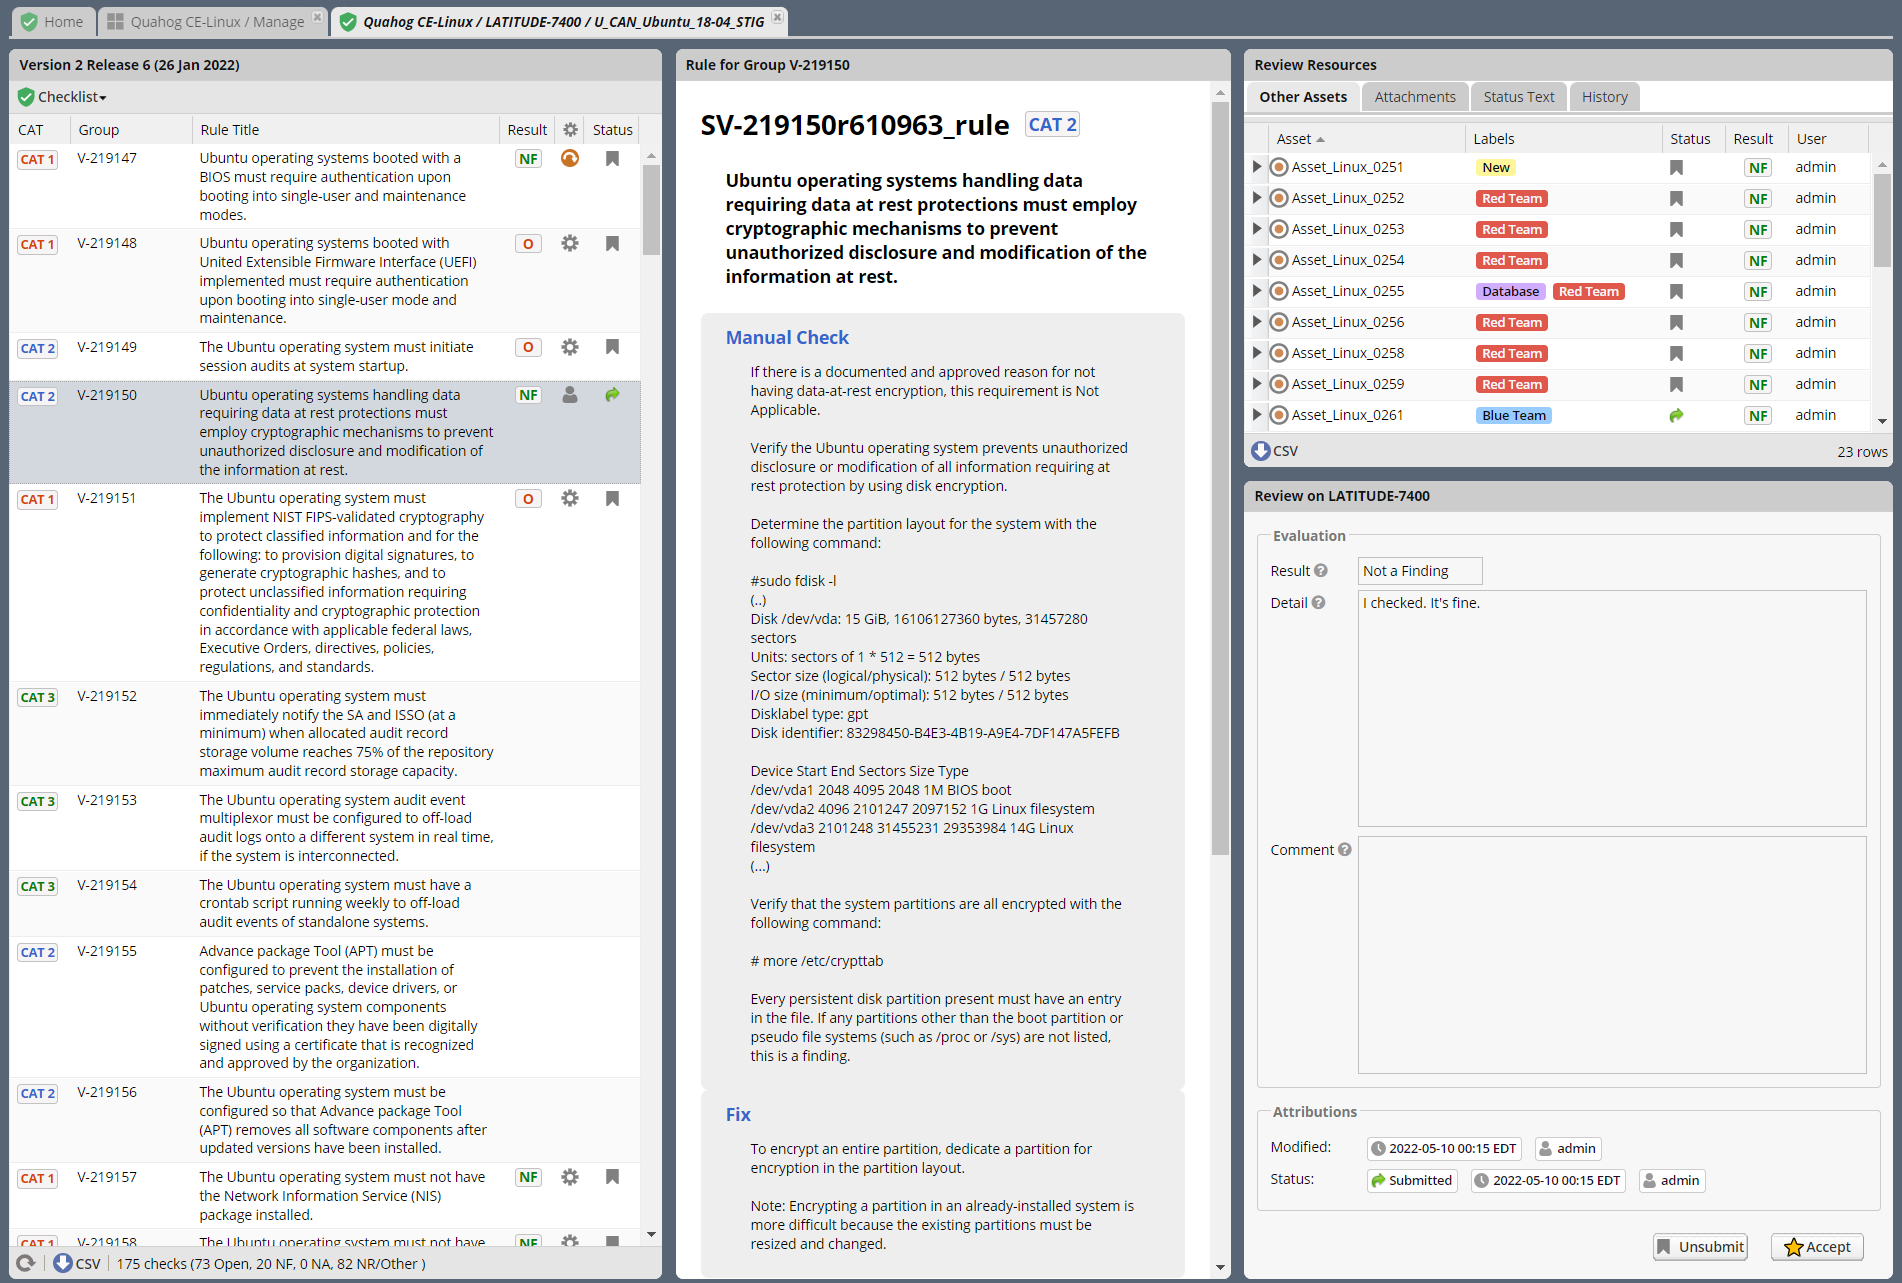
Asset Review Workspace
Select a few Rules and save some Evaluations of them. For now, set a few to “Open,” and provide a Comment. You will notice that you have the option to “Save without submitting” or “Save and Submit” the Evaluations. The “Submitted” status is available if you meet the Review Settings configured for your Collection. Hover over the
(?)symbol to view the applicable Collection Settings for Reviews in this Collection.As you perform reviews, the STIG Checklist panel will update the status columns of each Rule. The bar at the bottom of this panel indicates overall status of the checklist. The toolbar at the top provides options for filtering the current view of the checklist, and the “Checklist” menu provides various functions, including importing results (in .ckl or XCCDF formats) and exporting results in the .ckl format.
These evaluations are summarized and reported in the Reports node of the Nav Tree. Findings present just the Open rule evaluations, and can be exported as a spreadsheet or a pseudo-POAM format. Status presents an overall summary of evaluations, showing completion statuses and other info.
1.8. Evaluate multiple Assets at once for STIG compliance
From the Collection Dashboard, select a STIG from the STIGs panel in the Collection you just created.
If you select a STIG, you will see a list of Assets that have that STIG assigned to it. Double-clicking on one of these Assets (or clicking the shield icon in that row) will open the Evaluation tab described in the previous section.
Double-click on the STIG you want to evaluate to open up the Collection Review Workspace.
The Collection Review tab presents similar information to the Evaluation tab, but in a condensed view that allows you to review this STIG against all Assets you have access to in this Collection at once.
Editing in the Collection Review panel Select a Rule to review in the top left STIG Checklist Panel. Rule Info will appear in the panel below it.
Select an Asset in the Assets panel in the top right. Double-clicking in the Result, Detail, or Comment columns will allow you to edit those fields, either in a pull-down or a text box, as appropriate. Results are saved automatically.
Columns in the STIG Checklist panel will update with Statuses and Results as you review.
Once Assets are reviewed appropriately, the “Submit” or “Accept” (for Owners only) buttons in the Asset toolbar become available. Click them to set that Asset’s Review status. You can set Status on multiple Assets at once by selecting them with a Shift+Click, and then clicking the appropriate toolbar button.
If you are an Owner of the Collection, you have the option to “Reject” unsatisfactory Reviews. Select a review and then click the “Reject” button in the top toolbar. Provide some feedback in the popup that will guide the Evaluator in fixing their Review. Click “Reject review with this feedback.” This review will now be set to a Rejected status, and show up in the Evaluators “Rejected Reviews” report for their further action or review.
If you are an Owner of the Collection, and the option is enabled in Collection Settings, you can set Reviews in your Collection to “Accepted.”
1.9. STIG Manager Reports
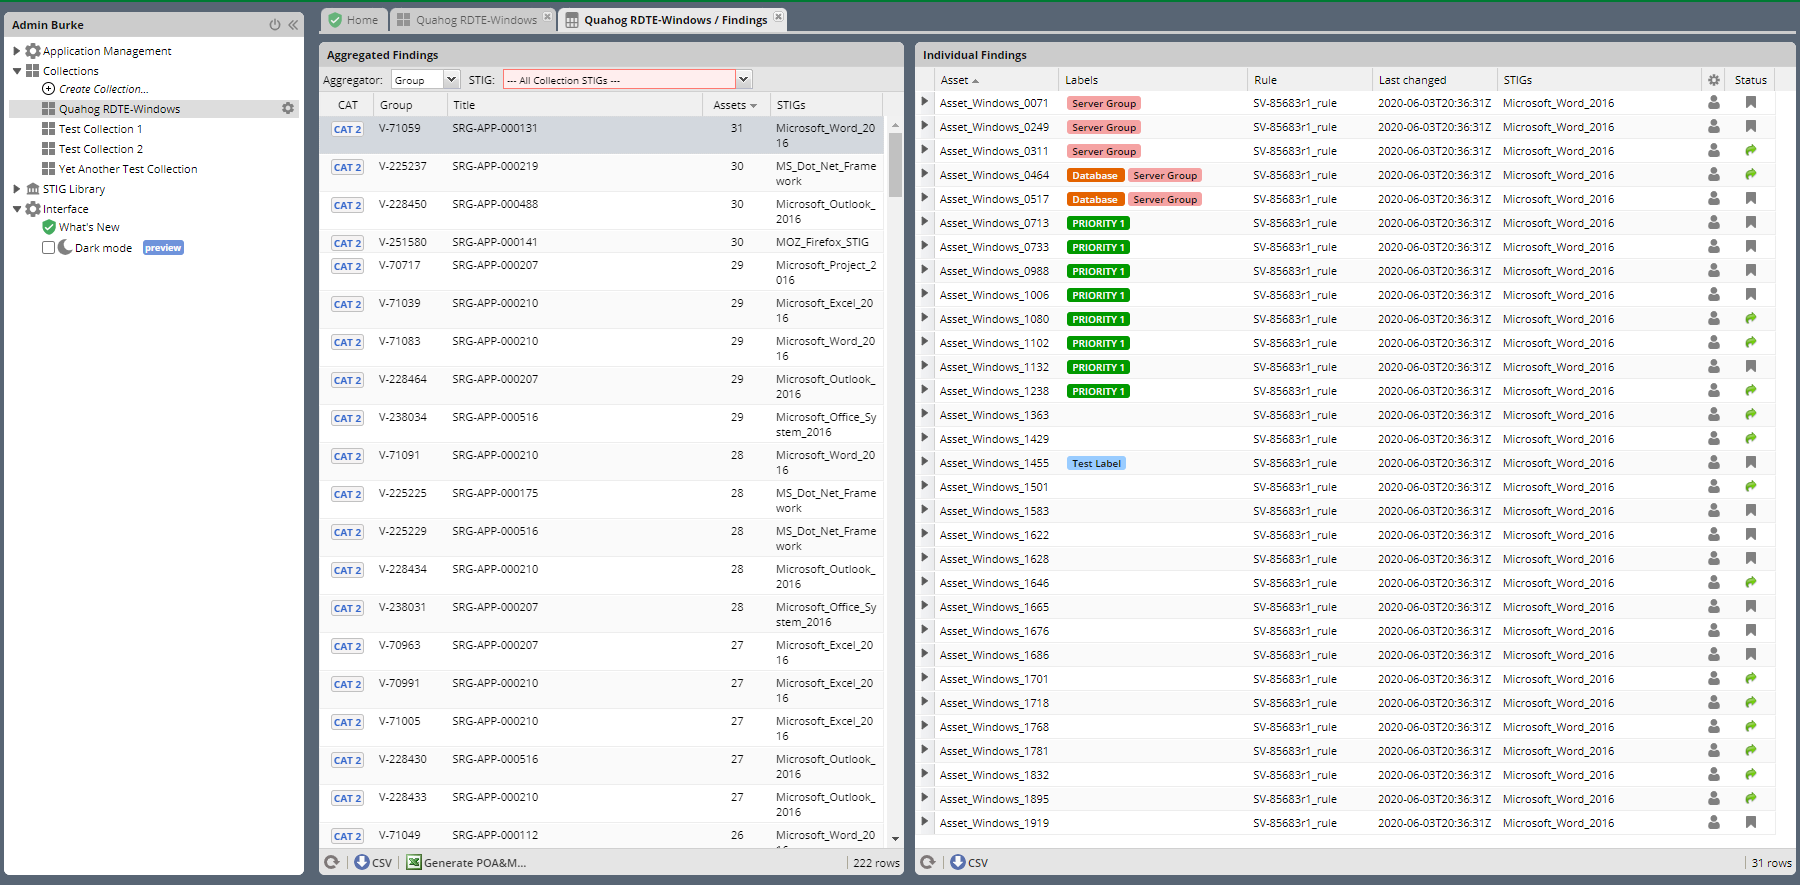
1.9.1. Findings Report
From the Collection Dashboard, click the “Details” button in the header of the “Findings” box.
This report lists every Open review in the Collection. It can be aggregated by Rule, Group, or CCI, and filtered by STIG.
From the bottom bar of the Aggregated Findings panel, a .csv and a POAM-like export is available for the Rule and Group aggregations.
Select a Finding in the Aggregated Findings panel on the left to display the Assets with those findings in the Individual Findings Panel on the right.
Click the “Generate POA&M…” button in the bottom bar of the Aggregated Findings panel.
You will be prompted for a little more information, which will be prepopulated into the POA&M that will be generated for you.
Congratulations! You’ve just Managed some STIGs!